background image

Contact us for assistance:  (866) 985-7877  |  www.wtliving.com 


      12

CARE & MAINTENANCE

To enjoy years of outstanding performance from your heater, make sure you perform 
the following maintenance activities on a regular basis:
Keep exterior surfaces clean.

1. Use soapy water for cleaning. Never use flammable or corrosive cleaning 

agents.

2. While cleaning your unit, be sure to keep the area around the burner and 

control compartment dry at all times. Do not submerge the control valve 
assembly. If the gas control is submerged in water, do NOT use it. It must 
be replaced.

3. Air flow must be unobstructed. Keep controls, burner, and circulating air 

passageways clean. Signs of possible blockage include:

• Gas odor with extreme yellow tipping of flame.
• Heater does NOT reach the desired temperature.
• Heater glow is excessively uneven.
• Heater makes popping noise.
• Spiders and insects can nest in burner or orifices. This dangerous 

condition can damage heater and render it unsafe for use. Clean 
burner holes by using a heavy-duty pipe cleaner. Compressed air may 
help clear away smaller particles.

• Carbon deposits may create a fire hazard. Clean dome and burner 

screen with warm soapy water if any carbon deposits develop.

Note: In a salt-air environment (such as near an ocean), corrosion occurs more quickly 
than normal. Frequently check for corroded areas and repair them promptly.

SERVICE:
Only a qualified service person should  
repair gas passages and associated  
components.

Caution: Always allow heater to cool  
before attempting service.

STORAGE:
Between uses:

• Turn control knob OFF.
• Disconnect LP source.
• Store heater in an area sheltered 

from direct contact with inclement 
weather (such as rain, sleet, hail, 
snow, dust and debris).

• If desired, cover heater to protect 

exterior surfaces and to help 
prevent build-up in air passages. 
Never leave LP cylinder exposed to 
direct sunlight or excessive heat. 
Note: Wait until heater is cool 
before covering.

During periods of extended inactivity 
or when transporting:

• Turn control knob OFF.
• Disconnect LP source and move to 

a secure, well-ventilated location 
outdoors.

• Store fire pit in an area sheltered 

from direct contact with inclement 
weather (such as rain, sleet, hail, 
snow dust and debris).

• If desired, cover fire pit to protect 

exterior surfaces and to help 
prevent build-up in air passages. 
Never leave LP cylinder exposed to 
direct sunlight or excessive heat.

Note: Wait until fire pit is  
cool before covering.

WARNING

FOR YOUR SAFETY

• 

Do NOT touch or move heater for at least 45 

minutes after use.

• 

Burner and housing are hot to the touch. 

• 

Allow burner and housing to cool before 

touching.

Summary of Contents for LIP-10A-TGG-LPG-SP

Page 1: ...he vicinity of this or any other appliance An LP cylinder not connected for use shall not be stored in the vicinity of this or any other appliance WARNING Improper installation adjustment alteration s...

Page 2: ...d live chat at www wtliving com This manual contains important information about the assembly operation and maintenance of this patio heater General safety information is presented in the first few pa...

Page 3: ...propane gas Propane gas is invisible odorless and flammable An odorant is normally added to help detect leaks and can be described as having a rotten egg smell The odorant can fade over time so leaki...

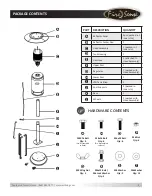
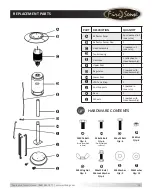
Page 4: ...ad Assembly Upper Post 1 Regulator 1 packed with Head Assembly Lower Post 1 LPG Tank Strap 1 Post Supports 3 packed in inner ctn Base 1 Wheels 2 packed with Head Assembly B A C D E L F G H I J K HARDW...

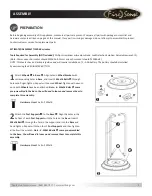
Page 5: ...all bolts with a wrench Note 3 M8x16 Bolts M come pre assembled to the base You will need to loosen and remove them to complete this assembly Hardware Used 3x Bolt M8x16 PREPARATION Before beginning...

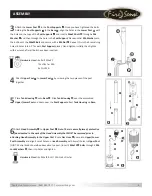
Page 6: ...re Used 6x Bolt M6x22 12x Washer M6 6x Nut M6 4Attach Upper Post F to Lower Post H by screwing the two pieces of the post together 5Place Tank Housing D onto Base K Slide Tank Housing D over the assem...

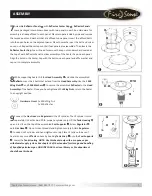
Page 7: ...lide the assembled Reflector over the 3 bolts that extend from the Head Assembly Use the 3 M8 Wing Nuts Q and 3 M8 Washers S to secure the assembled Reflector to the Head Assembly of the heater Once y...

Page 8: ...over filling prevention device The cylinder must have a connection device compatible with the connection for the appliance The cylinder used must include a collar to protect the cylinder valve Never...

Page 9: ...ests have been performed Operating Instructions WARNING Perform all leak tests outdoors Extinguish all open flames NEVER leak test when smoking Do not use heater until all connections have been leak t...

Page 10: ...knob clockwise toward the large flame symbol To decrease the flame turn the control knob counter clockwise towards the small flame symbol 6 To turn the appliance OFF push down the control knob and tur...

Page 11: ...ures and should stay away to avoid burns or clothing ignition m Young children should be carefully supervised when they are in the area of the heater m Clothing or other protective material should not...

Page 12: ...ote In a salt air environment such as near an ocean corrosion occurs more quickly than normal Frequently check for corroded areas and repair them promptly SERVICE Only a qualified service person shoul...

Page 13: ...ylinder or regulator New cylinder or 1st ignition Purge air from lines Cylinder valve on no gas flow Replace hose regulator assembly Dead igniter battery Replace battery by unscrewing igniter button L...

Page 14: ...Head Assembly Upper Post 1 Regulator 1 packed with Head Assembly Lower Post 1 LPG Tank Strap 1 Post Supports 3 packed in inner ctn Base 1 Wheels 2 packed with Head Assembly B A C D E L F G H I J K HAR...

Page 15: ...E NO EXPRESS WARRANTIES EXCEPT AS LISTED PURCHASER ASSUMES ALL RISKS IN THE ASSEMBLY AND OPERATION OF THIS UNIT FAILURE TO FOLLOW WARNINGS AND OPERATIONAL INSTRUCTIONS CONTAINED IN THIS MANUAL CAN RES...

Reviews: