EQUIPMENT:
FIRE
CLASS
PRECEPT EN
PUBLICATION:
FIRECLASS PREC EN INST
ISSUE No. & DATE:
3 13/09/18
PAGE 15 of 30
21. Reinstallation of the chassis is the reverse of
removal. Reconnect all wires and ensure none
are trapped between the chassis and backbox.
Do not connect the field wiring at this stage.
22. Refit the door. The refitting procedure is the
reverse of removal. Ensure that the earth strap
and ribbon cable are reconnected correctly.
23. Place the left-hand battery into the bottom of the
enclosure. The terminals should be positioned
towards the centre of the enclosure and the
battery should be adjacent to the left side of the
backbox, fixed by the raised indents in the
backbox, one above the battery and one to the
right.
24. Place the right-hand battery into the bottom of
the panel. The terminals should be positioned
towards the centre of the enclosure and the
battery should be adjacent to the right side of
the backbox located by the raised indents in the
back box above the battery and to the left.
25. Connect the black battery lead to the power
supply “Batt -” [battery negative] terminal and
connect the red battery lead to the power supply
“Batt +” [battery positive] positive terminal
[situated on the motherboard for the Precept EN
2/4, 8 and 16 panels and repeater panel or on
the separate power supply board in the Precept
EN 32 panel]. The location of the motherboard
battery terminals are shown in Figure 10 &
Figure 12. Fit the connector on the end of the
black lead onto the negative (black) terminal of
the left-hand battery. Fit the connector on the
end of the red lead onto the positive (red)
terminal of the right-hand battery.
26. Connect the blue battery lead between the
positive (red) terminal of the left-hand battery
and the negative (black) terminal of the right-
hand battery. Note that the batteries will not
power the panel until the mains supply is
energised.
11.2.2 Optional C1631 Repeater Interface
Installation
Warning: Observe anti-static precautions
1. Ensure that the panel and repeaters are
powered down and the main and standby
supplies are disconnected.
2. On the fire alarm panel and each repeater,
remove the jumper link at J22 (adjacent to J9)
and fit a C1631 repeater interface to connectors
J13 and J9 located immediately to the left of the
Zone Expansion ribbon connector on the right-
hand side of the C1627 motherboard. See
Figure 10. The board should be held in place by
the 12mm high plastic spacer provided.
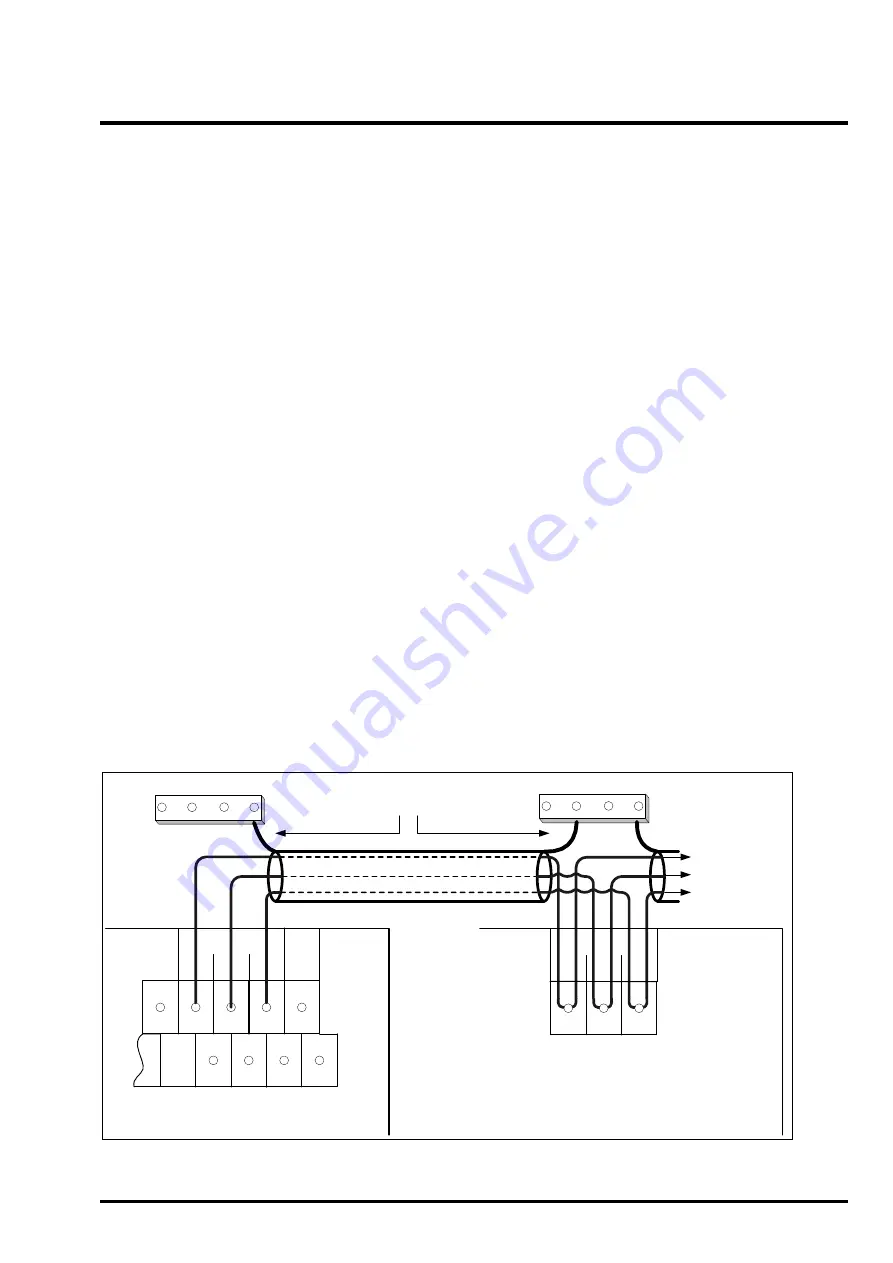
3. Connect the RS485 data cable as shown in
4. If the repeater is powered from the panel then
connect the Aux 24Vdc supply from the panel to
the repeater.
5. Connect the repeater mains power supply (if
required) to the L, N and E terminals as
described above for the panel.
Note: Use only RS485 screened data cable.
Figure 13 - Repeater connection diagram
EARTH BAR
EARTH BAR
Repeater
A
B
G
N
D
[Top right hand corner of C1627 motherboard]
Data Cable Screen
Panel
Power Supply connections not shown.
Repeater
A
B
G
N
D
Repeater [max 5 off]
[Top right hand corner of C1626 motherboard]


