background image

EQUIPMENT:


FIRE

CLASS 

PRECEPT EN13


PUBLICATION:


FIRECLASS PREC EN13 INST


ISSUE No. & DATE:


2     22/07/2021


PAGE 14 of 32 

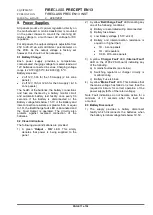
are trapped between the chassis and backbox. 

Do not connect the field wiring at this stage. 

22. Refit the door. The refitting procedure is the 

reverse of removal. Ensure that the earth strap 

and ribbon cable are reconnected correctly. 

23. Place the left-hand battery into the bottom of the 

enclosure. The terminals should be positioned 

towards the centre of the enclosure and the 

battery should be adjacent to the left side of the 

backbox, fixed by the raised indents in the 

backbox, one above the battery and one to the 

right. 

24. Place the right-hand battery into the bottom of 

the panel. The terminals should be positioned 

towards the centre of the enclosure and the 

battery should be adjacent to the right side of 

the backbox located by the raised indents in the 

back box above the battery and to the left. 

25. Connect the black battery lead to the power 

supply “Batt -” [battery negative] terminal and 

connect the red battery lead to the power supply 

“Batt +” [battery positive] terminal situated on the 

motherboard. The location of the motherboard 

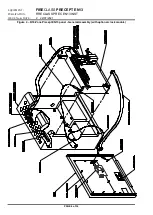
battery terminals is  shown in Figure  8. Fit the 

connector on the end of the black lead onto the 

negative (black) terminal of the left-hand battery. 

Fit the connector on the end of the red lead onto 

the positive (red) terminal of the right-hand 

battery. 

26. Connect the blue battery lead between the 

positive (red) terminal of the left-hand battery 

and the negative (black) terminal of the right-

hand battery. Note that the batteries will not 

power the panel until the mains supply is 

energised. 

10.2.2  Optional C1631 Repeater Interface 

Installation 

Warning: Observe anti-static precautions 

1.  Ensure that the panel and repeaters are 

powered down and the main and standby 

supplies are disconnected. 

2.  On the fire alarm panel and each repeater, 

remove the jumper link at J22 (adjacent to J9) 

and fit a C1631 repeater interface to connectors 

J13 and J9 located immediately to the left of the 

Zone Expansion ribbon connector on the right-

hand side of the C1627 motherboard.  See 

Figure 8. The board should be held in place by 

the 12mm high plastic spacer provided. 

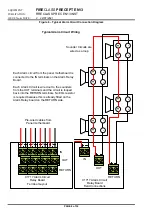
3.  Connect the RS485 data cable as shown in 

Figure 9. 

Note: Use only RS485 screened data cable. 

4.  If the repeater is powered from the panel then 

connect the Aux 24Vdc supply from the panel to 

the repeater. 

5.  If the repeater is mains powered, connect the 

repeater mains power supply to the L, N and E 

terminals as described above for the panel. 


Figure 9 - Repeater connection diagram 

EARTH BAR

EARTH BAR

Repeater

A

B

GND

[Top right hand corner of C1627 motherboard]

Data Cable Screen

Panel

Power Supply connections not shown.

Repeater

A

B

GND

Repeater [max 5 off]

[Top right hand corner of C1626 motherboard]


11.   Commissioning 

11.1  Introduction 

The following equipment should be available where 

possible to minimise commissioning time: 

i)  VHF/UHF Portable Radio (for two engineers) 
ii)  Multi-meter or equivalent 

Summary of Contents for Precept EN13

Page 1: ...UIPMENT FIRECLASS PRECEPT EN13 PUBLICATION FIRECLASS PREC EN13 INST ISSUE No DATE 2 22 07 2021 PAGE 1 of 32 Precept EN13 Fire Detection Alarm Panel Precept EN Repeater Installation Commissioning Manua...

Page 2: ...RY DEFAULT CONFIGURATION FOR ZONES OUTPUTS 22 14 4 ENGINEER S ZONE OUTPUT CONFIGURATION TIME OUT WARNING 22 14 5 INVALID CONFIGURATION CONDITIONS 22 14 6 LIST OF CONFIGURATION DIL SWITCHES AND THEIR F...

Page 3: ...this manual fully before commencing installation The following supporting documentation is also available FIRECLASS Precept EN13 Sales Literature FIRECLASS Precept EN13 Panel Application Guide FIRECLA...

Page 4: ...3 2 1 ZONE CIRCUITS RST SIL EVAC CLASS CHANGE BUZ ACTIVE P A B REPEATER AUX D C 0V OUTPUTS INPUTS EVAC FAULT GND O ZONE OUTPUTS 4 3 2 1 24V 0V 2 1 3 01 05 12 ISSUE 0 CEL C1717 ALARM 4 3 2 1 CIRCUITS...

Page 5: ...ACKBOX N L M a in s F u s e R ep la ce Sa m e Ty pe W ith RATING LABEL EARTH POST EARTH BAR MAINS TERMINAL ASSEMBLY RELAY BOARD Fu se In pu t Se ria l N o Pa rt N o Pr od uc t St an da rd s A pp ro va...

Page 6: ...EQUIPMENT FIRECLASS PRECEPT EN13 PUBLICATION FIRECLASS PREC EN13 INST ISSUE No DATE 2 22 07 2021 PAGE 6 of 32 Figure 4 8 16 Zone Precept EN13 panel General Assembly with optional clock module...

Page 7: ...iagram Connect to Aux DC 24V 24Vdc relay Typical zonal output wiring Field relay spec Coil resistance 2 6k to 4 5k Ohms Voltage 24Vdc Nom min 18V max 30V Fitted with suppression diode as shown Relay f...

Page 8: ...les from Panel motherboard Each Alarm circuit from the panel motherboard is connected to the IN terminals on the Alarm Relay Board Each Alarm Circuit is wired out to the sounders from the OUT terminal...

Page 9: ...le on selected panel Alarm Circuits 1 2 3 4 Aux DC 24V 0V SIL Inputs Outputs Repeater EVAC RST DIS EVAC A B GND Reset N C Inputs SIL Silence alarms EVAC Evacuate RST Reset Outputs DIS Disablement acti...

Page 10: ...Terminals Power Supply LED indicators OUTPUT OK Battery Charger Fault Charger Fault Mains Fault J18 Earth Fault Monitoring Link Secondary AC from transformer C1631 Repeater Interface Alarm Circuits Ma...

Page 11: ...tion resistance is greater than or equal to 1 the Batt Charge fault LED is illuminated and the Fault Output is operated The circuitry also protects against reversed connection of the batteries 9 2 Vis...

Page 12: ...eat care when lifting and transporting batteries For weights above 24 kilos lifting aids should be used DANGER Do NOT attempt to remove the battery lid or tamper with the internal workings of the batt...

Page 13: ...n an area that is clean dry and dust free where they will not be damaged You can place them inside the original packing box but you must ensure that sufficient soft packing is used to keep the door an...

Page 14: ...y 26 Connect the blue battery lead between the positive red terminal of the left hand battery and the negative black terminal of the right hand battery Note that the batteries will not power the panel...

Page 15: ...should be checked for correct audibility as specified in BS5839 1 using the Evacuate function 2 Detection zones should be commissioned next The purpose is to establish the correct functioning of each...

Page 16: ...ise the mains and check the voltage and polarity are correct before replacing the panel fuse 4 The panel will power up and enter the power up cable check mode flashing System Fault LED After about 60...

Page 17: ...nearest the panel operate each manual call point and detection device on the zone in turn o After operation of each device confirm The fire indication is provided on the panel on the correct zone The...

Page 18: ...ed out at the appropriate time in conjunction with the engineer responsible for the fire protection system 11 7 6 Ancillary inputs Remote Silence Alarms Reset and Evacuate inputs should each be tested...

Page 19: ...isabled Fault Routing Fault Disabled Yellow Flashes for a fault on the Fault Routing Output Steady when Fault Routing Output is disabled POWER SUPPLY ON FIRE FIRE ROUTING ACTIVE GENERAL FAULT POWER SU...

Page 20: ...ked and if silence before reset is configured sounders are silenced Silence Buzzer 1 Press to stop the buzzer sounding in fire or fault conditions Always available 2 In 2 Stage Delay Mode with stage 1...

Page 21: ...and the panel buzzer will silence A pulsing indication cursor will appear either on the Zone 1 Fault Disabled LED or the Sounder Fault Disabled LED Test depending upon which configuration DIL switch i...

Page 22: ...e o The panel buzzer will sound o The Cursor indication will clear o Configuration will be inhibited To clear the invalid condition check the configuration switches SW1 4 to SW1 8 on the motherboard a...

Page 23: ...1 minute within the range 0 9 minutes See Table 1 Motherboard Delay Switch Settings Table 1 Motherboard Delay Switch Settings Delay Duration SW2 2 SW2 3 SW2 4 SW2 5 NONE Off Off Off Off 1 minute On Of...

Page 24: ...14 8 Configuring the Fire Routing Fire Protection and Fault routing O Ps To configure the Fire Routing Output to volt free relay contacts remove links J10 J11 and J12 These links are combined in a sin...

Page 25: ...to 59 Press SELECT ON Time Set display HH MM SS ON Time SS flashing Press ENABLE or DISABLE to change SS to desired value 00 to 59 To set Day Night Mode Off Time Press SELECT to access day night OFF...

Page 26: ...or EEPROM1 EEPROM 0 ERROR or EEPROM 1 ERROR Note Both EEPROMs can be erased by the following procedure 1 Power the panel down 2 Place the WP DIL switch in the ON position 3 Power the panel back up 4...

Page 27: ...15 4 C1651 Clock Module PCB Features Figure 10 llustrates the PCB features referred to elsewhere in the documentation Figure 10 C1651 Clock Module PCB LK1 Select Operating Mode LK1 S1 WP ZERO 1 2 ON D...

Page 28: ...Voltage 230Vac 10 15 Cable requirements Minimum of 1mm2 copper protected by a 5A fuse Power Supply Output Specification Panel Repeater AC powered 2 4 zone 8 zone 16 zone 2 4 8 16 zone Maximum Short T...

Page 29: ...off PS12120 12V 12Ah 2 off PS12120 12V 12Ah 2 off PS12120 12V 12Ah 2 off PS1230 12V 3 4Ah Battery size mm L HT H W L 151 W 98 H 94 HT 100 L 151 W 98 H 94 HT 100 L 151 W 98 H 94 HT 100 L 133 W 67 H 60...

Page 30: ...characteristics Performance under fire conditions Pass Response delay response time to fire Pass Operational reliability Pass Durability of operational reliability Temperature resistance Pass Durabil...

Page 31: ...5 EN BSEN 54 4 Power supply equipment for fire detection and fire alarm systems for buildings List of essential characteristics Performance under fire conditions Pass Operational reliability Pass Dura...

Page 32: ...2 07 2021 2021 Johnson Controls All rights reserved All specifications and other information shown were current as of document revision date and are subject to change without notice Tyco Fire Security...

Reviews: