background image


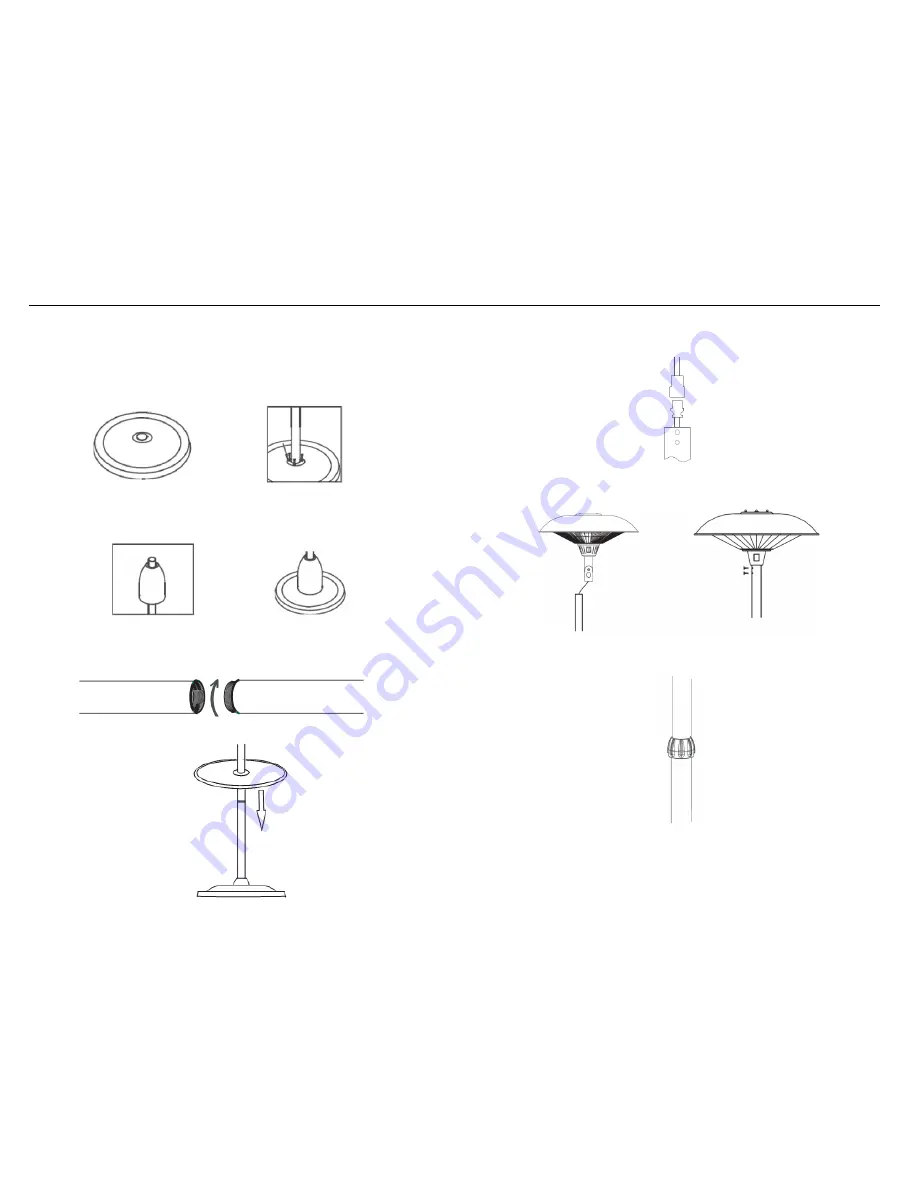
Assembling Process 

 
Step 1: Fix the Bottom Pole to the base using 3pcs M6*50 bolts.   


Step 2: Place the Decoration Cover onto the Bottom Pole. 


Step 3: Connect the middle Pole with bottom pole by screwing them together.   


Step 4: Push the Aluminum Table onto the Middle Pole. 


Step 5: Place the power cord plug through base, bottom pole, middle pole, Connect 
the power cord plug to the socket in the heater head. 


Step 6: Feed the power cord plug through the middle pole, push the heater head onto 
upper pole and secure using M4*8 screws. 


Step 7: Raise or retract the top pole to the desired height and tighten to the middle 
pole by screwing knob down. 


Summary of Contents for OL1786TBL

Page 1: ... the heater head 5 Do not leave turned on and unattended especially when children and or animals are in the vicinity 6 The indication of the different positions of switches shall be visible from a distance of 1M 7 The Marking concerning covering shall be visible after the heater has been installed It shall not be placed on the back of portable heaters 8 The unit must be securely placed on a horizo...

Page 2: ... intended normal operating position and they have been given supervision or instruction concerning use of the appliance in a safe way and understand the hazards involved Children aged from 3 years and less than 8 years shall not plug in regulate and clean the appliance or perform user maintenance CAUTION Some parts of this product can become very hot and cause burns Particular attention has to be ...

Page 3: ...ep 4 Push the Aluminum Table onto the Middle Pole Step 5 Place the power cord plug through base bottom pole middle pole Connect the power cord plug to the socket in the heater head Step 6 Feed the power cord plug through the middle pole push the heater head onto upper pole and secure using M4 8 screws Step 7 Raise or retract the top pole to the desired height and tighten to the middle pole by scre...

Page 4: ...n Part by screwing the Screw Knob Step 10 Connect the upper pole with middle pole by screwing them together Step 11 Secure the power cord to the weighted base Attach the power cord on the stainless steel base with four M4 x 12 screws Step 12 Press the button to adjust heater head to desired angle Complete ...

Page 5: ...ushes to clean the heater This may cause damage or deterioration to the surface of the heater Although this heater is outdoor approved DO NOT immerse the heater in water for your safety Wait until the unit is completely dry before use STORAGE If the heater will not be used for a long period of time store it in a cool dry location when not in use To prevent dust and dirt build up use the original p...

Reviews: