I
NSTALLATION OF BATTERY PACK
1.
During the installation the location of the Battery Pack should be installed in the location that is easy to service.
The best location is in the vertical enclosure of the Fire Pit. The plastic junction box is provided for the installation
of the battery pack.
REV. 10-10-12 Page 7
Requires 4-AA 1.5V
alkaline batteries
Batt
ery c
over
slid
es o
n/off
La
tc
hin
g S
ole
no
id
D
C
M
oto
r D
riv
e
Slide Switch
to Latching
Solenoid
2.
The wiring extending from the valve box is a 12-foot special 4-pin connector that connects to the battery pack and
(2) two additional wires with 1/4’’ female connectors. A complete wiring diagram (Fig.12) is located on page 12.
3.
Feed all wires into the plastic junction box and connect special 4-pin plug into back of the battery pack. Connect
1/4’’ female spade connectors to solenoid wires matching color, red-to-red and black-to-black.
4.
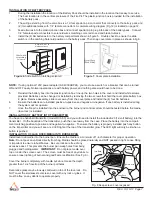
Install the (4) AA batteries in to the battery compartment shown in figure 5. Double check to ensure the slide
switch is in the Latching Solenoid position on the battery pack. Then snap cover plate in place as shown in fig.6.
Figure 6.
Slide switch on latching solenoid
5.
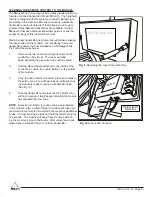
Reinstall the battery box into the plastic junction box, line up the two holes in the cover and install white screws
provided. Batteries can be changed or installed by removing the two screws that hold the cover plate battery box
in place. Remove assembly, slide cover away from the cover plate and install the (4) four AA batteries.
6.
Be sure the batteries are installed positive-to-positive and negative-to-negative. If one battery is installed wrong
the system will not operate.
7.
Once the fire pit is installed into the enclosure, the burner and control system should be tested before the media
(lava rock) is installed.
NOTE:
If using optional 120V power adapter (AF-4000ADP24), you must use a switch or a breaker that can be turned
ON and OFF easily. Normal operations are with battery power, and nothing else would have to be done.
INSTALLATION OF BATTERY INTO TRANSMITTER
You have one handheld transmitter (model RCAF-3) and you will need to install the included A23 (12-volt battery) into the
transmitter. On the backside of the transmitter, push the cover away from the case. Place the battery into the compart
-
ment matching positive-to-positive and negative-to-negative. To ensure the battery is properly installed push any button
on the transmitter and you will see a red LED light at the top of the transmitter glow. The LED light will only be lit when a
button is pushed.
Lava Rock
Lava Rock
Lava Rock
Ignition Hood
Screen Cover
INSTALLATION OF LAVA ROCK/MEDIA INTO BURNER PAN
Install lava rock/media into the burner pan. Ensure the media is a minimum of 1-inch diameter for proper operation.
Note:
Do not pour Lava Rock directly from bag. Media should be placed naturally and NOT packed in tight. Loose fitting
is important to ensure robust flames. Be sure rocks are free of any
excessive dust. This prevents the burner pan weep holes from being
plugged and holding water.
IMPORTANT
: Do not place media over
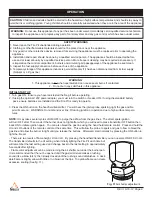
top or under the screen cover. The screen must be free of any debris to
ensure proper lighting of burner and good flame rectification (See fig. 8).
Cover the burner completely with media but do not make the depth
greater than 1-inch overtop of the burner portholes.
Decorative glass may be loosely scattered on top of the lava rock. Do
NOT cover the stainless steel screen cover with any rock or glass. It
must be free an any debris to operate properly.
Figure 7.
Cover plate installation
Fig. 8 Keep screen cover exposed


