22
Firegear Outdoors® Key West™ Series
INSTALLATION
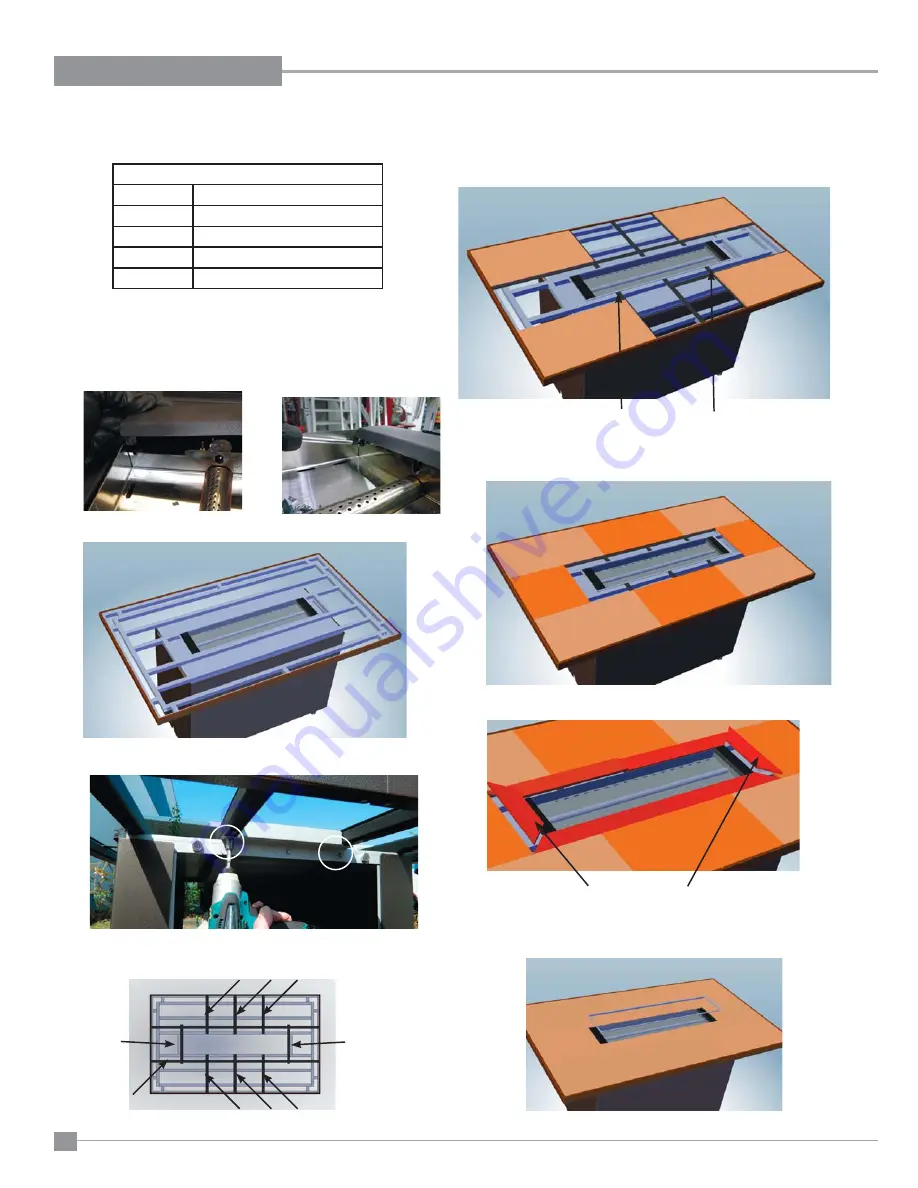
TABLE TOP INSTALLATION
(FOR DINING AND BAR UNITS ONLY)
(
)
2)
Place table top frame on top of unit - fi nished edge with return face up.
3)
Line up holes from table top frame with holes on unit - secure with 2
screws at each end - locations shown below
5)
Install tiles - starting with 4 corner tiles.
4)
Place the 10 fi ller brackets on the table top as shown - before installing
tiles.
NOTE:
Filler brackets are used to fi ll the gaps between each tile.
6)
With 4 corner tiles are in place - install center tiles.
7)
Install - 4 smaller inner tiles. Install 2 end small inner tiles to com-
plete tile installation.
8)
With all tiles installed - install inner frame to fi nish installation.
NOTE:
TAKE CARE WHEN HANDLING AND INSTALLING TILES.
TILES TO FREE FLOAT _ DO NOT GLUE TILES TO TABLE TOP.
Table Top Components.
8
Tiles
6
Tiles (small inner)
10
Filler Brackets.
1
Table Top Frame
1
Inner frame
1)
Install the end caps (found in the manual pack) at each end and secure
with 2 phillips screws found in manual pack.
Install small inner end tiles last
Note: Correct position of fi ller
brackets.
Summary of Contents for KWBH-2
Page 6: ...6 Firegear Outdoors Key West Series DIMENSIONS UNIT DIMENSIONS DINING HEIGHT ...
Page 7: ...Firegear Outdoors Key West Series 7 DIMENSIONS UNIT DIMENSIONS BAR HEIGHT ...
Page 35: ...Firegear Outdoors Key West Series 35 PARTS LIST DINING AND BAR HEIGHT ...
Page 36: ...36 Firegear Outdoors Key West Series PARTS LIST COFFEE HEIGHT ...
Page 37: ...Firegear Outdoors Key West Series 37 NOTES ...


