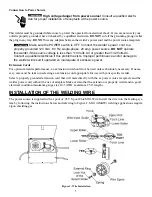
Remove the contact tip and gun nozzle from the welding torch before starting this
procedure.
1. Loosen the nut of the spool holder (brake drum). Remove the spring and the external ring.
2. Remove the plastic protection from the spool. Place it on the spool holder again. Mount the external ring,
the spring and the plastic lock nut again. These parts form the braking system for the wire spool. Tighten nut
until slightly snug. Excessive pressure strains the wire feeding motor. Too little pressure does not allow the
immediate stop of the wire spool at the end of the welding.
3. Loosen and lower the plastic knob. Release the upper roll of the feeder. Extract any wire remaining in the
torch liner from an earlier roll of wire.
4. When the wire is disconnected, grasp it with pliers so that it cannot exit from the spool. If necessary,
straighten it before inserting it in the wire input guide. Insert the wire on the lower roll and in the torch liner.
Keep the torch straight. When feeding a new wire through the liner, make sure the
wire is cut cleanly (no burrs or angles) and that at least 2” from the end is straight (no curves).
Failure to follow these instructions could cause damage to the liner.
5. Lower the upper roll and the knob. Tighten slightly. If tightened too much, the wire gets locked and could
cause motor damage. If not tightened enough, the rolls will not feed the wire.
6. Connect the power supply cable to the 120 V, 60 Hz line. Turn on the switch. Press the torch switch. The
wire fed by the wire feeding motor at variable speed must slide through the liner. When it exits from the
torch neck, release the torch switch. Turn off the machine. Mount the contact tip and the nozzle.
The drive rollers, when moving, may crush the fingers. Periodically, check the drive
rollers. Replace them when they are worn and compromise the regular feeding of the wire.
The FP-90’s welding torch is a “live” contact torch and is ALWAYS
in the power on position. Wear eye protection at all times when handling this
torch.
WELDING TORCH
The welding torch is installed in the welder at the factory. We recommend you periodically check the contact
tips and the nozzle. These parts must be clean and not worn. Replace the torch liner when the wire does not
run smoothly.
The FP-90’s welding torch is a “live” contact torch and is ALWAYS
in the power on position. Wear eye protection at all times when handling this
torch.
GASLESS WELDING (FCAW)
In gasless welding the torch is connected to the negative pole and the ground cable to the positive pole.
Gasless welding requires a special wire called “flux cored wire.” Flux-cored wire simplifies the use of these
machines compared to the machines with standard wire which requires a separate source of shielding gas.
ADVANTAGES OF GASLESS WELDING
1. There is no need for gas cylinders.
2. Welding outdoors is easier because there are fewer chances that wind blows away the shielding gas.
8
Summary of Contents for FP-90
Page 2: ......
Page 27: ...23 Figure 21 FP 90...
Page 29: ...25 Figure 22 FP 90 Wiring Diagram...
Page 30: ...26...


