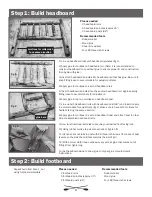
1) Line up headboard rails with headboard spindles (fig 1).
2) Apply glue to mortises on headboard rail. (Note: it is recommended to
construct headboard once without glue to ensure proper fit and construction,
then again with glue).
3) Insert all headboard spindles into headboard rail that has glue.
Be sure to
keep fitting loose to accommodate for adjustment later.
4) Apply glue to mortises on second headboard rail.
5) Insert headboard spindles into the second headboard rail, again keeping
fitting loose to accommodate for adjustment.
6) Apply glue to top two mortises on headboard post.
7) Line up both headboard rails with headboard post (48”) and insert loosely
to accommodate for adjustment (fig 2).
Make sure to have both mortises for
bedrails facing the same direction.
8) Apply glue to mortises on second headboard post and attach post to other
side of assembled headboard rails.
9) Now twist individual spindles to acquire your desired front facing look.
10) Using rubber mallet, tap all connections to tighten fit.
11)
Optional
: secure rails to post with #8 three-inch screws from back of post
(secure on the side that will face towards the wall, fig 3).
12) With a moist cloth/towel, wipe away any excess glue that comes out of
fittings from tightening.
13) Set headboard aside to allow glue to dry per glue manufacturer’s
instructions.
Step 1: Build headboard
Step 2: Build footboard
Pieces needed
- 2 headboard rails
- 5 headboard spindles (approx 24”)
- 2 headboard posts (48”)
Recommended tools
- Rubber mallet
- Wood glue
- Power screwdriver
- Four #8 three-inch screws
fig 1
fig 2
fig 3
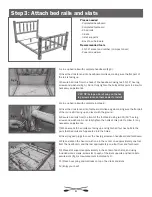
Pieces needed
- 2 footboard rails
- 5 footboard spindles (approx 20”)
- 2 footboard posts (35”)
Recommended tools
- Rubber mallet
- Wood glue
- Four #8 three-inch screws
Repeat build from Step 1, but
using footboard materials.
glue here
mortises for rails must
face same direction
3


