background image


© 2022 Carrier 

7

ASSEMBLY INSTRUCTIONS

If the optionally available extension tubes are used, the extension tube is first screwed into the thread of the junction box. Then the 

cover of the junction box is unscrewed. The red high-voltage cable from the ignition tip adapter is pulled through the extension tubes 

into the junction box. The ignition tip adapter is then screwed into the extension tube. If no extension tube is used, the ignition tip 

adapter is screwed directly into the junction box.

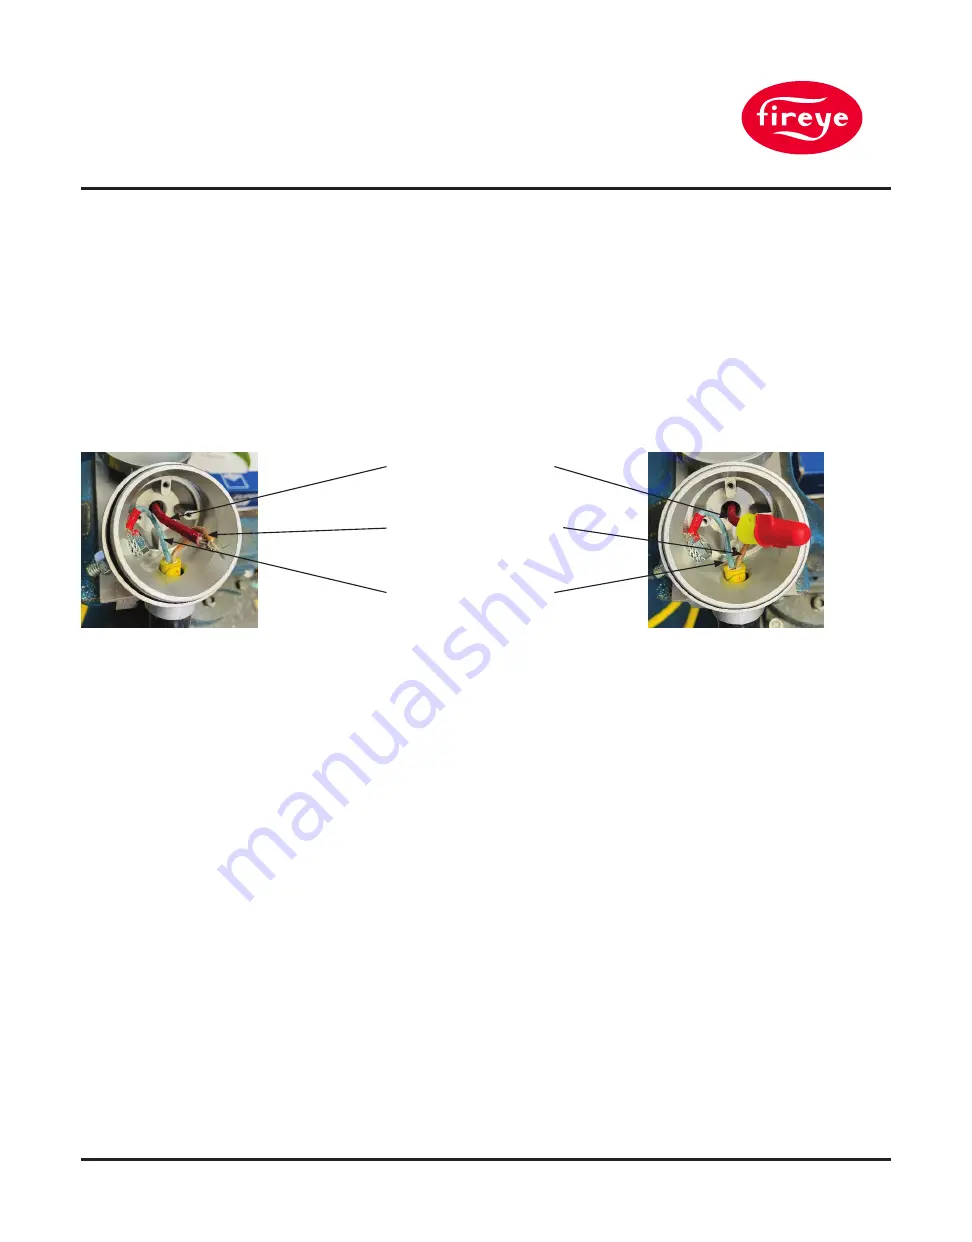
The red high-voltage cable is to be shortened in the junction box so that approximately 8 cm (measured from the bottom of the junc

-

tion box) remain. The insulation is stripped down to about 1 cm at the ends of the red and brown lines. The wires of the high-voltage 

cables are inserted into the rotary connector (supplied with the junction box) up to the stop and contacted by turning the connector 

clockwise.

Before: After:


High Voltage Cable (Red)


from the ignition electrode


High voltage cable (brown)


from the ignition unit


Ground connection (blue)


to the ignition unit

The cover of the junction box is screwed on again in the last step.

The ignition tip HE-S or HE-L has to be screwed into the ignition tip adapter.

For personal protection and for later use, it is recommended to connect a protective conductor (minimum cross-section 4mm²)


to the external PE connection bolt of the junction box with a grounding clamp for connecting the ground potential to the burner


(see installation instructions described below).

Protective conductor assembly

The insulation of the PE wire must be offset by approx. 8mm at the end. The supplied yellow ring cable lug

(4 mm²) is fitted here with crimping pliers (model for insulated ferrules with forced lock). The yellow ferrule is placed on the external 

grounding bolt on the housing and secured with the washer and serrated lock washer and a nut.

On the other side of the PE cable, a grounding clamp should be connected to metal surfaces grounded on the system side for easy 

handling to ensure good contact.

A ready-made PE cable with mounted grounding clip is available as an accessory (HEP-2-CLIP).      

Summary of Contents for HEP-2

Page 1: ...h flexible cable in front of the ignition electrode and short ignition tip HE S HEP 2 Zxxxx with fixed ignition electrode and screwed on ignition tip HE S The operating instructions must be read carefully before installation commissioning and maintenance Instructions must be observed and the operating manual must be kept for later use ...

Page 2: ...of Fireye the documentation or parts thereof may not be reproduced copied or lent or passed on to third parties Fireye as supplier of the described portable high energy hand held ignition device described reserves the right to change the equipment and design of the device modules or individual assemblies at any time even without prior notice The actual availability results from the individual offe...

Page 3: ...l connections and the tightness of the screws Compliance with the permissible ambient temperatures must be checked During ignition 2kV are applied to the ignition electrode There is a danger to life if touched The portable high energy hand held ignition device may only be operated in the combustion chamber with the lid of the ignition unit closed and with an undamaged cable depending on the versio...

Page 4: ...Loading process 10 Replacing the batteries 11 Technical specifications 12 Accessories and spare parts 13 Warranty 14 Liability 14 PICTURE DIRECTORY Individual components HEP 2 with flexible cable in front of the ignition electrode 6 Individual components HEP 2 Zxxxx with fixed ignition electrode 8 Handle top view 9 The ignition start Ignition 9 Displays while charging 10 The polarities must be obs...

Page 5: ...device is switched ready for operation via a latching switch The ignition is started with a button The device has an LED status indicator and informs the user when the device needs to be recharged Two versions are available See individual drawings enclosed 1 The HEP 2 is supplied with a pluggable ignition cable a junction box and the ignition lance with a replaceable igni tion tip The user can det...

Page 6: ...HE L screwed in 675mm Please note that the red high voltage cable is shortened to the required length in the junction box only after all components have been assembled NOTICE Due to the pre assembled high voltage cable the electrode length is usually 3 m and can be longer if required In this case please contact Fireye WARNING ATTENTION HIGH VOLTAGE Before mounting replacing the ignition tip or ope...

Page 7: ...lectrode High voltage cable brown from the ignition unit Ground connection blue to the ignition unit The cover of the junction box is screwed on again in the last step The ignition tip HE S or HE L has to be screwed into the ignition tip adapter For personal protection and for later use it is recommended to connect a protective conductor minimum cross section 4mm to the external PE connection bolt...

Page 8: ... connecting the ground potential to the burner see installation instructions described below Protective conductor assembly The insulation of the PE wire must be offset by approx 8mm at the end The supplied yellow ring cable lug 4 mm is fitted here with crimping pliers model for insulated ferrules with forced lock The yellow ferrule is placed on the external grounding bolt on the housing and secure...

Page 9: ...he device on and off Power On Off The device is switched on and ready for operation by pressing the latching switch on the top of the device In the On state the background LED lights up in white Push the electrode of the portable ignition device into the combustion chamber The ignition start Ignition To ignite the Ignition button in front of the handle on the side of the ignition lance must be pre...

Page 10: ...rs After charging the hand held ignition device must be disconnected from the mains If the ignition spark is very weak and the red background LED on the ignition button lights up the battery should also be charged If batteries are allowed to drop below 3 0 volts they can be permanently damaged Displays while charging The charge status displays are located on the back of the hand held ignition devi...

Page 11: ...again with the four previous ly loosened screws Proper operation can only be guaranteed with the batteries installed by the manufacturer BATTERY REPLACEMENT The batteries may only be replaced by a qualified electrician WARNING ATTENTION HIGH VOLTAGE Before opening the ignition unit it is absolutely necessary to disconnect the main connection and secure it against being switched on again Check whet...

Page 12: ...HEP 2 remote ignition electrode approx 2 7 kg varies depending on length HEP 2 Zxxxx fixed ignition electrode approx 3 1 kg varies depending on length Possible ignition electrode total lengths HEP 2 Length without firing tip 325 mm Total insertion depth through use of extension tubes 525mm with HE S 200 mm 725 mm with ET 0 02 200 mm and HE S 200 mm 825 mm with ET 0 03 300 mm and HE S 200 mm 925 mm...

Page 13: ... Portable Battery Igniter Order no HE SSR 0 0 Ignition Cable Order no HEP SR Spacer Ring with 16 5mm inner diameter and Allen screw for locking Order no HEP 2 GRIP Grip Handle Order no HEP BP The set consists of three flat top Li Ion single batteries 3 7V 3000 mAh ...

Page 14: ... overall performance WARRANTIES FIREYE guarantees for one year from the date of installation or 18 months from date of manufacture of its products to replace or repair Fireye s option any product or part thereof except lamps and photocells which is found defective in material or workmanship or which otherwise fails to conform to the description of the product on the face of its sales order THE FOR...

Reviews: