background image

Table of Contents

Page 01

SAFETY PRECAUTIONS

 . . . . . . . . . . . . .  . . .3

UNPACKING THE GENERATOR

. . . . . . . . . . .6

      Parts Included. . . . . . . . . . . . . . . . . . . . . . . .6

REMOVAL OF SHIPPING SUPPORTS

. . . . . .7

ASSEMBLY

 . . . . . . . . . . . . . . . . . . . . . . . . . . . . .8

      Install the Wheel Kit . . . . . . . . . . . . . . . . . . 8

      Install the Support Leg . . . . . . . . . . . . . . . .8

      Install the Handle . . . . . . . . . . . . . . . . . . . . 8

Controls and features

. . . . . . . . . .  . . . . . . . . 9

      Generator. . . . . . . . . . . . .. . . . . . . . . . . . . .9

      Control Panel. . . . . . . . . .. . . . . . . . . . . . . 10

Specifications

. . . . . . . .. . . . . . . . . . . . . . 11

      Add engine oil . . . . . . .. . . . . . . . . . . . . . . .12

      Low oil shutdown . . . . . . . . . . . . . . . . . . . .12

      Add fuel . . . . . . .. . . . . . . . . . . . . . . . . . . . . 13

      Operation


at


high


altitude  . . . . . . . . . . .13

      Grounding. . . . .. . . . . . . . . . . . . . . .. . . . . .14

Operation

 . . . . . . . . . . . . . . . . . . . . . . . . .. . . . 15

      Generator Location . . . . . . . . . . . . . . . . . . 15

      Surge Protection . . . . . . . . . . . . .. . . . . . . .15

      Starting the Engine . . . . . . . . . .  . .. . . . . . 16

      Connecting Electrical Loads . . . . . . . .. . . 17

      Stopping the Engine . . . . . . . . . . . . . . . . . 17

      Low Oil Shutdown  . . . . . . . . . . . . . . .  . . . 18

      Do Not Overload Generator . . . . . . . . . . . 18

MAINTENANCE AND STORAGE

. . . . . . . . . 19

      Maintenance Schedule  . . . . . . . . . . .  . . 19

      Engine Maintenance . . . . . . . . . . . . . . . . 20

      Change Engine Oil . . .. . . . . . . . . . . .. . . . 20

      Air Filter Maintenance. . . . . . . . . . . . . . . .20

      Spark Plug Maintenance. . . . . . . .  . . . . . 21

      Cleaning Fuel Strainer . . . . . . . . . . . .  . . 21


 . . . . 22

Inspect


Muffler


and


Spark


Arrester

      Generator Maintenance . . . . . . . . . . . . . 22

      Service And Storage . . . . . . . . . . . . . . . . . 23


Trouble Shooting 

. . . . . . . . . . . . . . . . . . . . .24

Parts Diagram


and Parts List

 . . . . . . . . . . 2 5

      Parts Diagram . . . . . . . . . . . . . . . . . . . . . 25

      Parts List  . . . . . . . . . . . . . . . . . . . . . . . . . 26

Service information 

. . . . . . . . . . . . . .. . . . . 27


Summary of Contents for P03602

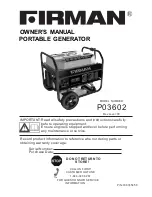
Page 1: ...performing any maintenance or service IMPORTANT Record product information to reference when ordering parts or obtaining warranty coverage Serial Number Purchase Date PORTABLE GENERATOR MODEL NUMBER P...

Page 2: ...ounding 14 Operation 15 Generator Location 15 Surge Protection 15 Starting the Engine 16 Connecting Electrical Loads 17 Stopping the Engine 17 Low Oil Shutdown 18 Do Not Overload Generator 18 MAINTENA...

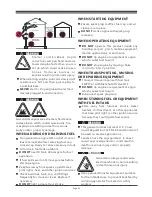
Page 3: ...ce Important Safety Information The manufacturer cannot possibly anticipate every possible circumstance that might involve a hazard The warnings in this manual and the tags and decals affixed to the u...

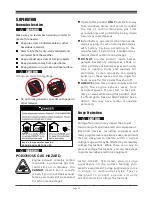
Page 4: ...o fresh air RIGHT AWAY See a doctor You may have carbon monoxide poisoning Avoid other generator hazards READ MANUAL BEFORE USE WARNING The engine exhaust from this product contains chemicals known to...

Page 5: ...raction will pull hand and arm toward engine faster than you can let go which could cause broken bones fractures bruises or sprains resulting in serious injury When starting engine pull cord slowly un...

Page 6: ...or operation Turn electrical loads OFF and disconnect from generator before stopping generator DO NOT use generator with electrical cords which are worn frayed bare or otherwise damaged DO NOT operate...

Page 7: ...f you or anyone in your household depends on electrical equipment to live Inform your electrical provider immediately if a loss of power would cause you or anyone in your household to experience a med...

Page 8: ...remove the attached engine support brackets red under the engine 1 Before filling the engine oil tip the generator back onto its recoil frame end as indicated in this picture Place the generator on th...

Page 9: ...C F F The generator requires some assembly priorto usage If problem arise when assembling the generator call 1 844 347 6261 E G H K 1 Before adding wheels tip the generator on it s side 2 Slide the a...

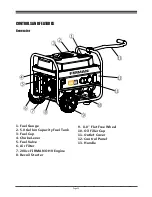
Page 10: ...erator 1 2 1 Fuel Gauge 2 5 0 Gallon Capacity Fuel Tank 3 Fuel Cap 4 Choke Lever 5 Fuel Valve 6 Air Filter 7 208cc FIRMAN OHV Engine 8 Recoil Starter 9 8 0 Flat Free Wheel 10 Oil Filler Cap 11 Outlet...

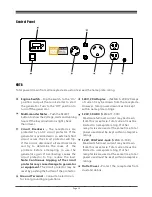
Page 11: ...age to generator or equipment The circuit protector may be reset by pushing the button of the protector 4 5 7 Ground Terminal Consult an electrician for local grounding regulations 120V 30A Twist Lock...

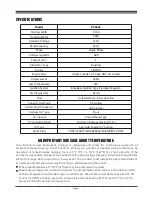
Page 12: ...uipment product is designed and rated for continuous operation at ambient temperatures up to 40 C 104 F When your product is needed your product may be operated at temperatures ranging from 15 C 5 F t...

Page 13: ...onally to allow stator windings to heat and cool Adjusting the load will also cause engine speed to vary and help seat piston rings CAUTION The unit is equipped with a low oil shutdown If the oil leve...

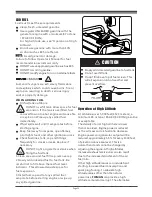
Page 14: ...sary DO NOT light a cigarette or smoke when filling the fuel tank 1 Clean area around fuel fill cap remove cap 2 Slowly add unleaded fuel to fuel tank Be careful not to fill above the red fuel level i...

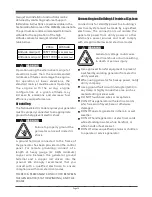
Page 15: ...pment to prevent backfeed by isolating generator from electric utility workers When using generator for backup power notify utility company Use a ground fault circuit interrupter GFCI in any damp or h...

Page 16: ...gine exhaust contains carbon monoxide a poisonous gas that could kill you in minutes You CANNOT smell it see it or taste it Even if you do not smell exhaust fumes you could still be exposed to carbon...

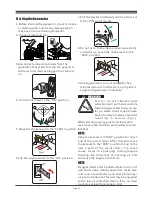
Page 17: ...uring shipment 2 Check oil level and fuel 5 Move the choke lever to the START position 6 Flip the engine switch to the ON position 8 Do not over choke As soon as engine starts and warm up move the cho...

Page 18: ...enerator with electrical devices plugged in or turned on This unit has been pretested and adjusted to handle its full capacity Before starting the generator disconnect all load Apply load only after g...

Page 19: ...is below LOW mark on dipstick 1 Add oil to bring level to HIGH mark 2 Restart engine and if the engine stops again a low oil condition may still exist DO NOT try to restart the engine 3 Contact an Au...

Page 20: ...commendations Regular maintenance will improve the performance and extend the life of the generator See any authorized dealer for service The generator s warranty does not cover items that have been s...

Page 21: ...in certain laboratory animals Thoroughly wash exposed areas with soap and water a Drain oil by removing the drain plug and the oil filler cap while the engine is warm Change engine oil every 100 hour...

Page 22: ...ner cup with gasoline c Tightly fasten the cup to main body making sure to avoid fuel leak SCREEN 2 SCREEN 1 O ring CUP BODY b Remove spark plug using provided wrench c Inspect spark plug for damage a...

Page 23: ...surface in a clean dry operating environment DO NOT expose the unit to extreme conditions excessive dust dirt moisture or corrosive vapours DO NOT use a garden hose to clean the generator Water can en...

Page 24: ...ition LONG TERM STORAGE When the generator set is not being operated or is being stored more than one month follow these instructions 1 Replenish engine oil to upper level 2 Run the generator then clo...

Page 25: ...ine has lost compression 1 Set engine switch to ON I position 2 Move fuel shutoff lever to ON I position 3 Fill crankcase to proper level or place generator on level surface 4 Clean or replace air cle...

Page 26: ...Page 25 PARTS DIAGRAM AND PART LIST PARTS DIAGRAM...

Page 27: ...4 41 42 43 44 45 46 47 48 49 50 51 52 53 54 55 56 57 58 59 60 61 62 63 64 65 66 67 68 69 70 71 72 73 74 75 76 77 78 79 335713640 335713641 335713642 335713643 335713644 335713645 335713646 335713647...

Page 28: ...nit to the Place of Purchase Contact the FIRMAN Service Center and FIRMAN will troubleshoot any issue via phone or e mail If the problem is not corrected by this method FIRMAN will at its option autho...

Page 29: ...ress SUMEC North America Attn Customer Service 2090 Baker Road Suite 304 Box 105 Kennesaw Ga 30144 www firmangenerators com Customer Service Mon Fri 8 30 AM 5 30 PM EST Toll Free 1 844 FIRMAN1 1 844 3...

Page 30: ...built and equipped so as to conform with all applicable regulations adopted by the Air Resources Board and US EPA and Free from defects in materials and workmanship that cause the failure of a warrant...

Page 31: ...c b Diagnosis and inspection fees that do not result in eligible warranty service being performed 1 Ignition system including Spark plug Ignition coil 2 Fuel metering system Fuel tank Fuel cap Fuel li...

Page 32: ...P N 336745450 Rev 00...

Reviews: