background image


10 

3.  Attach the USB 3.0 cable


Install the USB 3.0 data cable on the rear of the miniSwap/U3 enclosure. Do NOT force the 
USB connector.  The USB 3.0 Micro-B connector can only fit in one direction.  
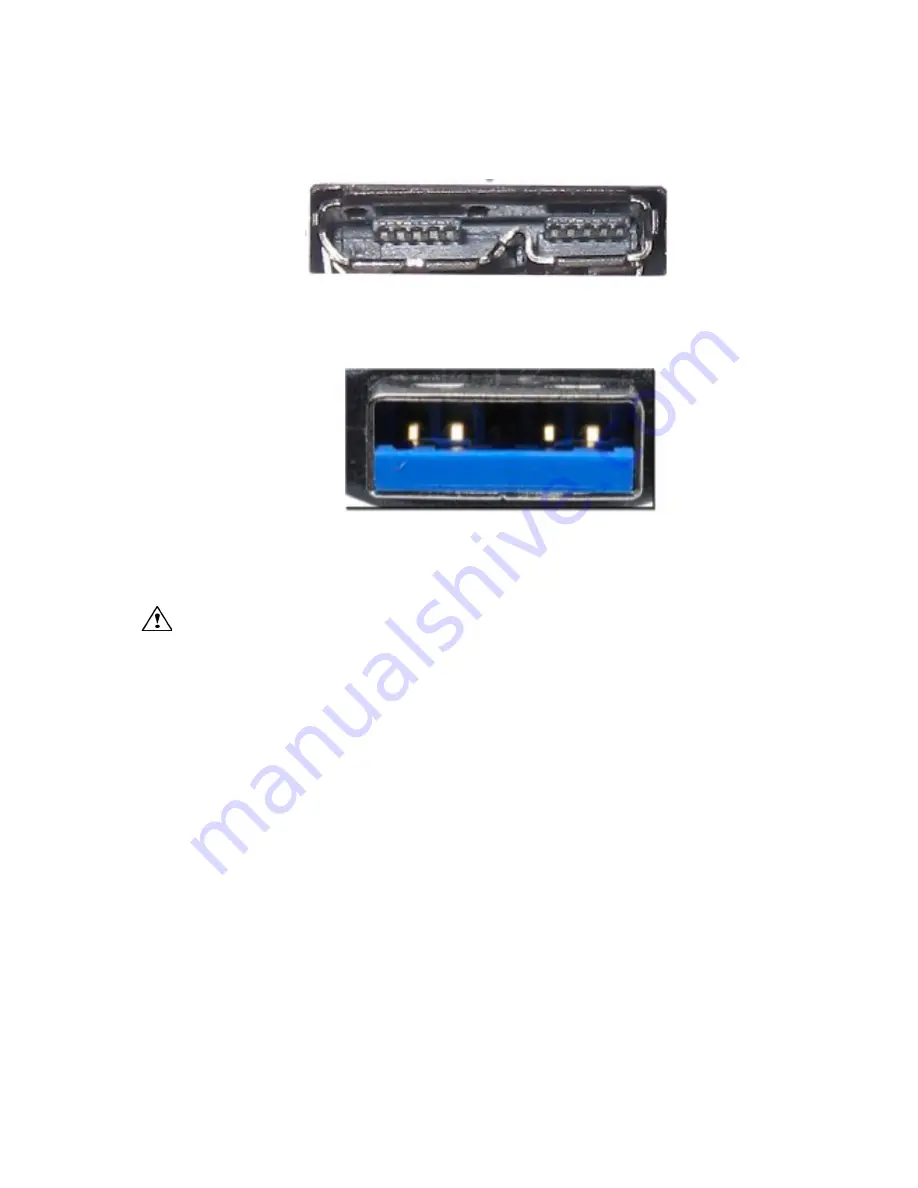
The notch 

in the Micro-B connector found on one end of the USB 3.0 cable must be pointed 
down

 to properly insert the USB connector into the rear of the miniSwap/U3. 


USB 3.0 Micro-B Connector 


Attach the USB A male connector found on the other end of the USB 3.0 cable to the 
computer. The blue area inside the connector must be down for the connector to properly 
slide into place.


USB 3.0 A Connector 


Making the USB 3.0 Connection:  


Caution

:  Be sure to connect the cable using the proper orientation to your computer and 

external enclosure. It should easily snap into place.  Please do not force the USB 

connector into the computer USB port or the miniSwap/U3. 

Use of excessive force may 

damage the computer or the miniSwap/U3 and is not covered by warranty service. 


Power Operation   


Once the USB cable is connected and the computer is running, the power LED will glow and the 
drive mounted in the miniSwap/U3 can be accessed by the computer.


The miniSwap/U3 will 

operate on bus power provided the USB power limits of the computer are not saturated.  USB 2.0 
computer connections offer up to 500mA of power while USB 3.0 ports provide up to 900mA. If too 
many USB devices are connected at the same time an optional miniSwap/U3 power adapter may 
be required. 


Front Panel Status & Activity LED Light 


On the front of the miniSwap/U3 enclosure are two multi-color (Green & Blue) status/activity LED 
lights. These lights appear on the right side of the bay door. The lights will be off if the power is off. 
When a USB cable is attached to the miniSwap/U3, the LED will normally glow green if no drive is 
detected. When a hard disk is installed a blue LED will glow. Once the drive is being accessed the 
blue LED will blink. 


Summary of Contents for miniSwap/U3

Page 1: ...1 Store and Share your Digital Creations miniSwap U3 Hot Swap 2 5 External Bus Powered USB 3 0 Enclosure User Manual...

Page 2: ...is for informational purposes only It is possible the content of this manual may contain technical inaccuracies typographical or other errors FirmTek assumes no liability for any errors omissions or f...

Page 3: ...3 8 Drive Installation 9 Power Operation 10 III Hot Swapping Hard Drives 11 General Hot Swap Guidelines 11 IV Sleeping Wake Up Procedures 12 V Troubleshooting 13 VI Product Support 14 VII Product Warr...

Page 4: ...2 than USB 2 0 USB 3 0 utilizes single unidirectional data paths for increased bandwidth up to 10x faster than USB 2 0 For faster data performance the miniSwap U3 implements USB Attached SCSI Protocol...

Page 5: ...capacity Bus Powered with Power and Activity LED Aluminum case for maximum durability and heat dissipation Ultra quiet fan free aluminum heat dissipation cooling system High performance to handle mult...

Page 6: ...D Must support 5V operation Supports 7mm 9 5mm 12 5mm 14 9mm drive heights Any capacity Data Transfer Rates Up to 5 Gbit second burst data Advanced Data Features Fully compliant with SATA 1 5 3 and 6...

Page 7: ...d on the 2012 Apple MacBook Pro 2012 MacBook Air 2012 Mac mini 2012 iMac and Windows PC notebooks and desktops 2 5 SATA 1 5G 3G 6G hard drive or SSD any capacity Bus power support for most 5v energy e...

Page 8: ...power supply case or a port access cover to discharge any built up static electricity from your body Make sure to handle the hard drives around the edges to avoid damage by static electricity Getting...

Page 9: ...n the correct position to avoid damage DO NOT insert a PATA device into the miniSwap as this will cause damage not covered by warranty Carefully press the miniSwap door closed The bay is now ready to...

Page 10: ...U3 Use of excessive force may damage the computer or the miniSwap U3 and is not covered by warranty service Power Operation Once the USB cable is connected and the computer is running the power LED wi...

Page 11: ...l hard drive before removing it Do not remove a disk that is being used as the Startup Disk Connecting External Hard Drive s If your computer is not turned on connect the USB cable and then power on t...

Page 12: ...red in cache memory To reconnect the external hard drive reconnect it and Windows will automatically detect it If you are re attaching a hard drive after the remove disable operation as explained abov...

Page 13: ...was able to successfully mount two miniSwap U3 enclosures at the same time with 2 5 SATA HDDs installed while only using Bus power on the 2012 MacBook Pro If you have several additional USB devices co...

Page 14: ...r the product is to be repaired or replaced with refurbished parts or with a new or refurbished product Data Recovery is not covered under this warranty and is not part of the warranty returns process...

Page 15: ...accordance with the instruction manual may cause harmful interference to radio communications However there is no guarantee that interference will not occur in a particular installation However if thi...

Reviews: