background image


13 

V.  Troubleshooting 


My hard drive isn’t recognized


Check the cables and connections.  Ensure the USB 3.0 cable is properly oriented to the 

connector on the computer and the external enclosure.  Ensure the enclosure is properly 
powered. If several USB devices are connected to the computer, remove all of them and just 
try connecting the miniSwap/U3.  USB 3.0 ports provide up to 

900mA of power.  USB 2.0 

ports provide up to 500mA of power.

 If the drive inserted in the miniSwap/U3 requires 12v it 

is not compatible and will not power up.


Make sure the hard drive has been initialized for use 

with the OS you have selected. Disk Utility completes this task with Mac OS X. Disk 
Manager provides this service in Windows.


Does the miniSwap/U3 work with all PPC and Intel based Macintosh computers? 

Yes, the miniSwap/U3 works with all computers with at least one available USB 3.0 or USB 

2.0 port. For support of devices over 2TB Mac OS X 10.5.x or higher is required 


Is a power adapter available? 

Yes, an optional miniSwap/U3 power adapter is available.  FirmTek was able to successfully 

mount two miniSwap/U3 enclosures at the same time with 2.5” SATA HDDs installed while 
only using Bus power on the 2012 MacBook Pro.  If you have several additional USB devices 
connected at the same time it’s possible a power adapter may be needed.  Simply 
unplugging excess USB devices will usually allow Bus power to support the miniSwap/U3.  
Please contact FirmTek if you wish to order a miniSwap/U3 power adapter. 


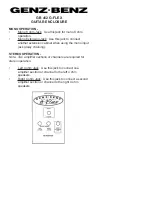
Drive is difficult to eject or insert? 

If the selected 2.5”

 SATA HDD has a notch in the rear, it may cause the disk eject arm to 

become stuck and the bay door difficult to open


DO NOT force the door open 

as this 

may damage the miniSwap. If the drive is difficult to eject, take the three screws off of each 
side of the miniSwap and remove the top. Next, push the drive forward with your finger to 
eject the drive.  

 
You can fill the notch if you wish to continue to use the drive with the miniSwap. One option 

is to use a knife to cut a small section of wood from a wooden paint stick to fill the gap.  Black 
electrical tape can be used to hold the wood in place. With this modification completed the 
drive will eject properly. Do not fill the gap with any substance that conducts electricity, as 
this can damage the HDD. 


Summary of Contents for miniSwap/U3

Page 1: ...1 Store and Share your Digital Creations miniSwap U3 Hot Swap 2 5 External Bus Powered USB 3 0 Enclosure User Manual...

Page 2: ...is for informational purposes only It is possible the content of this manual may contain technical inaccuracies typographical or other errors FirmTek assumes no liability for any errors omissions or f...

Page 3: ...3 8 Drive Installation 9 Power Operation 10 III Hot Swapping Hard Drives 11 General Hot Swap Guidelines 11 IV Sleeping Wake Up Procedures 12 V Troubleshooting 13 VI Product Support 14 VII Product Warr...

Page 4: ...2 than USB 2 0 USB 3 0 utilizes single unidirectional data paths for increased bandwidth up to 10x faster than USB 2 0 For faster data performance the miniSwap U3 implements USB Attached SCSI Protocol...

Page 5: ...capacity Bus Powered with Power and Activity LED Aluminum case for maximum durability and heat dissipation Ultra quiet fan free aluminum heat dissipation cooling system High performance to handle mult...

Page 6: ...D Must support 5V operation Supports 7mm 9 5mm 12 5mm 14 9mm drive heights Any capacity Data Transfer Rates Up to 5 Gbit second burst data Advanced Data Features Fully compliant with SATA 1 5 3 and 6...

Page 7: ...d on the 2012 Apple MacBook Pro 2012 MacBook Air 2012 Mac mini 2012 iMac and Windows PC notebooks and desktops 2 5 SATA 1 5G 3G 6G hard drive or SSD any capacity Bus power support for most 5v energy e...

Page 8: ...power supply case or a port access cover to discharge any built up static electricity from your body Make sure to handle the hard drives around the edges to avoid damage by static electricity Getting...

Page 9: ...n the correct position to avoid damage DO NOT insert a PATA device into the miniSwap as this will cause damage not covered by warranty Carefully press the miniSwap door closed The bay is now ready to...

Page 10: ...U3 Use of excessive force may damage the computer or the miniSwap U3 and is not covered by warranty service Power Operation Once the USB cable is connected and the computer is running the power LED wi...

Page 11: ...l hard drive before removing it Do not remove a disk that is being used as the Startup Disk Connecting External Hard Drive s If your computer is not turned on connect the USB cable and then power on t...

Page 12: ...red in cache memory To reconnect the external hard drive reconnect it and Windows will automatically detect it If you are re attaching a hard drive after the remove disable operation as explained abov...

Page 13: ...was able to successfully mount two miniSwap U3 enclosures at the same time with 2 5 SATA HDDs installed while only using Bus power on the 2012 MacBook Pro If you have several additional USB devices co...

Page 14: ...r the product is to be repaired or replaced with refurbished parts or with a new or refurbished product Data Recovery is not covered under this warranty and is not part of the warranty returns process...

Page 15: ...accordance with the instruction manual may cause harmful interference to radio communications However there is no guarantee that interference will not occur in a particular installation However if thi...

Reviews: