background image


- 9 - 


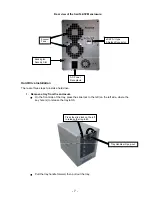
Insert the drive tray into the enclosure


There are five sets of tray rails inside the SeriTek/5PM enclosure, on the left and right 
sides of each of the five slots: 1 (top), 2 (second from the top), 3 (third from the top), 4 
(four from top slot), and 5 (bottom slot). 


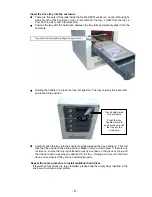
Position the tray with the hard drive between the tray rails and carefully slide it into the 
enclosure: 


Holding the handle out, press the tray into position.  The tray is ready to be secured 
and locked into position: 


Carefully push the tray into the enclosure while pressing the tray handle in.  This will 
lock the tray and hard drive into position.  

Note:


This is a critical step.  If there is any 

resistance, ensure the tray is positioned properly as shown in the previous step, and 
that the hard drive was properly attached to the tray.  Damage can occur to the hard 
drive and enclosure if they are not installed properly. 


 Repeat the same procedure to install additional hard drives 

If fewer than four drives are to be installed, please keep the empty trays inserted in the 
enclosure to ensure proper airflow.  


Tray handle mated 

with enclosure 


Press the tray 

handle toward to 

enclosure and


 push 

the tray into the 

enclosure


Summary of Contents for Seritek /5PM

Page 1: ...Store and Share your Digital Creations SeriTek 5PM Five Bay Hot Swap Port Multiplier External Serial ATA Enclosure User Manual...

Page 2: ...ta or profits Before installing SeriTek 5PM or any other hardware or software you are responsible for backing up data contained on any storage devices After hardware or software installation you are r...

Page 3: ...Drive Installation 7 Front Panel Status LEDs 11 III Hot Swapping Hard Drives 12 Introduction 12 General Hot Swap Guidelines 12 IV Sleeping Wake UP Procedures 13 V Troubleshooting 13 VI Product Suppor...

Page 4: ...ta cable The SeriTek 5PM also provides versatile hot swap capabilities with virtually unlimited storage possibilities in a small form factor package Built from the ground up as a true Serial ATA solut...

Page 5: ...ing screws Four clear rubber feet Pre installed One external shielded Serial ATA data cables eSATA 1 meter each One power cord One CD ROM containing the SeriTek 5PM User s Manual Part number SATA 5PM...

Page 6: ...ove hard drives Easy to transport Compact portable sturdy SeriTek 5PM Applications Graphic arts Digital photography Computer animation High performance workstations File sharing over high speed networ...

Page 7: ...y RAID capable Compatible with most operating system and host adapter based RAID solutions RAID arrays can span across multiple enclosures Multiple volume RAID 0 OR AND RAID 1 can be configured Warran...

Page 8: ...h port multiplier support Such as SeriTek 2SE4 SeriTek 2ME4 E SeriTek 2SE2 E SeriTek 2SM2 E with shielded eSATA I type receptacle 3 5 SATA I or SATA II hard drive any capacity up to 10 000RPM RAID or...

Page 9: ...ccess cover to discharge any built up static electricity from your body Make sure to handle your hard drives around the edges to avoid damage by static electricity Introduction This section describes...

Page 10: ...the front side of the tray press the slide lock to the left on the left side where the key hole is to release the tray latch Pull the tray handle forward then pull out the tray Exhaust Fans Kensington...

Page 11: ...ng drives to tray sleds be sure that all screws are tightened completely and that the screw heads are flush with or below the plane of the drive sled Protruding screw heads can interfere with or even...

Page 12: ...the tray into the enclosure while pressing the tray handle in This will lock the tray and hard drive into position Note This is a critical step If there is any resistance ensure the tray is positione...
Page 13: ...Cable Connectors Shipped with the SeriTek 5PM both ends of the cable have eSATA I type connectors Making the SATA Connections Caution Be sure to connect the cable using the proper orientation to your...

Page 14: ...your SeriTek 5PM fails or spins slowly the FAN status light will turn Red and the Beeper Alarm will stay on continuously FirmTek recommends if a fan fails replace it as soon as possible At this time...

Page 15: ...port the RAID volume or data loss may occur An example is a RAID volume that spans hard drives located within the computer chassis and the SeriTek 5PM external enclosure Do not remove a hard drive tha...

Page 16: ...and reinserting the hard drive into the SeriTek 5PM external enclosure will effectively power cycle the drive If several drives were removed disabled then the external enclosure itself may be power cy...

Page 17: ...nes the product needs to be repaired or replaced a Return Merchandise Authorization RMA number and shipping address will be provided Please pack the product in the original shipping container and incl...

Page 18: ...nerates uses and can radiate radio frequency energy and if not installed and used in accordance with the instruction manual may cause harmful interference to radio communications However there is no g...

Reviews: