C
B
A
11
1b
C
B
A
C
B
A
C
B
A
6
Assembly Instructions
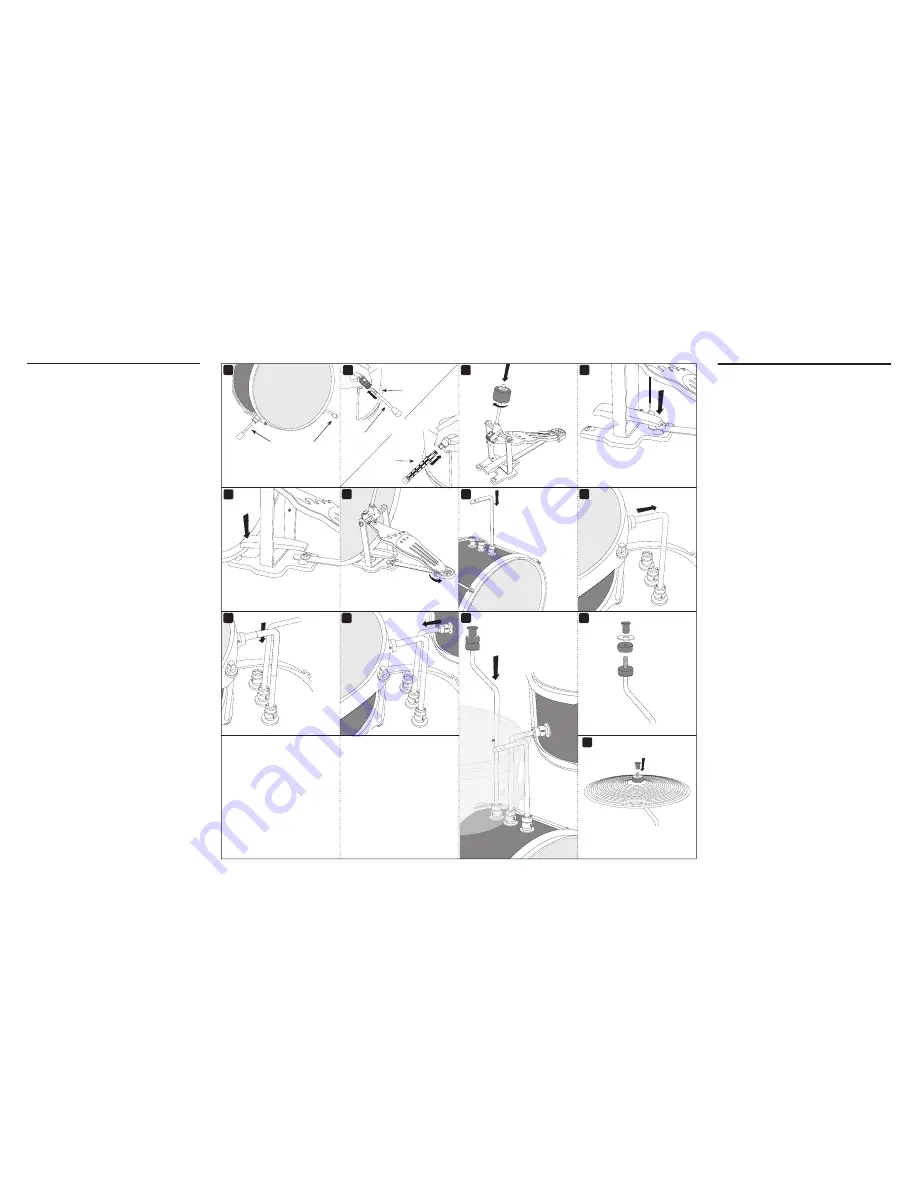
Bass Drum and Pedal
1. Insert the two bass drum spurs into the push mounts
on the bottom of the bass drum.
For all push mounts, follow these steps:
PUSH mount collar in, in direction of white arrow (1b).
INSERT spur.
RELEASE collar.
Place the bass drum upright with the spurs facing out.
2. Attach the felt beater to the bass drum pedal by screwing
felt beater into hole as shown.
3. To attach the bass drum pedal to the back (player’s
side) of the bass drum, open the clip.
4. Slide clip onto bottom rim and release.
5. Check to be sure that the “heel” of the foot pedal is
not curled under the pedal, but is extended and flat
on the floor.
Mount the Snare and Tom Drums
6. Insert the longer end of an L mounting arm into the
snare push mount (A) on top of the bass drum. Be sure
arm is pointing left.
7. Attach the snare drum by inserting the shorter end of
the L mounting arm into the push mount on the snare.
8. Insert the longer end of the other L mounting arm into
the center tom push mount (B) on top of the bass
drum with the arm pointing right.
9. Attach the tom drum by inserting the shorter end of
the L mounting arm into the push mount on the tom.
Mount the Cymbal
10. Insert the cymbal arm into the cymbal push mount (C)
on top of the bass drum with the arm pointing forward.
11. Remove the cap, washer, and top felt from the cymbal
arm. Place the cymbal on the bottom felt with the First
Act logo facing up. Place the washer and top felt on
the cymbal.
12. Attach the press-fit cap to hold the cymbal in place.
Directives D'Assemblage
Grosse Caisse et Pédale
1. Insérez les deux éperons de la grosse caisse dans les
fixations à pression dans le bas de la grosse caisse.
Procédez comme suit avec toutes les fixationsà
pression :
ENFONCEZ le collier (1b).
INSÉREZ l'ergot.
RELÂCHEZ le collier.
Mettez la grosse caisse à l'endroit, les éperons vers le
plancher.
2. Fixez la mailloche en feutre à la pédale de la grosse
caisse en vissant la mailloche dans l'orifice, comme in-
diqué.
3. Ouvrez la pince pour fixer la pédale de la grosse caisse
au dos (côté du batteur) de la grosse caisse.
4. Faites glisser la pince sur la plaque inférieure et
relâchez-la.
5. Assurez-vous que le « talon » de la pédale ne se replie
pas sous la pédale mais s'allonge à plat sur le plancher.
Montage de la caisse claire et du tom-tom
6. Insérez la tige longue du bras en L dans la fixation à
pression (A) de la caisse claire, sur la grosse caisse.
Voyez à ce que le bras pointe vers la gauche.
7. Montez la caisse claire en insérant la tige courte du
bras en L dans la fixation à pression de la caisse claire.
8. Insérez la tige longue de l'autre bras en L dans la fixa-
tion à pression centrale (B) du tom-tom, sur la grosse
caisse, le bras pointant vers la droite.
9. Montez le tom-tom en insérant la tige courte du bras
en L dans la fixation à pression du tom-tom.
Montage de la cymbale
10. Insérez la tige de la cymbale dans la fixation à pression
(C) sur le dessus de la grosse caisse, la tige pointant
vers l'avant.
11. Enlevez le capuchon, la rondelle et le feutre supérieur
de la tige de cymbale. Placez la cymbale sur le feutre
inférieur, le logo First Act vers le haut. Remettez le feu-
tre supérieur et la rondelle sur la cymbale.
12. Posez le capuchon à pression afin de tenir la cymbale
5
7
8
C
10
1
2
3
4
9
12
front/audience side
devant/côté auditoire
back/player's side
dos/côté batteur
Bass Drum Spurs
Éperons de grosse caisse
Spur A
Éperon A
Collar
Collier
Spur B
Éperon B
OR/
OU


