background image

Home and Office Security Safes

7

6

Additional Features: Bolt-Down Kit

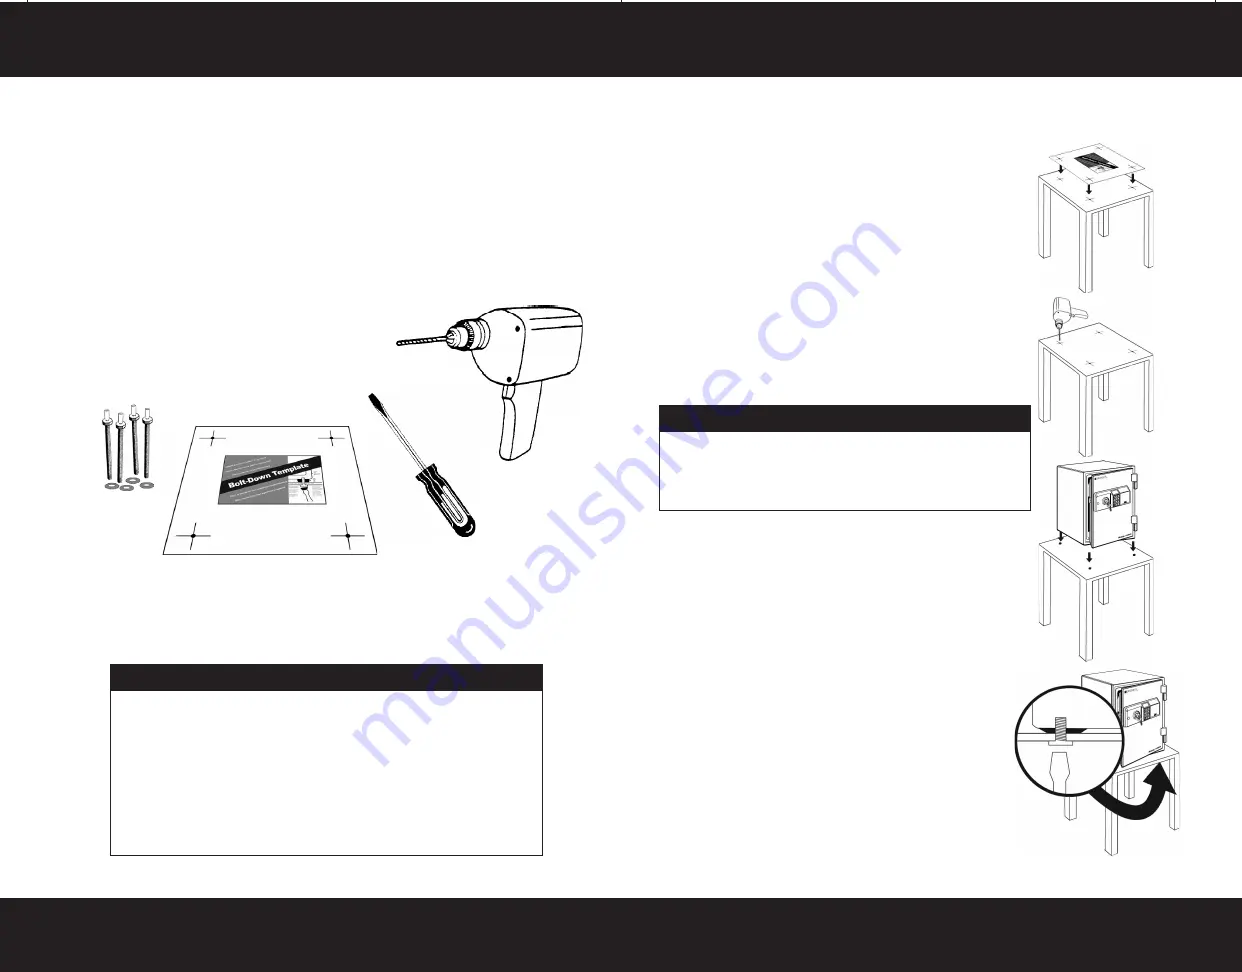
Installation Procedure

1. Choose a mounting location that is easily 

accessible from both above and below. 

2. Carefully position the template on the 

location that you want to mount the safe. 

3. Create the guide marks by pressing a sharp 

tool through the circles at the four corners of 

the template and into the mounting location. 

4. Drill a hole (the diameter of the break-off bolt 

shaft) through each guide mark. 

5. Before attaching the safe, you should check 

carefully that the 4 holes you have drilled 

match up precisely with the holes that have 

been pre-drilled in the bottom of the safe.        

Note: 

On certain models, It may be necessary 

to remove the rubber foot pads that are 

screwed into the bolt-down holes at the 

factory.

6. Once you have confirmed that the holes 

are aligned and in the location you desire, 

install the break-off bolts and washers from 

underneath the mounting location (through 

the furniture or shelf), and into the pre-drilled 

holes in the safe. 

7. Turn bolts until the screw heads break off. 

Model 2054DF (only) 

Important: DON’T DRILL SAFE

Do not drill into the feet, bottom or any other 

part of safe!  Doing so will 

ELIMINATE THE FIRE 

PROTECTION

 that has been designed into your 

safe and invalidate all stated warranties.

Installing Your Safe


Certain models include a Bolt-Down kit with break-off bolts and a mounting 

template for permanent mounting to a flat surface. Once the safe is installed 

using the break-off bolts, it is permanent and cannot be easily removed. 

Tools Required


4  Break-off Bolts (Supplied)


4  Washers(Supplied)


1  Mounting Template (Supplied)


1  Drill


1  Screwdriver

Additional Features: Bolt-Down Kit

Model 2054DF (only)

Important: SECURING TO FLOOR 

Many consumers prefer to bolt their safe to the floor to 

increase protection from theft and resistance to tipping. 

If your safe was manufactured with bolt down holes pre-

drilled in the floor of the safe, bolting your safe to the 

floor may provide additional theft deterrence. 
If you have 

ANY QUESTIONS 

about how to accomplish 

this, or are uncomfortable using the tools necessary 

to complete this project, please check with your local 

retailer, home center, or independent contractor.

Summary of Contents for 2054DF

Page 1: ...ase is required to obtain warranty performance BRK dealers service centers or retail stores selling this product do not have the right to alter modify or in any way change the terms and conditions of this warranty This warranty does not apply to the finish on the product This warranty does not cover normal wear and tear of parts or damage resulting from any of the following negligent use or misuse...

Page 2: ...g Preparation Step 1 Installing Batteries Step 2 Opening Safe with Override Key Programming a Passcode LCD Display Menu Step 3 Programming a Passcode Opening Closing Digital Safe Open Safe with Passcode Key Close Safe Open Safe with Override Key Additional Features Shelves Additional Features Bolt Down Kit Consumer Affairs Use Care and Maintenance Page 1 Page 2 Page 3 Page 4 Page 5 Page 6 Page 8 P...

Page 3: ...refully check the list to confirm all items have been received If any item is missing then please contact Consumer Affairs 1 800 223 8566 1 Home and Office Security Safes Notes 12 Package Contents All Models 1 First Alert Firesafe 1 Operation Installation Guide 2 Companion Entry Keys Models 2054DF only 1 Bolt Down Kit Including 1 Mounting Template 4 Break off Bolts 4 Washers 1 Removable Shelf Mode...

Page 4: ...ding on use we recommend replacing the batteries at least once a year 1 Locate battery compartment to the right of the digital keypad 2 To open the compartment press firmly in on the battery cover and slide it to the right for removal 3 Install 4 new AA batteries in the battery compartment Make sure they are installed in the correct direction as marked on the inside of the battery compartment 4 On...

Page 5: ... to wash your hands before using the safe Clean Safe To clean the outside surface of your safe it is recommended that you use a mild cleaner e g window cleaner to avoid scratching or discoloring the surface Do not use abrasive cleansers Moisture If the safe is stored in an area of high moisture content such as near the ocean or in a tropical climate moisture from the environment may become trapped...

Page 6: ...Keys If a key becomes misplaced or you would like additional keys you may conveniently purchase them from our Consumer Affairs Department You must supply the following information to assure accurate processing Name Address Telephone Safe Model Number Serial Number Key Number located on the key and on the Emergency Override Key lock Number of keys requested E mail address if available In the USA re...

Page 7: ... then they should be attached to the inside back cover of the Operation and Installation Guide Store in a safe and secure place for future reference Consumer Affairs Additional Features Removable Shelves Shelves Removable Shelf Model 2054DF only To remove the shelf simply lift it up and tilt it on a sufficient angle to provide clearance for removal Adjustable Removable Shelves Models 2084DF 2118DF...

Page 8: ...holes in the safe 7 Turn bolts until the screw heads break off Model 2054DF only Important DON T DRILL SAFE Do not drill into the feet bottom or any other part of safe Doing so will ELIMINATE THE FIRE PROTECTION that has been designed into your safe and invalidate all stated warranties Installing Your Safe Certain models include a Bolt Down kit with break off bolts and a mounting template for perm...

Page 9: ...holes in the safe 7 Turn bolts until the screw heads break off Model 2054DF only Important DON T DRILL SAFE Do not drill into the feet bottom or any other part of safe Doing so will ELIMINATE THE FIRE PROTECTION that has been designed into your safe and invalidate all stated warranties Installing Your Safe Certain models include a Bolt Down kit with break off bolts and a mounting template for perm...

Page 10: ... then they should be attached to the inside back cover of the Operation and Installation Guide Store in a safe and secure place for future reference Consumer Affairs Additional Features Removable Shelves Shelves Removable Shelf Model 2054DF only To remove the shelf simply lift it up and tilt it on a sufficient angle to provide clearance for removal Adjustable Removable Shelves Models 2084DF 2118DF...

Page 11: ...Keys If a key becomes misplaced or you would like additional keys you may conveniently purchase them from our Consumer Affairs Department You must supply the following information to assure accurate processing Name Address Telephone Safe Model Number Serial Number Key Number located on the key and on the Emergency Override Key lock Number of keys requested E mail address if available In the USA re...

Page 12: ... simple precautions Clean Hands Do not attempt to operate combination dial if your hands have excessive dirt debris or liquids on them Under normal circumstances it is not necessary to wash your hands before using the safe Clean Safe To clean the outside surface of your safe it is recommended that you use a mild cleaner e g window cleaner to avoid scratching or discoloring the surface Do not use a...

Page 13: ...ding on use we recommend replacing the batteries at least once a year 1 Locate battery compartment to the right of the digital keypad 2 To open the compartment press firmly in on the battery cover and slide it to the right for removal 3 Install 4 new AA batteries in the battery compartment Make sure they are installed in the correct direction as marked on the inside of the battery compartment 4 On...

Page 14: ...refully check the list to confirm all items have been received If any item is missing then please contact Consumer Affairs 1 800 223 8566 1 Home and Office Security Safes Notes 12 Package Contents All Models 1 First Alert Firesafe 1 Operation Installation Guide 2 Companion Entry Keys Models 2054DF only 1 Bolt Down Kit Including 1 Mounting Template 4 Break off Bolts 4 Washers 1 Removable Shelf Mode...

Page 15: ...g Preparation Step 1 Installing Batteries Step 2 Opening Safe with Override Key Programming a Passcode LCD Display Menu Step 3 Programming a Passcode Opening Closing Digital Safe Open Safe with Passcode Key Close Safe Open Safe with Override Key Additional Features Shelves Additional Features Bolt Down Kit Consumer Affairs Use Care and Maintenance Page 1 Page 2 Page 3 Page 4 Page 5 Page 6 Page 8 P...

Page 16: ...ase is required to obtain warranty performance BRK dealers service centers or retail stores selling this product do not have the right to alter modify or in any way change the terms and conditions of this warranty This warranty does not apply to the finish on the product This warranty does not cover normal wear and tear of parts or damage resulting from any of the following negligent use or misuse...

Reviews: