background image

Page  11

REMOTE VIEWING

SMARTPHONE APPS

1.  Follow steps 1-3 in "Initial 

Camera Installation" 

instructions.

2.  Make sure your mobile 

device is connected to your 

Local Area Network (WIFI).

3.  Download the First Alert HD 

IP Camera Viewer from the 

appropriate App Store.

4.  Open First Alert HD IP 

Camera Viewer App on 

mobile device.

5.  Select the Local tab from  

the bottom of the App.

6.  Select the camera in the 

camera list to view.

7.  Select back.

1. 

Repeat steps 1-4 

2. 

Select Remote tab.

3. 

Create an account by selecting  


"Create Account" or if you already  


created an account move onto the  


next step.

4. 

Enter your username and    


password and select login.

5. 

Select "Options" from the top right  


of the App.

6. 

Select "Add Camera".

7. 

Select "Scan QR code" (QR code  


is on the bottom of the camera)  


or Enter the device information for  


the camera. 

(Device information is  


on a label on the bottom of the  


camera. DO NOT LOSE THIS  

 INFORMATION.)

8. 

Click done on the top righ corner.

9.  Click "OK" on the add camera  

 success.

10.  Select the camera in the camera  


list to view.

1.  Next to Exxxx ID number in App, select the (iPhone) or   

 (Android) button.

2.  Select wireless Setting (iPhone) or use WIFI (Android).

3.  Toggle WIFI to ON.

4.  Select SSID (iPhone) or click search (Android).

5.  Select Password and enter your Wireless Network Password


a. Toggle show password to confirm the password was  


    entered correctly.


b. DHCP should be enabled.

6.  Select Done (iPhone) or OK (Android).

7.  Unplug the Camera Ethernet Cable from the 


router and the camera.

8.  Please allow 2 minutes for the camera to reboot.

9.   Select  Back.

10.   Click the refresh button at the top right. The    


 camera will show up in the task pane when it    


 is finished rebooting.

11.  Select camera to view.

LAN viewing on a shared network 

(From iPhone/iPad/Android)

(iPhone/iPad/Android must be connected to the same local network as the Camera)

Remote viewing of DWIP-720 

(From iPhone/iPad/Android)

Wireless Connectivity 

(From iPhone/iPad/Android)

Remote Viewing (continued)

Email Alerts

The system can notify you when it detects motion from any camera by 

sending you an email alert. The email alert contains information such   

as the time that motion was detected and by which camera. In order   

to enable the Email Alert function, you must enter both incoming and

outgoing email addresses.

We strongly recommend you use Gmail to set up as the outgoing  

email server.

The outgoing mail server (SMTP server) is responsible for sending out 

the email notification to tell users when the system detects motion from 

any camera (Motion Detection must be activated). The incoming mail 

server (Email To) receives the email notification sent from the SMTP 

server. The user must be able to receive email on a Windows PC or on 

mobile devices (such as an iPhone, iPad, or Android smartphone or 

tablet) to receive e-mail alerts from the system. When you receive an 

email alert, you can view live video from your Windows PC, an iPhone, 

iPad, Android smartphone or Andriod tablet through apps. Apps are 

available through the iTunes App store or the Android Market.

XXXX@gmail.com

XXXX@gmail.com

smtp.gmail.com

465

XXXX@gmail.com

XXXXXXXX

Tip:

1. Pinch the image screen    

    to zoom.

2. Manually focus the 

    camera by rotating the    

    lens on the front of the

    camera.

Summary of Contents for DWIP-720

Page 1: ...USER S MANUAL Model DWIP 720 IP CAMERA ...

Page 2: ...d However because of our ongoing effort to constantly improve our products additional features and functions may have been added since that time and on screen displays may change We encourage you to visit our website at www firstalert com to check for the latest manuals English and Spanish firmware updates downloads other security camera products and announcements You ll find this product line und...

Page 3: ...720 High Definition resolution 11 Infrared LEDs Night Vision range of 32 feet 47 degree field of view Built in microphone Audio output Alarm output Motion detection Video capture Supports 802 11 B G N WiFi protocol we recommend a 802 11 N AC wireless router for optimal performance Supports up to 32GB micro SDHC Operates from 23ºF to 131ºF Main Description Product Features ...

Page 4: ...Setup 7 4 Program Function 8 9 Menus 8 9 5 Remote Viewing 10 11 Setup 10 Smartphone Apps 11 6 Program Functions 12 Motion Recording 12 Alarms 13 7 Program Settings 14 21 System Video 14 Network Alarms 15 Camera Properties 16 Devices Settings 17 Playback 18 Playback 19 Device Log 20 Help Notifications 21 8 Appendix 22 23 Troubleshooting 22 Warranty 23 ...

Page 5: ... First Alert BRK Brands Inc could void the user s authority to operate the equipment We First Alert BRK Brands Inc declare under our sole responsibility that the device to which this declaration relates Complies with Part 15 of the FCC Rules Operation is subject to the following two conditions 1 this device may not cause harmful interference and 2 this device must accept any interference received ...

Page 6: ...Page 6 PRODUCT OVERVIEW PACKAGE CONTENTS What s in the Box DWIP 720 IP Camera Installation Software RJ45 Ethernet Cable Quick Install Guide Power Supply Anchors and Screws Wall Mount and Brackets ...

Page 7: ...2 3 Setting up the Camera Connect Power and Network This IP Camera and its software are designed for Windows XP Vista and Windows 7 and Windows 8 1 Connect the IP Camera to your router via a standard RJ45 network cable and plug into the power supply Your computer should be connected to the network either by wifi or RJ45 cable Camera will need about 45 60 seconds for initial configuration Please wa...

Page 8: ...ck snapshot picture of the live video 19 Record Starts manual recording 20 Listen allows to listen with the 2 way audio feature 21 Talk Allows the user to talk into a pc connected microphone to the camera 22 Motion Detection Area Manual set of the area to be set for motion detection 23 Horizontal Pan ON OFF Camera will go into horizontal Pan Mode 24 Vertical Pan ON OFF Camera will go into vertical...

Page 9: ...ke a photo 7 Begin Record Start video audio recording 8 More Select to adjust camera settings 9 Close Close the Camera display 10 Motion Detection Area Adjust the area of view for motion detection 11 Full Screen Enlarge camera display to fill whole monitor screen 1 3 5 7 2 4 6 8 5 7 8 10 9 11 1 3 6 2 7 9 8 1 H264 MPEG4 Player Stream via H264 MPEG4 2 Sub stream Player Stream via sub stream protocol...

Page 10: ...you will now be able to log off the local internet on your PC and connect to another remote internet souce 23 Once connected to a different internet source than the Open the PC software select the WAN tab and log into your account You will see the added camera under WAN 6 Repeat steps 1 4 7 Right click on the Camera ID in the task pane 8 Select Set WIFI Connection 9 Check the start WIFI setting bo...

Page 11: ...utes for the camera to reboot 9 Select Back 10 Click the refresh button at the top right The camera will show up in the task pane when it is finished rebooting 11 Select camera to view LAN viewing on a shared network From iPhone iPad Android iPhone iPad Android must be connected to the same local network as the Camera Remote viewing of DWIP 720 From iPhone iPad Android Wireless Connectivity From i...

Page 12: ...k drag cursor in video screen dialogue box to make a motion detect area Click apply 10 Motion Detection is now enabled in the area specified 11 Click OK to exit dialogue 12 You can view the files by right clicking on the camera ID number in the left pane and select SD File Download Inserting the micro SD card into the T F slot of the camera Insert the card with the terminals facing upward Note The...

Page 13: ...xternal device such as a horn or LED or relay after an alarm is triggered To configure alarm outputs connect the external device to the out connections on the alarm block as required by the device Connect of ALARM to ALARM IN 2 of the DWIP 720 Connect of ALARM to ALARM IN 1 of the DWIP 720 Alarm Block Functionality Preset Positions must be configured for the Alarm Block features through the softwa...

Page 14: ... updates Language Set your preferred language here This will require the program to restart Folder Location for Videos and Snapshots Allows you to set a drive location to where you want your video s or Snapshot s to be stored PC captured files are quick picture snapshots Set the location to where you want the snapshots to be saved Record Settings Choose to record both audio and video or video only...

Page 15: ...Alarm Music Play sound file when alarm is activated Proxy Set the proxy type HTTP or SOCKS and enter the IP Port and username and password Connect Set the connection type default TCP or UDP and set the IP and Port Local Enter the UDP or TCP port for LAN connections Also set the UPNP settings Network Operator Set defaults for ISP based on geographical area Net Tab Local Alarm Alerts Tab Program Set...

Page 16: ... a smoother video picture but will require more data resources Image Settings Sharpness Set sharpness of camera feed Brightness Set brightness level of camera feed Saturation Set color saturatio level of camera feed Contrast Set contrast level of camera feed Exposure Set exporsure value of camera feed Video Settings Resolution set image size Frame Rate set frames per second Video Set video quality...

Page 17: ...ts Watch Permission Set user watch permissions Change Management Password Device ID Device ID number New Password Set new password Verify Verify password Change Watch Password Device ID Device ID number Set Access Password Verify Enter and Verify watch password Watch Permission Set user watch permissions Change Device Alias Set device ID to a custom name Micro SD card video config Configure the se...

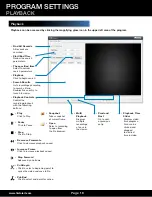
Page 18: ...ase Frame Click to increase playback speed Step Forward Advance by one frame Snapshot Takes snapshot of current frame Open Select a recording to open from the file browser Cut Begin Click to select a beginning point to splice the video and save to file Cut End Click to select end point for splice PROGRAM SETTINGS PLAYBACK Playback Click to begin search Playback Time Slider Displays video time prog...

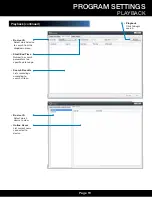
Page 19: ...ime Narrow the search parameters to a specific date range Search Results Lists recordings according to search criteria Online Users List current users connected to device Device ID Select which device to view PROGRAM SETTINGS PLAYBACK Playback continued Playback Click to begin search ...

Page 20: ...n Device Lists device ID of action Description Lists description of action PROGRAM SETTINGS DEVICE LOG Search Settings Checked boxes denote which log entries are displayed System System events User User events Video Video events Device Device events List List events Time Time events PTZ PTZ events Alarm Alarm events Parameter Parameter events Remarks Recordings according to search criteria Clear C...

Page 21: ...left menu Time Select which device to search User Narrow the search parameters Device Lists recordings according to search criteria Description Lists recordings according to search criteria PROGRAM SETTINGS HELP NOTIFICATIONS Help is launched by clicking on the question mark icon on the upper left menu ...

Page 22: ...by the system Micro SD card is loose or not properly connected Remove the Micro SD card and reinsert firmly Install Micro SD card There is no picture on selected channels camera picture is not being displayed Camera is not connected to network Try moving the camera to another network or use another cable Camera is not focusing Camera only has a manual focus Rotate focusing ring to adjust focus Tro...

Page 23: ...n the users system as a result of installing the software provided This warranty is in lieu of other warranties expressed or implied and BRK neither assumes nor authorizes any person to assume for it any other obligation or liability in connection with the sale or service of the product In no event shall BRK be liable for any special or consequential damages arising from the use of the product or ...

Page 24: ... 2014 BRK Brands Inc a Jarden Corporation Company NYSE JAH 3901 Liberty Street Road Aurora IL 60504 8122 Phone 630 851 7330 Tech Services 800 323 9005 www firstalert com M08 0463 000 ...

Reviews: