background image

8

BOLTING YOUR SAFE TO THE FLOOR

TROUBLE SHOOTING GUIDE

7

Locate the four (4) Concrete Bolts inside the safe.

Remove interior shelving and the four (4) Bolt Down Hole Caps.

Position the safe before marking the floor through the holes in the bottom 

of the safe.

Move the safe and drill holes in the floor where marked in step 3 with

 a 5/8 inch masonry bit.  

Reposition the safe over the holes and install the four (4) Concrete Bolts.

To prevent heat from entering the safe during a fire, fill the holes with a 

high temperature silicone caulk.

NOTE: Caulk is not included. Purchase from your local hardware store. 

Replace the four (4) Bolt Down Hole Caps and interior shelving. 


1

2

3

4

5

6

7

PROBLEM

SOLUTION

I lost the combination to 

my safe. What should I do?

How do I remove the pallet

from my safe?

How do I change the combination 

in my lock?

Please refer to Pg.5 CHANGING 

COMBINATION ON MANUAL LOCKS

Visit the FAQ section on

www.firstalert.com.

For your protection, the most important 

aspect of this process is for us to verify the 

true ownership of the safe. Please go to 

www.firstalert.com and click on the

COMBINATION/KEY REQUEST page and 

follow the instructions. Once completed, fax 

or email the forms to us for an processing.

Door Rattles When Shut

Verify that the handle is rotating

completely and that the locking bolts 

are fully extending. Refer to the 

DOOR ADJUSTERS section on Page 7. 

DOOR ADJUSTERS

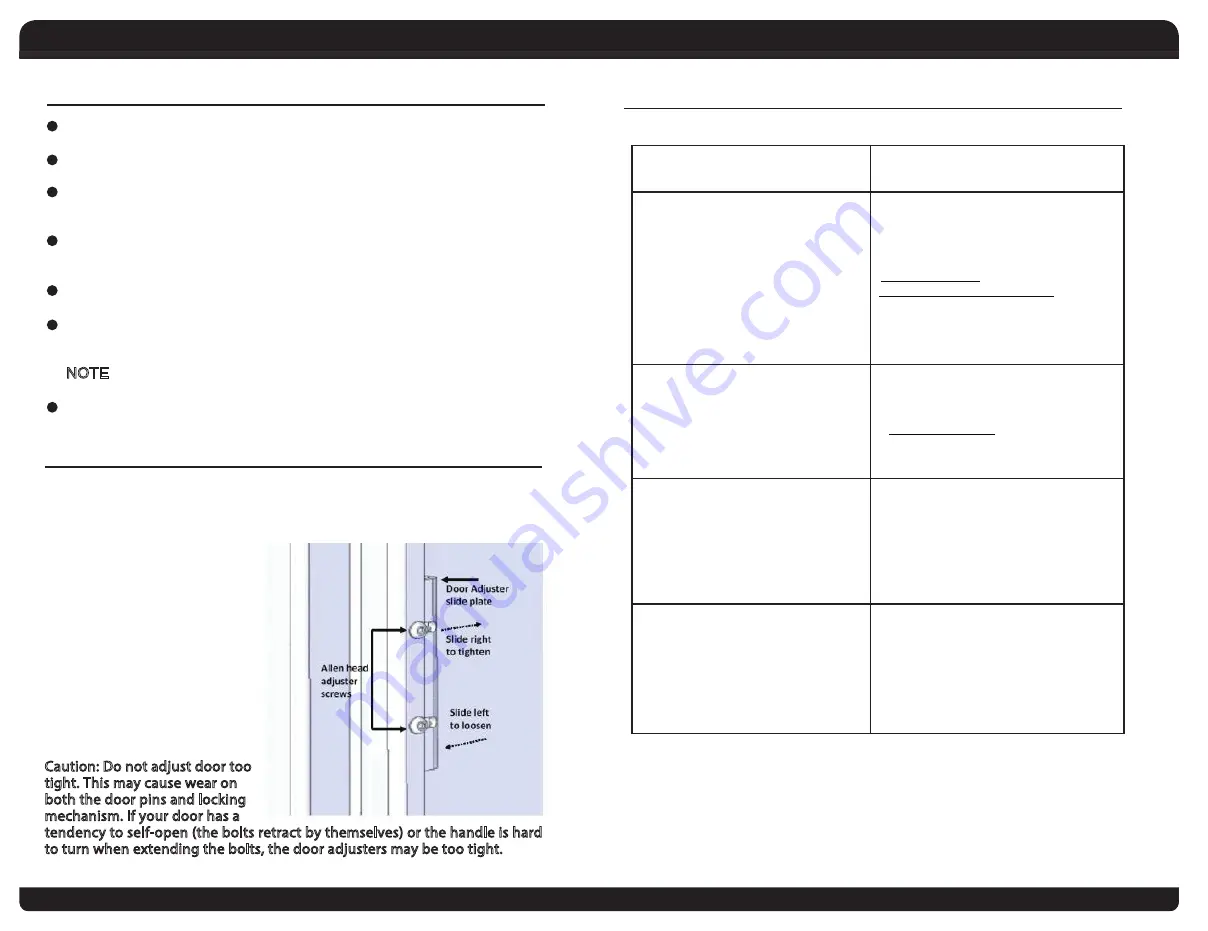
Most safe models have one or two adjusters for tightening or loosening 

the door. These adjusters are located just inside the left side of the safes 

doorjamb. After removing all packaging materials, close the door and extend 

the bolts. Pull out on the door handle to check the tightness. If there is play 

in the door, you will need to adjust 

the slide. Using the supplied door 

adjustment wrench, loosen the 

two (2) adjuster screws. Slide the 

adjuster left to loosen the door, 

right to tighten the door. Re-tighten 

screws and check door again for fit. 

When properly adjusted, you should 

feel slight resistance when turning 

the handle to extend the door bolts. 

Only slight movement should be 

felt with the door shut.

Caution: Do not adjust door too 

tight. This may cause wear on 

both the door pins and locking 

mechanism. If your door has a 

tendency to self-open (the bolts retract by themselves) or the handle is hard 

to turn when extending the bolts, the door adjusters may be too tight.  

Summary of Contents for LW-592117

Page 1: ...MANUAL M08 0480 005 MANUAL M08 0480 005 LW 592117 www FirstAlert com Operation Installation Guide ...

Page 2: ...ime Monday through Friday To assist us in serving you please have the model number and date of purchase available when calling OVERVIEW OF YOUR SAFE Congratulations Your new First Alert Gun Safe will provide secure protection for your firearms ammunition and documents All First Alert safes are designed and built using the highest manufacturing standards to ensure maximum user satisfaction under a ...

Page 3: ...nation with the door open If there are problems it is easier to service the lock or mechanism with the door open Before verifying your combination you will need to extend the door bolts while the door is open Keep the door open You can now verify your combination IMPORTANT DIAGRAM EXTERIOR 1 3 INTERIOR CONFIGURATION LOCKING BOLTS AND BOLT WORK MAY VARY ON SOME MODELS Top Shelf Safe Interior Walls ...

Page 4: ... combination by anyone other than a certified technician will void the lock portion of your warranty The lock requires accurate alignment with the index mark located at twelve o clock position on the dial ring Always turn the dial slowly and steadily when entering your combination to avoid dialing past your numbers Never spin the dial rapidly back and forth as this may cause damage to the lock If ...

Page 5: ...d click on the COMBINATION KEY REQUEST page and follow the instructions Once completed fax or email the forms to us for an processing Door Rattles When Shut Verify that the handle is rotating completely and that the locking bolts are fully extending Refer to the DOOR ADJUSTERS section on Page 7 DOOR ADJUSTERS Most safe models have one or two adjusters for tightening or loosening the door These adj...

Page 6: ...d aired out for at least 20 minutes every two weeks For future reference store this Operation and Installation Guide in a secure area away from the safe DO NOT DISCARD It is strongly recommended that you identify and record the following information will be needed to correct the problem It is recommended that the number tags remain in place on the safe If removal is necessary then they should be a...

Page 7: ...f you have any questions that cannot be answered by reading this manual call Consumer Affairs at 1 800 323 9005 Please have the model number serial number and date of purchase available when calling If service is required Consumer Affairs will advise where the product should be returned Combination ...

Page 8: ...han BRK or an authorized service center improper installation or exposure to extremes of heat or humidity Further the warranty does not cover Acts of God including natural disasters BRK shall not be liable for any incidental or consequential damages caused by the breach of any express or implied warranty BRK is also not responsible for costs associated with removing or installing the product openi...

Reviews: