background image

21

POSITIONING YOUR REFRIGERATOR

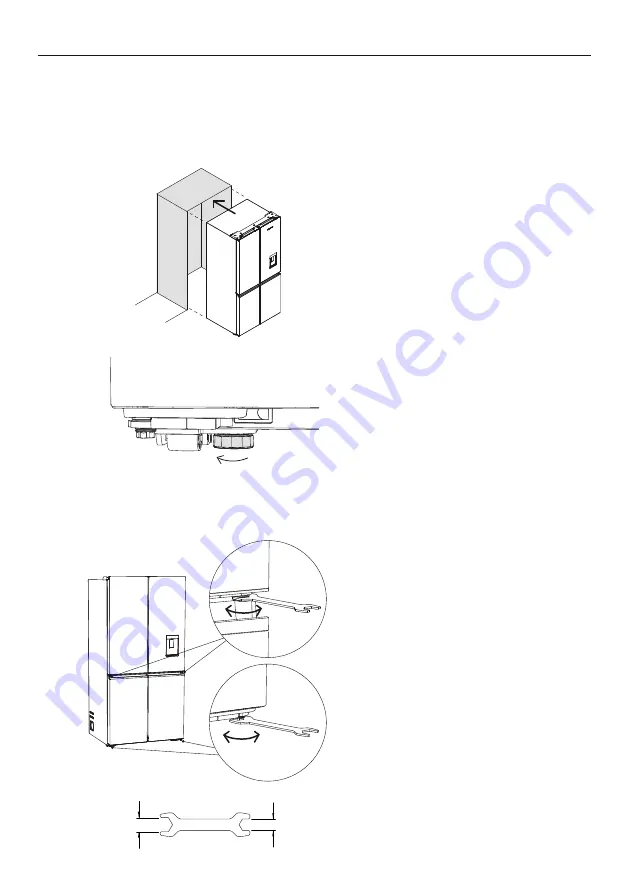
Your Fisher & Paykel ActiveSmart™ refrigerator is fitted with front and rear rollers to allow 
you to easily move your refrigerator forward and backward. Avoid moving your refrigerator 
sideways to prevent damaging the rollers or the floor covering surface.

Your refrigerator will arrive with the front feet wound up to assist with moving the product 
into its final location.

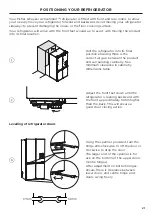
1

2

Roll the refrigerator into its final 
position ensuring there is the 
correct air gap between the product 
and surrounding cabinetry. See 
minimum clearance in cabinetry 
dimensions table.

Adjust the front feet down until the 
refrigerator is leaning backward with 
the front approximately 10mm higher 
than the back. This will ensure a 
good door closing action.

Levelling of refrigerator doors

3

Using the spanner provided, turn the 
hinge anti-clockwise to lift the door or 
clockwise to drop the door. 

The larger end of the spanner is for 
use on the bottom of the upper doors 
(centre hinges). 

After adjustment on bottom hinges, 
ensure there is clearance between 
lower doors and centre hinge and 
doors swing freely.

14mm

17mm

Summary of Contents for ACTIVESMART RF730QNUVB1

Page 1: ...INSTALLATION GUIDE NZ AU FREESTANDING QUAD DOOR REFRIGERATOR FREEZER CONTEMPORARY RF730QZUVB1 RF730QNUVX1 RF730QNUVB1 models ...

Page 2: ......

Page 3: ...rigerator 7 Unpacking and moving your appliance 8 Before installation 9 Supplied parts 10 Product dimensions 11 Cabinetry dimensions Proud 13 Cabinetry dimensions Flush 15 Electrical 17 Water connection 18 Water connection 19 Flushing the water filter 20 Positioning your refrigerator 21 Complete installation 23 Final checklist 24 ...

Page 4: ...ct your Fisher Paykel trained and supported service technician immediately to arrange for the appliance to be repaired z It is hazardous for anyone other than a Fisher Paykel trained and supported service technician to service this appliance z In Queensland the authorised service person must hold a gas work licence or authorisation for hydrocarbon refrigerants to carry out service or repairs which...

Page 5: ... that have become frayed or otherwise damaged Do not use a cord that shows cracks or abrasion along its length or at either the plug or appliance end z If the power supply cord is damaged it must only be replaced by your Fisher Paykel trained and supported service technician because special purpose tools are required z When moving your appliance away from the wall be careful not to roll over or da...

Page 6: ...system has been allowed to freeze replace filter cartridge Failure to replace the disposable filter at recommended intervals may lead to reduced filter performance and failure of the filter causing property damage from water leakage or flooding z When installing the product use new tubing supplied with the refrigerator DO NOT reuse any existing water connections z The water system is designed to o...

Page 7: ...7 ACTIVESMART REFRIGERATOR Quad Door Fridge Freezer 905mm 690L Ice Water Contemporary RF730QZUVB1 RF730QNUVX1 RF730QNUVB1 models ...

Page 8: ...ful when tilting the appliance forward backward Tape the door shut to prevent opening while moving the appliance 1 2 Tilt the appliance slightly forward and Insert the hand truck between the plastic base and appliance at the right hand side when viewed from the front Restrain the appliance with a strap 3 Tilt backward to load appliance onto hand truck and push to install location ...

Page 9: ... the information on the serial plate located at the front bottom right hand side of the refrigerator when the door is open z Ensure your appliance is properly grounded earthed z Connect the appliance to the electrical supply 220V 240V 50Hz with the fitted plug and lead z Connections to the mains supply should be in accordance with local regulations Ice Water models z Your Ice Water refrigerator mu...

Page 10: ...nstallation guide 1 USER INSTALLATION GUIDE NZ AU FREESTANDING QUAD DOOR REFRIGERATOR FREEZER CONTEMPORARY RF730QZUVB1 RF730QNUVX1 RF730QNUVB1 models MISCELLANEOUS ITEMS PACK WATER FILTER KIT Spanner 1 Water hose connectors 1 ...

Page 11: ...11 PRODUCT DIMENSIONS FRONT C b PROFILE D b E C h F A G Control cover Hinge cover Chassis PLAN ...

Page 12: ...verall depth of product excludes handle 748 D Depth with door open from rear of fridge 90 rotation 1142 E Depth with door open from flush with door 90 rotation 394 F Height to top of chassis 1867 G Height to top of hinge cover 1896 H Height to top of control cover 1899 Actual product dimensions may vary by 2 mm ...

Page 13: ...eight of cavity 1920 B Inside width z 90 rotation z full rotation 985 945 C Overall depth 690 Measurement includes a feet increase of 10mm For full drawer shelf access the doors need to be open past 90 To avoid damaging the product ensure doors do not contact the adjacent cabinetry wall B C a CUTOUT ...

Page 14: ...p of cupboard 50 B Side clearance z 90 rotation z full rotation 60 20 C Rear clearance 30 D Door clearance z 90 rotation z full rotation N A 350 For full drawer shelf access the doors need to be open past 90 To avoid damaging the product ensure doors do not contact the adjacent cabinetry wall CLEARANCES C a a b b D ...

Page 15: ...eight of cavity 1945 B Inside width z 90 rotation z full rotation 1075 1125 C Inside depth 778 Measurement includes a feet increase of 10mm For full drawer shelf access the doors need to be open past 90 To avoid damaging the product ensure doors do not contact the adjacent cabinetry wall b CUTOUT C a ...

Page 16: ...p of cupboard 50 B Side clearance z 90 rotation z full rotation 60 110 C Rear clearance 30 D Door clearance z 90 rotation z full rotation N A 260 For full drawer shelf access the doors need to be open past 90 To avoid damaging the product ensure doors do not contact the adjacent cabinetry wall CLEARANCES b b d c a a ...

Page 17: ...ction should be located in an adjacent cabinet to either side of the refrigerator or above the refrigerator cavity We recommend the use of an isolating switch that is easily accessible to the user after the refrigerator is installed ...

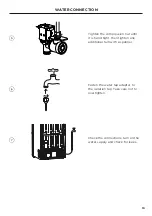
Page 18: ... the isolation tap for cold water connection tee and tap fitting not supplied 1 2 3 4 Remove cap from water inlet valve at the back of the refrigerator Connect one end of the water hose set to the water inlet valve Locate the water hose set to complete the water connection installation ...

Page 19: ...il it is hand tight then tighten one additional turn with a spanner Fasten the water tap adaptor to the isolation tap Take care not to overtighten 5 6 7 Check the connections turn on the water supply and check for leaks WATER CONNECTION ...

Page 20: ...erator has cooled for at least 2 hours before use 1 Press the water dispenser pad to dispense 4L of water Wait for four minutes before dispensing again 2 Dispense 4L of water and then wait for another four minutes There may be carbon residue dispensed together with water This is not harmful and is normal during the flushing process 3 Dispense another 4L of water This prevents excessive dripping of...

Page 21: ...ring there is the correct air gap between the product and surrounding cabinetry See minimum clearance in cabinetry dimensions table Adjust the front feet down until the refrigerator is leaning backward with the front approximately 10mm higher than the back This will ensure a good door closing action Levelling of refrigerator doors 3 Using the spanner provided turn the hinge anti clockwise to lift ...

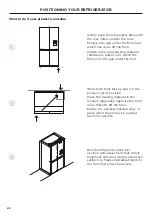
Page 22: ... 1 2 3 Wind both front feet up and roll the product out of position Place the packing material in the location diagonally opposite the front roller that lifts off the floor Ensure the packing material stays in place when the product is pushed back into position Roll the refrigerator back into position and adjust front feet Check alignment and door closing action are satifactory Make small adjustme...

Page 23: ...helves z Clean the inside of the appliance with a mix of warm water and a small amount of liquid detergent Use a soft cloth to remove dust collected during manufacture and transport z Allow the refrigerator and freezer to run empty for 2 3 hours to allow each compartment to cool to the appropriate temperature z The appliance may have an odour on its initial operation this will go when the refriger...

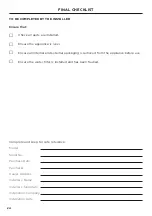
Page 24: ... level Ensure all internal and external packaging is removed from the appliance before use Ensure the water filter is installed and has been flushed Complete and keep for safe reference Model Serial No Purchase Date Purchaser Dealer Address Installer s Name Installer s Signature Installation Company Installation Date ...

Page 25: ...nge at any time The product specifications in this guide apply to the specific products and models described at the date of issue Under our policy of continuous product improvement these specifications may change at any time For current details about model and specification availability in your country please go to our website or contact your local Fisher Paykel dealer ...

Reviews: