background image

1

Safety and warnings


2

Installation instructions


3

Operating instructions


8

Cleaning and maintenance


9

Troubleshooting


10


Manufacturer’s warranty


11

Customer care


12

Contents

Important!

SAVE THESE INSTRUCTIONS 

The models shown in this user guide may not be available in all markets and are 
subject to change at any time. For current details about model and specification 
availability in your country, please go to our website listed on the back cover 
or contact your local Fisher & Paykel dealer.

4020_Wastedisposal_UG.indd   1

10/22/08   6:21:06 PM

Summary of Contents for GD75IA1

Page 1: ...Food waste disposer Installation instructions and user guide NZ GD75IA1 ...

Page 2: ......

Page 3: ... Manufacturer s warranty 11 Customer care 12 Contents Important SAVETHESEINSTRUCTIONS Themodelsshowninthisuserguidemaynotbeavailableinallmarketsandare subjecttochangeatanytime Forcurrentdetailsaboutmodelandspecification availabilityinyourcountry pleasegotoourwebsitelistedonthebackcover orcontactyourlocalFisher Paykeldealer ...

Page 4: ...r shells b Caustic drain cleaners or similar products c Glass china or plastic d Large whole bones e Metal such as bottle caps tin cans utensils or aluminium foil f Hot grease or other hot liquids g Whole corn husks or similar fibrous material When not operating the waste disposer leave the drain stopper in place to reduce the risk of objects falling into the disposer Your new appliance must be pr...

Page 5: ...ion Removing an existing waste disposer if installed 1 Disconnect electrical power supply to existing disposer 2 Remove old disposer or sink flange assembly 3 Inspect drain line If it is heavily coated with hardened grease and accumulations clear out the build up using a plumber s rod or auger 4 Remove old sealing materials and gaskets from sink opening both top and bottom What you will need Phill...

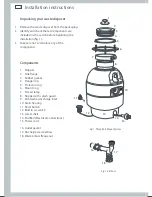
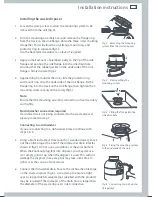
Page 6: ...d in the carton before beginning the installation fig 1 3 Take care not to misplace any of the components Components Stopper 1 Sink flange 2 Rubber gasket 3 Flange ring 4 Protector ring 5 Mount ring 6 Screw clamp 7 Hopper with splash guard 8 Dishwasher discharge inlet 9 Drain housing 10 Reset button 11 Built in air switch 12 Lower shell 13 End Bell Electrical Connections 14 Power cord 15 Outlet ga...

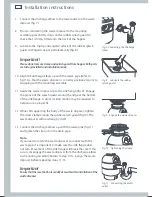
Page 7: ...nnection required If a dishwasher is not being connected to the waste disposer please proceed to step 7 Connecting to a dishwasher If you are connecting to a dishwasher please continue with steps 5 6 5 Using a blunt instrument steel punch or wooden dowel knock out the entire plug at the end of the dishwasher drain inlet as shown in fig 6 Do not use a screwdriver or sharp instrument When the knocko...

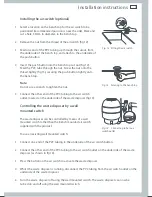
Page 8: ...he bottom of the sink flange A slight rocking motion may be required to help ensure a proper fit 12 While still supporting the body of the waste disposer tighten the screw clamp around the rubber splash guard fig 10 The waste disposer will now hang by itself 13 Connect the discharge elbow up with the waste pipe fig 11 and tighten the slip nut on the drain pipe Note If you need to rotate the waste ...

Page 9: ...he waste disposer fig 14 Controlling the waste disposer by a wall mounted switch The waste disposer can be controlled by means of a wall mounted switch rather than the bench mounted air switch supplied with the product Installation instructions Fig 12 Fitting the air switch Fig 13 Securing to the bench top Fig 14 Connecting tube to air switch outlet To use an existing wall mounted switch 1 Connect...

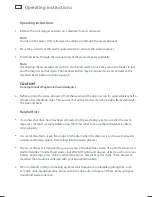
Page 10: ... food waste is thoroughly flushed through the trap and drain Helpful Hints If a dishwasher drain hose has been connected to the waste disposer be sure that the waste disposer s chamber is empty before using the dishwasher to ensure the dishwasher is able to drain properly It is recommended to leave the stopper in the drain when the disposer is not in use to prevent utensils and foreign objects fro...

Page 11: ...m turn the power back on turn on a medium flow of cold water and run the waste disposer for half a minute to ensure that all the food waste is thoroughly flushed through the trap and drain Note If the motor does not start when activated refer to the Overload Reset Button section below or the Troubleshooting guide on page 9 Overload Reset button The waste disposer is fitted with an overload control...

Page 12: ...n or non magnetic implement to remove the foreign object Waste disposer is jammed Foreign object may be lodged between the turntable and grinding ring Turn power supply and water tap off Rotate the turntable using a plastic wooden or non magnetic implement to dislodge the foreign object Unit is leaking at the top connections Improper seating of the sink flange Check that the sink flange is centred...

Page 13: ...ed by accident neglect misuse or Act of God D The cost of repairs carried out by non authorised repairers or the cost of correcting such unauthorised repairs E Normal recommended maintenance as set out in the Product s User Guide F Repairs when the appliance has been dismantled repaired or serviced by other than a Fisher Paykel AUTHORISED CUSTOMER SERVICE CENTRE or the selling dealer G Pick up and...

Page 14: ...rry out any service necessary on your appliance Your dealer or our Customer Care Centre can recommend an Authorised Service Centre in your area In Australia if you need assistance Call the Fisher Paykel Customer Care Centre and talk to one of our Customer Care Consultants Toll Free 13 00 650 590 Fax 07 3826 9298 Email customer care fp com au Postal Address PO Box 798 Cleveland QLD 4163 If you need...

Page 15: ...13 ...

Page 16: ...d at the date of issue Under our policy of continuous product improvement these specifications may change at any time You should therefore check with your Dealer to ensure this booklet correctly describes the product currently available www fisherpaykel co nz NZ Food waste disposer installation and user guide Published 09 2008 Part No 791634 ...

Reviews: