18
INSTALLATION INSTRUCTIONS
17 5/
8” (4
48m
m)
D
E
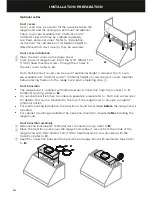
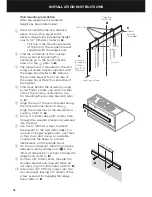
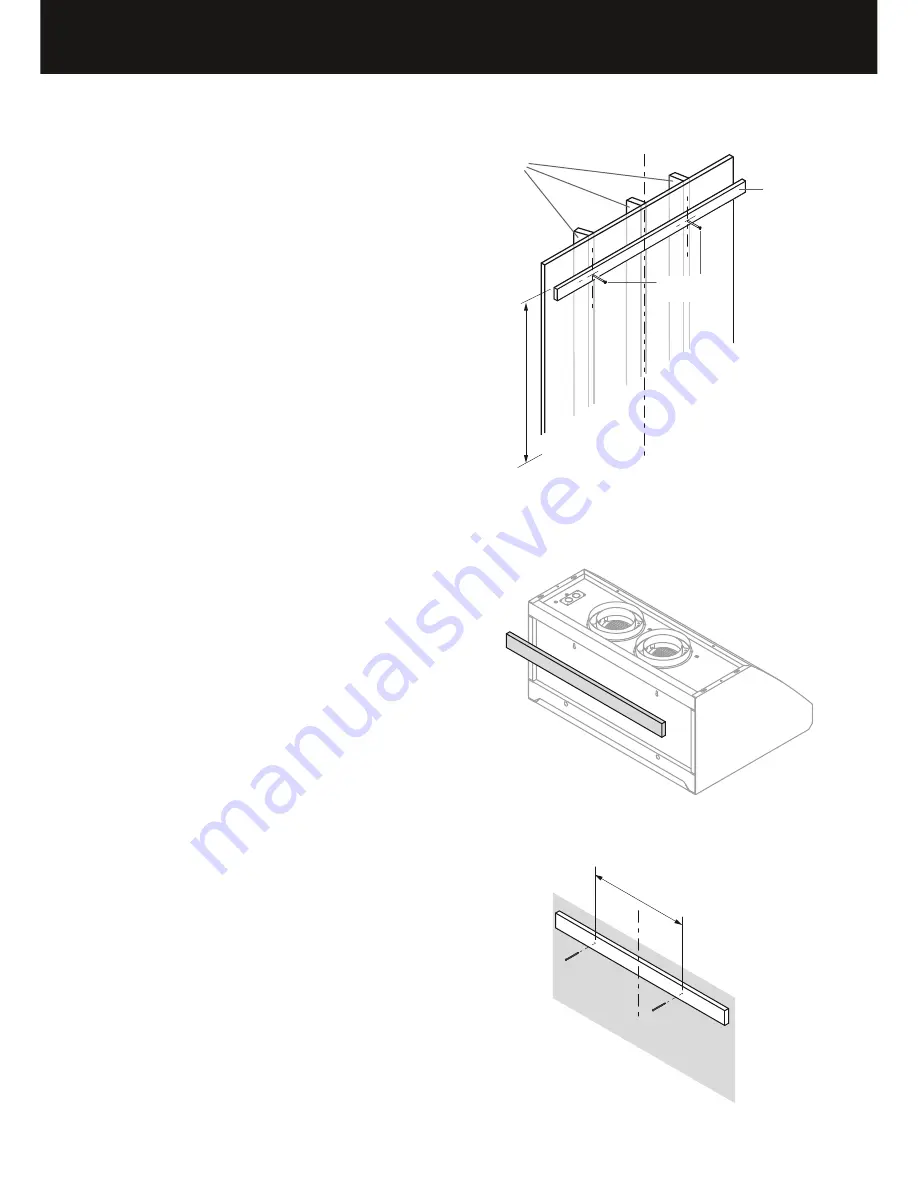
Wall mounting installation
After the range hood installation
height has been determined:
1
Draw a horizontal line at a distance
above the cooktop equal to the
desired range hood installation height
plus 15 1/2” (394mm) (refer to
A
).
– This line is the mounting location
of the top of the wooden bracket
supplied with the range hood.
2
Find the centerline of the cooktop.
Draw a vertical line along this
centerline up to the horizontal line
drawn in step
1
(refer to
B
).
3
The range hood is mounted to the wall
using a wooden bracket supplied with
the range hood (refer to
D
). Remove
the wooden bracket from the rear of
the range hood. Mark the centerline of
the bracket.
4
Find studs behind the drywall by using
a stud finder. Locate one stud on either
side of the cooktop centerline to use
for mounting the wooden bracket (refer
to
C
).
5
Align the top of the wood bracket along
the horizontal line drawn in step
1
.
Align the centerlines of the bracket and
cooktop (refer to
A
).
6
Drill a 3” (76mm) deep 1/8” (3mm) hole
through the wooden bracket, drywall and
into the stud.
7
Use the 3” (76mm) screws to attach
the bracket to the wall (refer to
A
). For
support of longer range hoods, use three
or four studs and screws as available.
Countersink the heads to prevent
interference with the range hood.
8
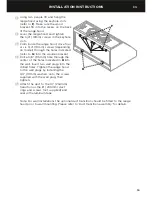
On the wood bracket, mark the distance
between wall mounting slots (
K
in the
‘Product dimensions’ section) to hang the
range hood (refer to
E
).
9
Drill two 1/8” (3mm) holes through the
wooden bracket and drywall (these do
not need to go into the studs) (refer to
E
).
!0
Screw two 3/4” (19mm) screws into the
wood bracket, leaving 1/4” (6mm) of the
screw exposed for hanging the range
hood (refer to
E
).
A
Cooktop
centerline
Cooking surface
Distance
to cooking
surface
plus 15 1/2”
(394mm)
Drywall
3” (76mm)
screws
Wood
bracket
(included)
B
Wall studs
C
Summary of Contents for HC36 Shell
Page 2: ...English Page 1 29 Français Page 31 59 ...
Page 4: ......
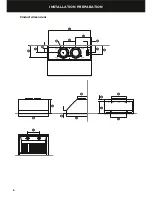
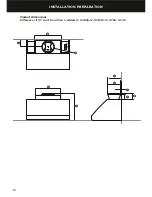
Page 10: ...8 INSTALLATION PREPARATION Product dimensions P O Q A B I C D S R K T E F M N G L J H ...
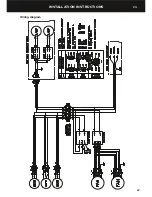
Page 25: ...23 INSTALLATION INSTRUCTIONS Wiring diagram EN ...
Page 32: ......
Page 34: ......
Page 55: ...53 Schéma de câblage INSTRUCTIONS D INSTALLATION FR ...
Page 62: ......
Page 63: ......


