background image

22

*If you call, write or contact our website please provide: your name and address, model 
number, serial number, date of purchase and a complete description of the problem. 
This information is needed in order to better respond to your request for assistance.

Product details can be found on the inside of the chassis. The filter needs to be 

removed to be able to see them.

Registration

Register your product with us so we can provide you with the best service possible.  
To register your product visit our website: 

www.fisherpaykel.com

CUSTOMER CARE

Complete and keep for safe reference:

Model 

Serial No. 

Purchase Date 

Purchaser 

Dealer 

Suburb 

Town  

Country


Summary of Contents for HP60IDCHX2

Page 1: ...Built In Integrated Rangehood HP60IDCHX2 HP90IDCHX2 HP60IDCHX3 and HP90IDCHX3 models NZ AU ROW INSTALLATION INSTRUCTIONS USER GUIDE ...

Page 2: ......

Page 3: ...he models shown in this user guide may not be available in all markets and are subject to change at any time For current details about model and specification availability in your country please go to our website www fisherpaykel com or contact your local Fisher Paykel dealer Registration Register your product with us so we can provide you with the best service possible To register your product vi...

Page 4: ......

Page 5: ...with you This use and care manual will answer most of your questions about the set up use and on going maintenance of your Fisher Paykel product however if you require further information about your product and its use please consult our website for solutions and further contact information to discuss with a service representative To ensure you receive all relevant product updates and the best ser...

Page 6: ...e must be installed onto a solid wall stud beam or truss Weight of the product is 8 2 kg HP60 11 5 kg HP90 WARNING Electric Shock Hazard Always disconnect the appliance from the mains power supply before carrying out any maintenance or repairs Alterations to the domestic wiring system must only be made by a qualified electrician Failure to follow this advice may result in electrical shock or death...

Page 7: ...des Attention should be given to ensure that any applicable regulations concerning the discharge of exhaust air are fulfilled Before connecting any pipes consult municipal ordinances to ensure that any applicable regulations concerning the discharge of exhaust air are adhered to and request permission from the person in charge of the building Exhaust air must not be discharged into an existing flu...

Page 8: ...f fire is even greater in the case of used oil Do not flambé under the rangehood Never use the rangehood without the filters in place During an electrostatic discharge ESD it is possible that the device will stop working By switching the device off and on the device will again work as intended CAUTION accessible parts may become hot when used with cooking appliances Remove all packaging including ...

Page 9: ...w 2 Installation instructions User guide manual 1 125 mm ducting adapter 1 Rangehood 1 Built In Integrated Rangehood HP60IDCHX2 HP90IDCHX2 HP60IHCB3 and HP90IHCB3 models NZ AU ROW INSTALLATION INSTRUCTIONS USER GUIDE 150 mm ducting adapter with non return flap 1 ...

Page 10: ...8 INSTALLATION INSTRUCTIONS J K H I G E B F C A D M N O A M N Power cord location Ducting adapter Ø L Product and cabinetry cutout dimensions HP60 HP90 ...

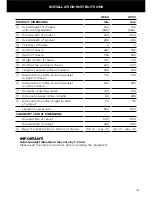
Page 11: ...60 335 J Distance from centre of ducting outlet to back of chassis 145 145 K Distance from centre of ducting outlet to side of chassis 245 395 L Diameter of ducting outlet 150 150 M Distance between centre of lights 80 285 N Distance from centre of light to back of product 70 115 Length of power cord 950 950 CABINETRY CUTOUT DIMENSIONS Overall width of cutout 500 800 Overall depth of cutout 260 26...

Page 12: ...ktop Gas cooktop min 600 max 750 min 650 max 750 Rangehood installation height above the cooktop is the user s preference Lower installation heights will improve the efficiency of capturing cooking odours grease and smoke This rangehood must be installed between the minimum and maximum dimensions indicated in the table above P ...

Page 13: ...tly For optimal efficiency use the shortest and straightest duct route possible and use rigid or semi rigid ducting for reduced noise and increased airflow Flexible metal ducting should only be used as a last resort ie in difficult installations and if used ensure that it is straight and smooth and extended as much as possible Recirculating Where ducting outside is not a practical option this rang...

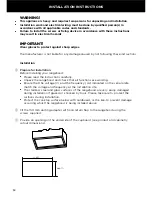
Page 14: ... Please read the instructions carefully Unpack the rangehood and check that all functions are working Ensure that the voltage V and the frequency Hz indicated on the serial plate match the voltage and frequency at the installation site The stainless steel and glass surfaces of the rangehood are very easily damaged during installation if grazed or knocked by tools Please take care to protect the su...

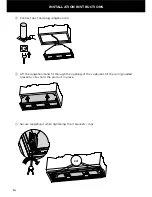
Page 15: ...13 INSTALLATION INSTRUCTIONS 4 Remove the filters and face plate of the rangehood 360 1 360 2 360 360 360 360 3 4 5 6 ...

Page 16: ...t duct and plug rangehood in 6 Lift the rangehood and fit through the opening of the cupboard till the spring loaded brackets clips hold the product in place 7 Secure rangehood while tightening the 4 brackets clips depth 2 3 2 2 2 1 x4 x4 ...

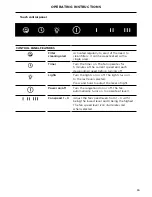
Page 17: ...s at the current speed and each descending speed before turning off Lights Turn the lights on or off The lights turn on to the last level selected Press and hold to adjust the level of light Power on off Turn the rangehood on or off The fan automatically turns on to operate at level 1 Fan speed 1 3 Adjust the fan speed levels from 1 3 with 1 being the lowest level and 3 being the highest The fan s...

Page 18: ...ase filters should be removed and cleaned with hot soapy water or in a dishwasher If washed in a dishwasher the filters should be placed in an upright position to prevent food from falling on them After rinsing and drying replace the filters Note some discolouration of the frames may occur Removing the aluminium filters 1 Open the glass panel 2 Pull the relative filter catch tilting it downwards u...

Page 19: ...ulb replacement Note replacement bulbs are not covered by warranty 1 Open the glass panel 2 Remove the aluminium filters 3 Unscrew the light bulb 4 Insert the replacement bulb into the lamp socket 5 Replace the aluminium filters 6 Replace the glass panel ...

Page 20: ...18 PARTS AND ACCESSORIES ITEM REFERENCE NUMBER LED bulb x2 792393 Aluminium filter 792429 Recirculation carbon filter x2 792481 Ducting 150 mm kit eaves PD RHK150E Ducting 150 mm kit wall PD RHK150W ...

Page 21: ...mal domestic use or 2 Use in accordance with the product s user guide C Defects to the product caused by accident neglect misuse or act of God D The cost of repairs carried out by non trained and supported service technicians or the cost of correcting such repairs E Normal recommended maintenance as set out in the product s user guide F Repairs when the appliance has been dismantled repaired or se...

Page 22: ...be excluded under the Australian Consumer Law You are entitled to a replacement or refund for a major failure and for compensation for any other reasonably foreseeable loss or damage You are also entitled to have the goods repaired or replaced if the goods fail to be of acceptable quality and the failure does not amount to a major failure Please keep this user guide in a safe place ...

Page 23: ...service technicians that can carry out any service necessary on your appliance Our Customer Care Centre can recommend a Fisher Paykel trained and supported service technician in your area In Australia if you need assistance Call the Fisher Paykel Customer Care Centre and talk to one of our Customer Care Consultants Toll free 1300 650 590 Fax 07 3826 9298 Website www fisherpaykel com Postal address...

Page 24: ... to your request for assistance Product details can be found on the inside of the chassis The filter needs to be removed to be able to see them Registration Register your product with us so we can provide you with the best service possible To register your product visit our website www fisherpaykel com CUSTOMER CARE Complete and keep for safe reference Model Serial No Purchase Date Purchaser Deale...

Page 25: ......

Page 26: ......

Page 27: ......

Page 28: ... in this booklet apply to the specific products and models described at the date of issue Under our policy of continuous product improvement these specifications may change at any time You should therefore check with your dealer to ensure this booklet correctly describes the product currently available NZ AU ROW ...

Reviews: