background image

4

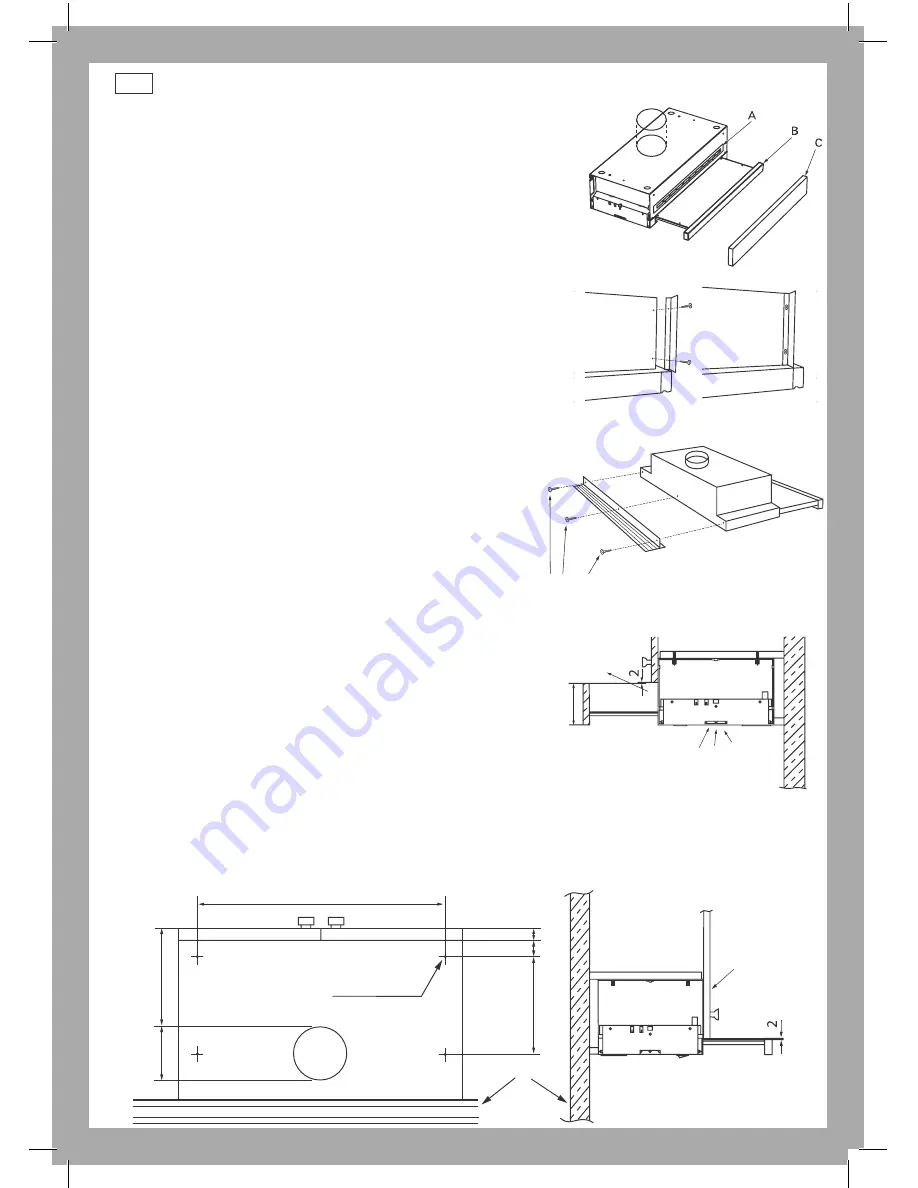
Preparing the rangehood for installation

Ensure the overhead cabinets are built according to Fig.7 (below).
Before drilling any holes, check that the area behind the surface 
to be drilled is clear of any electrical cables or pipes etc. 

Recirculated installation


If the rangehood is to be installed as a recirculated hood,  

first ensure the cabinets are built according to Fig.7 below:

1

  Do not remove the knockouts shown in Fig.4. These are 

removed for ducted options only. 

2

  Remove Cover Tape “A”. See Fig.4.


Note: for recirculation, please purchase a charcoal  

filter (refer to Accessories list on page 2).

3

  If a 70 mm handle is not installed (depending on model 

purchased), remove front handle “B” by undoing the 

3 screws on the fascia (see Fig. 4).

4

  Replace front handle “B” with the replacement handle “C”. 

See Fig.7 for height of handle.

Ducted installation

If the rangehood is to be installed as a ducted hood:

1

  Remove the appropriate knockout to suit top venting,  

as shown in Fig.4 

2

  Do not remove Cover Tape “A”. See Fig.4. This is  

removed for recirculating only. 

Mounting the rangehood

Warning!

Failure to install the screws or fixing device in accordance 

with these instructions may result in electrical hazards.

The rangehood can be mounted from the top.

Before commencement, unpack the rangehood and  

check that it functions correctly.

Mounting to underside of cupboard

Fix the rangehood to a shelf mounted at the right height in your wall units, by drilling 4 holes,  

6 mm in diameter, (see Fig.8) and fixing with the 4 screws supplied (found in the bag labelled 

“TOP FIXING”). When installing the rangehood the space between the product and the wall shall 
be covered with the adjustable lateral and rear spacer supplied (Fig.5 and Fig.6).

Installation instructions

453/753

33

15

210

203

Ø120

Wall

Cupboard 
Door

For top ducting cut hole to suit size

Drill 6 mm holes

Fig.8 Mounting to 
underside of cabinetry

Fig.4 Preparing for install

70

Fig.7 Panel heights

Cooking fumes

Filtered air

Fig.5 Spacer Lateral

Screw shall be fixed into 
lower face of the hood

Fig.6 Spacer Rear

Summary of Contents for HS60CIWX3

Page 1: ...NZ AU Installation instructions and User guide Slideout rangehood HS60CIWX3 HS90CIWX3 HS60CSX3 HS90CSX3 HS60CSRX3 models ...

Page 2: ...r Care 9 Contents Important SAVETHESEINSTRUCTIONS The models shown in this User Guide may not be available in all markets and are subject to change at any time For current details about model and specification availability in your country please visit our local website listed on the back cover or contact your local Fisher Paykel dealer ...

Page 3: ...tention should be given to ensure that any applicable regulations concerning the discharge of exhaust air is fulfilled If the supply cord of this equipment is damaged it must only be replaced by the manufacturer its service agent or similarly qualified person in order to avoid a hazard Always switch the power off prior to installation servicing or cleaning the rangehood Never use the rangehood wit...

Page 4: ...ve and including 1 x 40 mm white glass handle HS60 HS90CI All of above and including 1 x Vent Duct Dia 120mm HS60 HS90CS All of above and including 1 x Vent Duct Dia 120 mm top extraction 1 x Vent Duct Dia 100 mm rear extraction 2 x covers for extraction hole Dia 120 mm Dia 100 mm Accessories Accessory Part Number Replacement aluminium filter HS60 792391 Replacement aluminium filter HS90 792392 Ch...

Page 5: ...equire rangehoods to be vented outside Attention should be given to ensure that any applicable regulations concerning the discharge of exhaust air is fulfilled In recirculating mode you must use charcoal filters to eliminate cooking smells Part No 792390 HS60CSRX3 models are supplied with charcoal filters and 70 mm handle Ducting through roof Ducting through cavity to side Front Ducting Recirculat...

Page 6: ...ckout to suit top venting as shown in Fig 4 2 Do not remove Cover Tape A See Fig 4 This is removed for recirculating only Mounting the rangehood Warning Failure to install the screws or fixing device in accordance with these instructions may result in electrical hazards The rangehood can be mounted from the top Before commencement unpack the rangehood and check that it functions correctly Mounting...

Page 7: ...ent speeds depending on the cooking requirements Operating instructions 1 Pull out the grill A more than 50 mm 2 Switch on the lamps Fig 9 3 Air intake speed Fig 10 4 The front panel has to be pulled to its maximum extension so as to optimise the extraction capacity 5 The three setting switches Fig 10 have the following functions O Stops I Low speed II High speed A Fig 11 Pull out the grill ...

Page 8: ...e Do not use abrasives or harsh detergents cleaning fluids Note in areas of high humidity and coastal environments cleaning should be carried out frequently Aluminium filter The grease filter must be periodically cleaned at least every two months Remove the grease filter and wash either by hand using hot soapy water or place in the dishwasher using mild detergent A badly smoked filter may be clean...

Page 9: ...ce charcoal filters C proceed as follows 1 Remove Aluminium filter A 2 To remove charcoal filter undo and remove the screw B 3 To install follow above steps in reversed order For replacement charcoal filters ducting accessories spare parts and service please contact your local supplier or Fisher Paykel Customer Care Centre A C C B C B B B A C C B C B B B Fig 12 Charcoal filter replacement Light bu...

Page 10: ...f repairs carried out by non authorised repairers or the cost of correcting such unauthorised repairs E Normal recommended maintenance as set out in the Product s User Guide F Repairs when the appliance has been dismantled repaired or serviced by other than a Fisher Paykel Authorised Repairer or the selling dealer G Pick up and delivery H Transportation or travelling costs involved in the repair w...

Page 11: ...lly trained technicians can carry out any service necessary on your appliance Your dealer or our Customer Care Centre can recommend a Fisher Paykel Authorised Repairer in your area In Australia if you need assistance Call the Fisher Paykel Customer Care Centre and talk to one of our Customer Care Consultants Toll Free 1 300 650 590 Fax 07 3826 9298 Email customer care fp com au Postal Address PO B...

Page 12: ...eserved The product specifications in this booklet apply to the specific products and models described at the date of issue Under our policy of continuous product improvement these specifications may change at any time You should therefore check with your Dealer to ensure this booklet correctly describes the product currently available ...

Reviews: