10
Installation instructions
Installation instructions
+ 8
0
mm
+ 8
mm
+ 1
3
mm
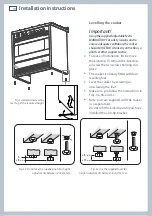
Levelling the cooker
Important!
Using the supplied adjustable feet is
MANDATORY. For safety reasons and to
ensure adequate ventilation, the cooker
chassis MUST NOT sit directly on the floor, a
plinth, or other support surface.
For ease of installation, first remove
the kickstrip. To remove the kickstrip,
unscrew the two screws holding it in
place.
The cooker is already fitted with four
levelling feet.
Level the cooker by screwing or
unscrewing the feet.
Make sure you follow the instructions in
Figs. 3a, 3b, and 3c.
Note: nuts are supplied with the cooker
in a separate kit.
Do not refit the kickstrip until you have
installed the anti-tip bracket.
Fig. 3b Do not use the supplied nuts for height
adjustments between 0 and 8 mm
Fig. 3c Use the supplied nuts for
height adjustments between 8 and 13 mm
Fig. 3a Screw/unscrew the
feet to get the required height
Summary of Contents for OR90SDBGFPX
Page 1: ...NZ AU Installation instructions and User guide Freestanding cooker OR90SDBGFPX models...
Page 2: ......
Page 22: ......
Page 62: ......
Page 63: ......


