321023
20
5
TEMPERATURE CONTROLS & USER OPTIONS
5.1
Warm Cabinet Temperatures
At times, the front of the refrigerator cabinet may be warm to touch. This is a normal occurrence that
helps prevent moisture from condensing on the cabinet. This condition will be more noticeable when
the refrigerator is first started, during hot weather and after excessive or lengthy door openings.
5.2
Adjusting The Controls
24 hours after adding food, the customer may decide that one or both compartments should be
colder or warmer, so they can adjust the control(s) as indicated in the temperature control guide
table below.
Except when starting the refrigerator, do not change either control more than one number at a time.
Allow 24 hours for temperatures to stabilize.
Changing either control will have some effect on the temperature of the other compartment.
5.2.1
Touch Temperature Controls (Selected Models - Style Varies by Model)
The controls are located at the top front of the fresh food compartment compartment.
5.2.1.1
Initial Control Settings
Pressing the
TEMPERATURE UP
or
TEMPERATURE DOWN
keypads, adjust the controls to the
desired setting.
Set the freezer control to 4.
Set the fresh food compartment control to 4.
Let the refrigerator run for at least 8 to 12 hours before adding food.
Fresh food compartment too
warm.
Set the fresh food compartment control to the next higher
number by pressing the
FRESH FOOD
COMPARTMENT TEMPERATURE UP
keypad.
Fresh food compartment too
cold.
Set the fresh food compartment control to the next lower
number by pressing the
FRESH FOOD
COMPARTMENT TEMPERATURE DOWN
keypad.
Freezer too warm.
Set the FREEZER control to the next higher number by
pressing the
FREEZER TEMPERATURE UP
keypad.
Freezer too cold.
Set the freezer control to the next lower number by
pressing the
FREEZER TEMPERATURE DOWN
keypad.
Turn
refrigerator
OFF.
Press the freezer or fresh food compartment
TEMPERATURE DOWN
keypad until a dash “-“ appears
in the display.
5.3 Speed
Ice
When activated, Speed Ice reduces the freezer temperature to the optimum setting for 24 hours in
order to produce more ice.
NOTE:
When the Speed Ice feature is in operation, the
FREEZER TEMPERATURE UP
and
FREEZER TEMPERATURE DOWN
keypads will not operate.
Summary of Contents for RX256DT4X1
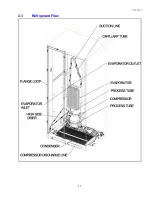
Page 11: ...321023 11 2 3 Refrigerant Flow...
Page 12: ...321023 12 2 4 Cabinet Air Flow...
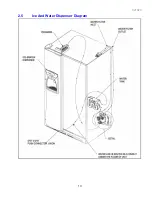
Page 13: ...321023 13 2 5 Ice And Water Dispenser Diagram...
Page 14: ...321023 14 2 6 Water Valve Diagram...
Page 15: ...321023 15 2 7 Typical External Sweat Pattern...
Page 16: ...321023 16 3 INSTALLATION...
Page 17: ...321023 17...
Page 18: ...321023 18...
Page 76: ...321023 76 Ice Water Dispensing Board...
Page 78: ...321023 78 Mid Electronic Specification Control RX256DT4X1 RX256ET2B1 RX256ET2W1...
Page 104: ...321023 104 14 WIRING DIAGRAMS 14 1 Wiring Schematic RX256DT7X1...
Page 105: ...321023 105 14 2 Wiring Diagram RX256DT7X1...
Page 106: ...321023 106 14 3 Wiring Schematic RX256DT4X1 RX256ET2B1 RX256ET2W1...
Page 107: ...321023 107 14 4 Wiring Diagram RX256DT4X1 RX256ET2B1 RX256ET2W1...
Page 108: ...321023 108 NOTES...


