26
Ice and water
Light
A light activates within the dispenser cavity when dispensing ice or water with the back
dispensing pad or FRONT FILL button.
Automatic ice maker
Connect the ice maker to the water supply as instructed on page 9. Proper water flow and a level
refrigerator are essential for optimal ice maker performance.
Note: energy rating guides that are posted on the refrigerator at the time of purchase do not
include optional ice maker energy usage.
Operating instructions
To start ice making
Confirm ice storage bin is securely in place.
Lower the wire arm inside the ice bin gently.
Once the freezer compartment has reached -18˚C, the ice maker
will fill with water.
Approximately three to six hours after installation the first batch
of ice will be produced.
After the initial ice batch is made, a complete batch will be
made every two to three hours.
Discard ice made in the first 12 hours of operation.
The ice maker will continue to make ice until the ice level raises
the wire arm, and stops production.
To stop ice production
Lift the wire arm inside the ice bin until a click is heard. The ice maker will not make or dispense
ice until the arm is lowered.
To remove the ice bin
Stop ice production by raising the wire arm.
Lift the ice bin up slightly and pull forward.
To install the ice bin
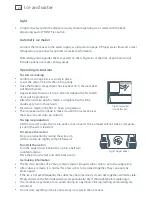
Turn the auger driver behind the ice bin a half turn
counterclockwise.
Place the bin in the rails and slide back gently.
Ice making information
The first two batches of ice may contain small or irregular cubes, due to air in the supply line.
After cubes are made, it is normal for a few cubes to be joined together. They can easily be
broken apart.
If the ice is not used frequently the cubes may become cloudy, small, stick together, and taste stale.
Empty and wash the bin in lukewarm water periodically. Dry it thoroughly before replacing it.
The ice maker may make a few sounds during its operation. Clicking, rattling, and buzzing are
all normal.
Do not store anything in the ice bin except ice made in the ice maker.
Fig.20 Ice maker
(inside freezer)
Fig.21 Auger driver
Summary of Contents for RX594
Page 48: ...46 Wiring diagram ...
Page 49: ...47 Wiring diagram ...


