13
INSTALLATION INSTRUCTIONS
fitting the water filter
1
Measure out and cut the length of tube
required from the filter to the refrigerator,
and from the filter to the water supply.
When cutting, make sure tube ends are
square and clean.
2
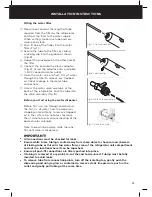
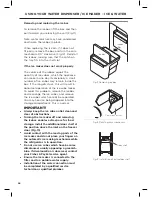
Push fit one of the tubes into the water
filter (Fig. 7).
3
Secure the tube to the filter by sliding
a locking clip into the groove as shown
(Fig. 8).
4
Repeat the procedure on the other end of
the filter.
5
Connect the end into the plastic adaptor
(Fig. 9). Screw the adaptor onto a suitable
½ BSP connector water outlet.
6
Open the water valve to flush 10 L of water
through the filter to remove any trapped
air. Check leakage in the water tube
connections.
7
Access the water valve assembly at the
back of the refrigerator. Push the tube into
the valve assembly (Fig. 10).
before you start using the water dispenser
Before first use, run through and discard
the first 3 L of water from the dispenser,
stopping intermittently to remove trapped
air in the system. Do not press for more
than 1 minute to prevent overheating of the
pad activator solenoid.
Note: there will be a delay while the tank
fills until water is dispensed.
ImpORTANT!
●
●
All connections must be checked for leaks.
●
●
Ensure white 6 mm tubing is routed away from sharp objects, sharp corners (beware
of kinking tube as this will stop water flow), clear of the refrigerator unit compartment
and not in a location where it can be squashed.
●
●
Ensure all push-fit connections are firmly pushed into place.
●
●
If tubing is removed at any point, re-cut the end and re-insert. Tubing must be fully
inserted to avoid leaks.
●
●
To remove tube from connection points, turn off the isolating tap, gently push the
dispensing pad using a glass or container to remove static line pressure push in the
collet and gently pull tubing at the same time.
Fig. 7 Filter connection
Fig. 8 Locking clip
Fig. 9 Waterline connection
Fig. 10 Valve assembly


