background image

-  16  -

3. If the motor stalls after the drum has moved at least 42 degrees, a “Clothes Jammed”

fault will be internally flagged and the drum will reverse and the door will open before
trying to close again.  After three unsuccessful attempts, the drum door will open, the
lid will be unlocked and the relevant User Warning will occur.

4. At the “Retract Grabber Position”, 142 degrees from “Home”, the sensor module

begins moving away the grabber.

  If a fault is detected during the actuator movement, the operation of the actuator will

be checked.  The drum will stop and an attempt will be made at moving the actuator
back to lower the door grabber.

  If a fault is again detected, a maximum of five attempts are made at moving the

grabber, alternating the direction with each attempt, until finally the dryer will display
the relevant fault code and remain in the stationary position with the lid unlocked.  If
however the actuator is operated correctly, the grabber is left in the retracted
position.

5.  When the grabber is confirmed to have retracted, the drum motor is sped up to 47

RPM and the sensor module will begin or continue the normal drying operation.

When 

Pause

 is pressed or the drying is completed:

1. If the drum is rotating in the Close direction, then it will be reversed and the drum

speed will be set at 20 RPM, at which speed the position of the drum is verified using
the tacho “Gap” as its reference.  If however the drum was moving in the open
direction, its position may have already being verified at the higher speed, but if not,
will be set to slow down to 20 RPM until the position is verified.  If within 40 seconds
the sensor module is unable to verify its position, either because no “Gap” of sufficient
arc has been detected or a correct count for a complete revolution of the drum cannot
be obtained, then a fault code will be displayed.

2. Once the position is known, the drum speed begins to slow to 5 RPM.  Provided the

drum speed has reduced to at least 18 RPM when the drum position is 132 degrees
from the extended door grabber position (210 degrees from “Home”), the lowering of
the grabber begins.

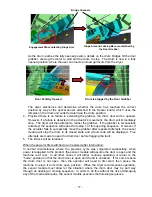
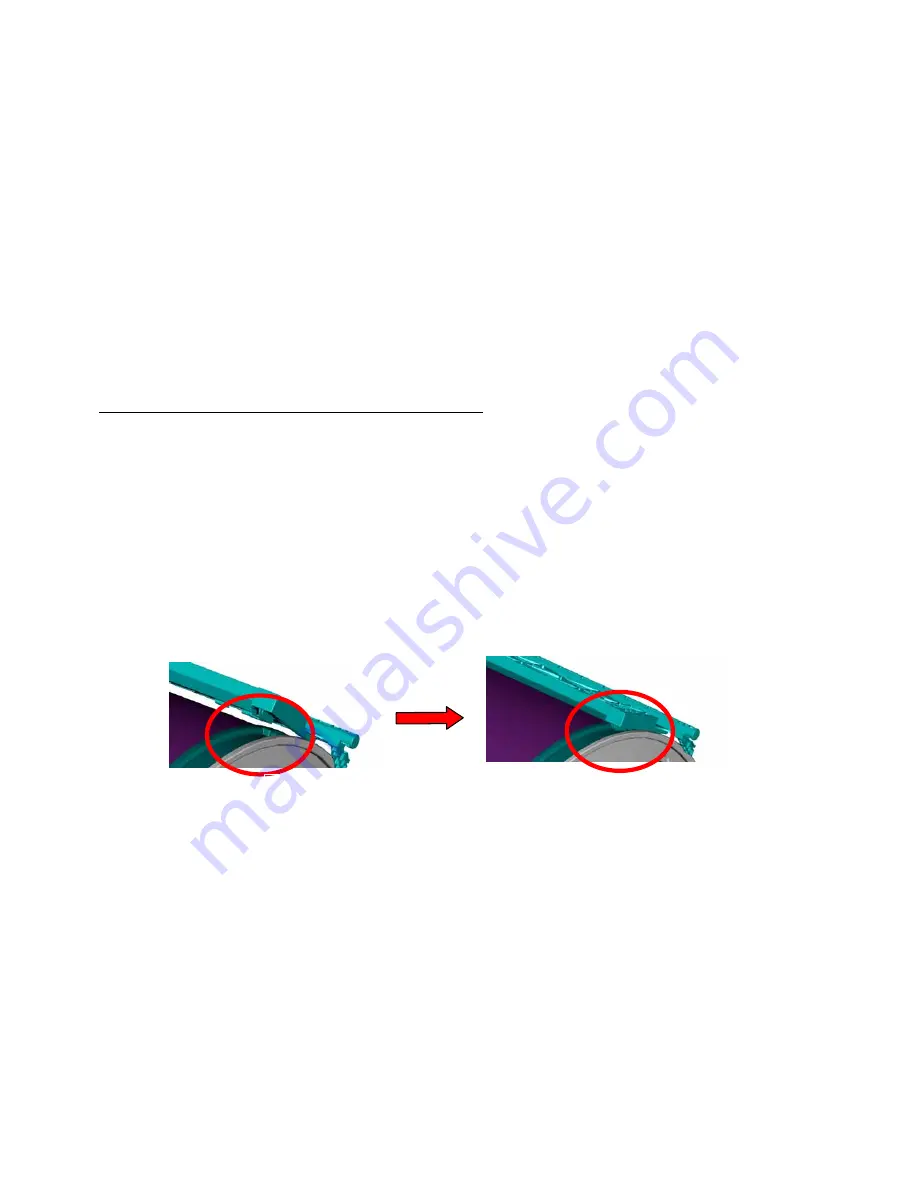
3. As the bridges approach the lowered door grabber, wings on each side of the grabber

enter the bridge channels.  If the wings do not enter the channels, the grabber will be
unable to open the drum door (refer to the diagram below).

As the drum continues to rotate, the engagement ribs attached to the door grabber
unlatch the drum door hinge arms, lifting them out of the channel slots.  The hinge
arms are raised by details on the door grabber to the top face of the bridge channels.
The drum continues to rotate in the opening direction, while the drum door is held
stationary by the door grabber.

Door Grabber is lowered against the Wrapper

Summary of Contents for Smartload DEGX1

Page 1: ...DRYER Models DEGX1 DGGX1 517760 ...

Page 2: ......

Page 3: ...y the reprint date and replaces any earlier editions Fisher Paykel Appliances Ltd Technical Publications PO Box 58 732 Greenmount Auckland 78 Springs Road East Tamaki New Zealand Telephone 09 273 0600 Facsimile 09 273 0656 Fisher Paykel Appliances Inc 27 Hubble Irvine California CA92618 USA Telephone 949 790 8900 Facsimile 949 790 8911 COPYRIGHT FISHER PAYKEL APPLIANCES LTD 2004 ...

Page 4: ... 5 4 Lint Filter 11 3 5 5 Airflow 12 3 5 6 Temperature Control 13 3 5 7 Cool Down 13 3 5 8 Drum Parts 13 3 5 9 Drum Control 15 3 5 10 Drum Door Control 15 3 5 11 Heater Control 18 3 5 12 Auto Sensing 19 3 5 13 Regulator Valve 20 3 5 14 Gas Flame Detector 21 3 6 Gas Igniter 22 3 7 Gas Regulator Valve 22 3 8 Gas Flame Detector 22 3 9 Thermostat Cutout Automatic Reset Gas 22 3 10 Thermostat Cutout Ma...

Page 5: ...Seals 38 5 3 Problem Drum Does Not Rotate 38 5 3 1 Check for Fault Code 38 5 3 2 Check the Integrity of the Belt 38 5 3 3 Check the Motor Windings 39 5 4 Problem Under Drying Damp 39 5 4 1 Possible User Faults 39 5 4 2 Possible Installation Faults 39 5 4 3 Possible Maintenance Problems 39 5 4 4 Check the Inlet and Outlet Duct Seals 39 5 4 5 Check the Heating Circuits 39 5 4 6 Check the Moisture Se...

Page 6: ...val of Lint Filter Assembly 54 6 32 Removal of Motor 54 6 33 Removal of Fan 55 6 34 Removal of Fan Motor Housing 55 6 35 Removal of Motor Control Module 56 6 36 Removal of Sensor Module 56 6 37 Removal of Gas Igniter Gas Models 56 6 38 Removal of Flame Detector Gas Models 56 6 39 Removal of Thermostats 57 6 40 Removal of Gas Regulator Valve Pipe and Burner Tube Gas Models 57 6 41 Removal of Elemen...

Page 7: ...ble components and breaking seals to access internal components of an electronic module may void the product warranty Avoid contact with PCB edge connectors when handling electronic modules 1 1 3 Good Working Practices Ensure the work areas are kept tidy and free of hazards while servicing the dryer On completion of the servicing ensure the dryer and work areas are left clean and tidy 1 1 4 Safety...

Page 8: ...formation Example B E N 123456 Sequential Serial Number Manufacturing Plant Code FISHERPAYKUL Code indicates month of manufacture CUMBERLAND Code indicates year of manufacture Cumberland Code Letter C U M B E R L A N D Year 1 2 3 4 5 6 7 8 9 0 Fisherpaykul Code Letter F I S H E R P A Y K U L Month 1 2 3 4 5 6 7 8 9 10 11 12 Manufacturing Plant Code A Laundry Australia F Refrigeration New Zealand M...

Page 9: ...t USA Electric 220 240V AC 60Hz 24 amps USA Gas 110 120V AC 60Hz 6 amps 3 3 Dimensions Height to lid Open 55 in 56 in 1410mm 1440 mm Closed 37 in 38 in 950 mm 980 mm Height to console 40 in 41 in 1020 mm 1050 mm Width 27 in 685 mm Depth 27 in 700 mm Note Exact height of the SmartLoad dryer is dependent on how far the feet are inserted into the base of the dryer Weight Packed 152 lbs 69kg Unpacked ...

Page 10: ...or restored to the sensor module the dryer will endeavour to continue operating from when the power was lost If mains power was lost during a drying cycle it will continue to dry to the same set dryness level otherwise the machine will return to have the drum door open and the lid unlocked The display module is a Dumb module and user interface that passes user settings to the sensor module and dis...

Page 11: ...utomatically recommence the drying cycle as long as the lid is shut If it is absolutely necessary to remove the load before the power is restored follow the steps below 1 Ensure the dryer is disconnected from the power supply 2 Open the lid this will already be unlocked 3 On the left hand side of the dryer there is a thumb tab that appears when the drum is not open Press the thumb tab and rotate t...

Page 12: ...er user manual and lid label instruct the user to empty the lint bucket before the lint reaches the top of the transparent part of the bucket If the lint bucket overflows due to the user not emptying it the SmartLoad dryer can clear itself The user just needs to empty the bucket and run the dryer on a cycle for approximately 20 minutes The dryer will free all the trapped lint and will re deposit i...

Page 13: ... heating elements burner turned off blowing cool air through the load to help prevent creasing If an Auto Sensing cycle has been selected the cool down period will continue until the exhaust temperature drops to 95o F 35o C If a Timed Dry cycle has been selected the cool down period will run for the last 5 to10 minutes of the timed dry period 3 5 8 Drum Parts 1 Drum Inlet End Allows inlet air to p...

Page 14: ...or It also latches the door closed over the end of the track 7 Locking Bar Attached to its ends are the hinge arms Its function is to hold these hinges in the correct orientation 8 Hinge Spring Springs the hinge arm down to ensure latching when the door is closed There is also a Drum Door Scraper that prevents clothes from being drawn into the gap between the drum and the door when the door is ope...

Page 15: ...end outlet spaced every 2 degrees to provide positioning information while also providing speed data There is a 15 degree gap to provide the reference for absolute position An infrared diode and optical receiving transistor provide the reading of the dimples The digital signal is output to the motor control module which uses the signal for speed controlling the drum The drum position is monitored ...

Page 16: ...and the drum speed will be set at 20 RPM at which speed the position of the drum is verified using the tacho Gap as its reference If however the drum was moving in the open direction its position may have already being verified at the higher speed but if not will be set to slow down to 20 RPM until the position is verified If within 40 seconds the sensor module is unable to verify its position eit...

Page 17: ...te and a fault code will be displayed Five attempts are made to open the drum door before flagging the fault 5 The lid lock will be released When the power is first switched on or restored after interruption In normal circumstances where the previous cycle was completed successfully when power is reapplied to the product the sensor module will assume the door is open and the machine is at rest In ...

Page 18: ...only switched on when the drum is up to speed Because of the time it takes for the element to cool down after switching off the larger element in the electric model is switched off a few seconds before stopping to reverse to prevent excessive heat entering the drum The software in the motor control module responds to the switching on and off of the heater as requested by the sensor module It also ...

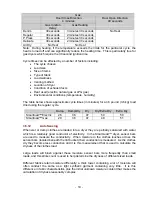
Page 19: ... the regular cycle Damp Damp Dry Dry Dry Extra Dry Extra Dry Smartload Electric 26 36 47 50 50 Smartload Gas 29 38 47 49 51 3 5 12 Auto Sensing When wet or damp clothes are loaded into a dryer they are partially saturated with water which is a relatively good conductor of electricity In the SmartLoad dryer sensor bars are used to measure the conductivity When moisture in the clothes touches across...

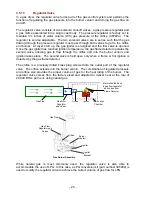
Page 20: ...rough the orifice and into the burner venturi and ignition takes place The second valve is held open only when a flame or hot ignition is detected by the gas flame detector The orifice is a precisely drilled brass plug screwed into the outlet port of the regulator valve The orifice extends into the burner venturi The combination of regulated pressure and orifice size provides the proper volume of ...

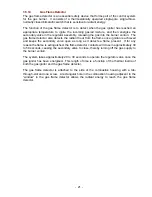
Page 21: ...me once ignition is achieved and keeps the secondary valve open as long as it detects a flame present If for any reason the flame is extinguished the flame detector contacts will close in approximately 30 to 50 seconds causing the secondary valve to close thereby turning off the gas supply to the burner venturi The system takes approximately 20 to 30 seconds to operate the regulator valve once the...

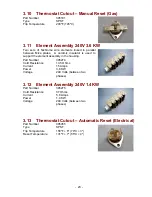
Page 22: ...d dual automatic gas valve Part Number 395369 Voltage Rated 120 Volts AC 60 Hz Resistance Across Terminals 1 2 1 4 kOhms 1 3 560 Ohms 3 4 1 3 kOhms Orifice 43 Regulated pressure 3 5 H2O 3 8 Gas Flame Detector Part Number 395194 Voltage Rated 120 Volts AC 60 Hz Contacts normally closed open with heat 3 9 Thermostat Cutout Automatic Reset Gas Part Number 395192 Type SPST Trip Temperature 230o F 5o 1...

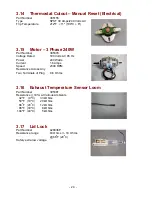
Page 23: ...upport the element assembly in the housing Part Number 395274 Cold Resistance 13 5 Ohms Current 15 Amps Power 3 6 KW Voltage 240 Volts between two phases 3 12 Element Assembly 240V 1 4KW Part Number 395275 Cold Resistance 37 Ohms Current 5 8 Amps Power 1 4 KW Voltage 240 Volts between two phases 3 13 Thermostat Cutout Automatic Reset Electrical Part Number 395455 Type SPST Trip Temperature 158o F ...

Page 24: ... AC 85 Hz Power 240 Watts Current 1 6 Amps Speed 2340 RPM Resistance Across Any Two Terminals of Plug 9 6 Ohms 3 16 Exhaust Temperature Sensor Loom Part Number 395381 Resistance 10 at Various Ambients 32o F 0o C 33 kOhms 50o F 10o C 20 kOhms 68o F 20o C 12 kOhms 86o F 30o C 8 kOhms 104o F 40o C 5 kOhms 3 17 Lid Lock Part Number 420036P Resistance range 63 Ohms 10 Ohms 68o F 20o C Safety extra low ...

Page 25: ... 25 3 18 Motor Control Module Part Number 395400 Electric models 395401 Gas models 3 19 Sensor Module Part Number 395394 3 20 Display Module Part Number 395124 ...

Page 26: ...ed represents a binary code By adding up the binary code value of the LEDs that are illuminated the fault code number can be determined In the example above the fault code is 8 2 1 11 Note If the dryer has faulted and displayed a fault but the fault is currently not displayed most faults will manifest when the user attempts to run the dryer again However at any time the Last Fault can be recalled ...

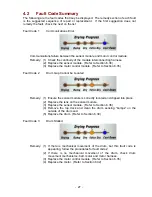
Page 27: ...r to Section 6 35 Fault Code 2 Drum Gap Cannot be Located Remedy 1 Ensure the sensor module is correctly located and clipped into place 2 Replace the lens on the sensor module 3 Replace the sensor module Refer to Section 6 36 4 Remove the top deck and clean the drum sensing bumps on the outside of the drum end 5 Replace the drum Refer to Section 6 30 Fault Code 3 Drum Stalled Remedy 1 If there is ...

Page 28: ...nable to close due to either clothes catching or an excessive closing load Remedy 1 Remove the obstruction 2 Reposition or remove some of the load 3 Fix the cause of binding in the door closing mechanism 4 Replace the motor Fault Code 7 Motor Current Excessive Remedy 1 Free up the dryer Remove overload or cause of jamming 2 Replace the motor control module Refer to Section 6 35 3 Replace the motor...

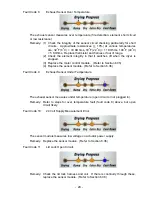
Page 29: ... dryer is stopped 3 Replace the motor control module Refer to Section 6 35 4 Replace the sensor module Refer to Section 6 36 Fault Code 9 Exhaust Sensor Under Temperature The exhaust sensor measures under temperature open circuit or not plugged in Remedy Refer to steps for over temperature fault fault code 8 above but open circuit likely Fault Code 10 24 Volt Supply Measurement Error The sensor mo...

Page 30: ... Section 6 36 Fault Code 16 Airflow Restriction User Warning Airflow restriction Remedy 1 Check that the lint bucket is empty and the filter is clear 2 Ensure that the exhaust duct is not restricted blocked or kinked preventing good airflow 3 Ensure that there is nothing inhibiting unrestricted airflow through the heater housing through the drum lint filter lint collector and through the exhaust d...

Page 31: ...abinet front 4 Ensure the user intervention tab is not inhibiting door grabber movement 5 Check that the actuator linkage is located correctly There must be no gap between the linkage and the plastic moulding refer to Section 6 9 reassembly procedure 6 Check that the actuator housing is in place and that the four retaining lugs are correctly located refer to Section 6 9 Early models may have alumi...

Page 32: ... 15 of nominal 2 Replace the sensor module as voltage measurement circuit may be reading incorrectly Refer to Section 6 36 3 Replace the motor control module as it may not be supplying sufficient power to the sensor module When display is off approximately 24V DC is supplied Refer to Section 6 35 Fault Code 24 Door Actuator Movement Took Too Long Remedy As per fault code 21 Fault Code 28 Data Retr...

Page 33: ... Warning Reason The lid lock failed to lock Not user displayed Remedy 1 Ensure the lid is closed and the tongue engaged 2 Replace the lid lock harness Refer to Section 6 5 3 Replace the lid lock Refer to Section 6 5 4 Replace the sensor module Refer to Section 6 36 Note The blue Cool Down LED illuminated without the fault beeps indicates the dryer is in a low mains voltage brown out state and is m...

Page 34: ...impedance check enter the diagnostic mode as described above then press the Auto Dry up button five times In this mode touching damp clothes or fingers across the conductivity contacts will cause the LED display to change If the contacts or the harness to them have gone open circuit no change will occur in the LED display This is a useful method of checking the integrity of the sensor circuits To ...

Page 35: ...nuity in these wires go to Section 5 1 2 c If there is no continuity replace the power cord and retest the dryer 5 1 2 Check the Continuity of the Main Harness Electric a Follow instructions for removal of components within the cabinet Refer to Section 6 6 b Disconnect the main harness from the motor control module manual resetable thermostat and automatic reset thermostats c Follow instructions f...

Page 36: ...ve white wires d If there is continuity replace the motor control module and retest the dryer e If there is no continuity replace the mains harness and retest the dryer 5 2 Problem No Heat 5 2 1 Check All Thermostats Gas and Electric WARNING The power must be disconnected to perform the following checks a Check that the manual reset thermostat has not tripped If it has reset it b Disconnect each t...

Page 37: ...y 240V AC c If there is no voltage replace the motor control module and retest the dryer If there is voltage go back to Section 5 2 1 and recheck 5 2 4 Measure the Current Draw for Each Element Electric Only This is an alternative to measuring the voltage a With a clamp amp meter measure the current draw of each element Approximate current draws are The Yellow lead 5 8 amps The Orange lead 15 amps...

Page 38: ...ust Sensor Gas and Electric This check will need to be performed if the dryer has stopped functioning and fault codes 8 or 9 have been displayed a Disconnect the temperature sensor from the sensor module and measure the resistance Resistance at various ambient temperatures should be 10 32ºF 0ºC 33 kOhm 10 50ºF 10ºC 20 kOhm 10 68ºF 20ºC 12 kOhm 10 86ºF 30ºC 8 kOhm 10 104ºF 40ºC 5 kOhm 10 b If the s...

Page 39: ...ance Problems a Is all venting clear of lint kinks etc Lint build up or kinks within the venting system will restrict the airflow and decrease drying performance Check the inlet grill burner inlet grill venting and vent outlet grill shutters to ensure that they are clear b Has the lint bucket been emptied c Are the lint filter and exhaust sensor free of lint 5 4 4 Check the Inlet and Outlet Duct S...

Page 40: ...ith the power disconnected from the dryer use a suitable high impedance meter on a high ohms range to measure the resistance between the conductivity contacts It should be 6 4 megohms 1 megohm Between either contact and the drum it should be 4 3 megohms 1 megohm f Check that the conductivity contacts circuit is registering the dryness levels of the clothes Refer to Section 4 3 1 2 ...

Page 41: ...Lid a Open the lid fully then lift off vertically Reassembly a Refit in reverse manner ensuring that the hinge lugs on the lid are vertical 6 2 Components in Console Area a Disconnect the unit from the power supply b Remove the lid Refer to Section 6 1 c Remove the two screws at the rear of the console securing the console to the top deck d Tilt the console forward Reassembly a Refit in reverse ma...

Page 42: ... with harness from the top deck Refer to Section 6 5 i Remove the stiffener brackets from under each side of the top deck 6 4 2 If the top deck is to be removed to gain access to other components a Follow instructions for removal of the lid Refer to Section 6 1 b Carefully remove the two lid buffers from front side top of the deck by levering upwards taking care not to damage the top deck c Remove...

Page 43: ...ides of the front panel to clear the tabs on the door grabber assembly d Pull the cabinet front forward and lift the base clear of the feet e Disconnect the cabinet front earth wire from the chassis and lift the cabinet front clear Reassembly a Refit in reverse manner 6 7 Removal of Front Cabinet Brackets a Follow general servicing instructions for components within the cabinet Refer to Section 6 ...

Page 44: ... the assembly upwards and outwards Reassembly a Refit in reverse manner 6 9 Removal of Door Grabber Actuator a Follow instructions for removal of the door grabber assembly Refer to Section 6 8 b Unclip the wiring from the grabber housing c While applying outward pressure to the actuator push in the four retaining lugs in the order shown on the photo below securing the actuator to the housing and l...

Page 45: ...e plastic moulding of the housing 6 10 Removal of Door Grabber a Follow instructions for removal of the door grabber actuator assembly Refer to Section 6 9 b Remove the four screws securing the chassis beam to the grabber housings c Lift the door grabber clear Reassembly a Refit in reverse manner Ensure that the linkage is correctly located in the slot of the door grabber No gap between linkage an...

Page 46: ... hinge arms and locking bar f Slide the door bracket away from the door Slide one side forwards and the other backwards to disengage it from the tracks in the drum bridge Reassembly a Refit in reverse manner When refitting the hinge springs ensure that they are not reversed or they will not sit flat Locate the longer right hand leg into the door bracket clips first then the left hand leg Push home...

Page 47: ...t provides static discharge protection for the controllers 6 14 Removal of Drum Door Key Bracket a Follow general servicing instructions for components within the cabinet Refer to Section 6 6 b Slide the drum door partially open c Push a small screwdriver blade through the holes in the drum 4 to release the clips on the drum door key bracket d Lift the drum door key bracket clear Reassembly a Refi...

Page 48: ...he floor in front of the dryer i Pull on the front of the panel chassis to pivot the assembly out of the cabinet j Roll the assembly clear of the cabinet Reassembly a Refit in reverse manner 6 17 Removal of Outlet Panel Assembly a Follow instructions for removal of the drum and chassis assembly Refer to Section 6 16 b Lay the assembly on its right hand side c Remove the chassis panel bracket d Rem...

Page 49: ...ct Bearings a Follow instructions for removal of the outlet panel assembly Refer to Section 6 17 b Lift the collector housing bracket clear of the outlet duct assembly c With a screwdriver push the tab on the back of the bearing assembly to push it out of the outlet duct assembly Reassembly a Refit in reverse manner 6 20 Removal of Outlet Duct Seal a Follow instructions for removal of the outlet d...

Page 50: ...int bucket b Remove the screw securing the lint collector housing and lift the housing clear Reassembly a Refit in reverse manner Put the top in first and ensure that the tab at the top of the housing slots in at the top Check that the top is secure when it is assembled 6 23 Removal of Conductivity Contacts a Follow instructions for removal of the lint collector housing Refer to Section 6 22 b Pus...

Page 51: ...sembly by pushing against the spring tension and unclipping from the rear chassis beam A screwdriver can be used to unclip it by putting the blade through the slot and levering against the beam c Lift the top of the belt tensioner assembly clear and unclip it from the centre chassis beam Lift clear Reassembly a Refit in reverse manner Push Belt Tensioner ...

Page 52: ...e inlet panel assembly photo 1 2 from the rear of the inlet panel assembly photo 2 and 2 from underneath the inlet panel assembly photo 3 Screws Screws Screws Photo 1 Photo 2 Photo 3 h Lift the inlet panel assembly clear Reassembly a Refit in reverse manner Do not overtighten the screw securing the drum inlet cap Tighten to 7 newton metres 1 5 foot pounds 6 26 Removal of Inlet Duct Seal a Follow i...

Page 53: ...ue of 20 newton metres 15 foot pounds 6 28 Removal of Drum Inlet Bearing a Lift the lid b Remove the drum inlet bearing cap by unscrewing with a M5 or 3 16 Allen key c Remove the 5 screws securing the bearing retainer to the drum and remove the retainer d While lifting the drum slightly slide the bearing and housing off the shaft Reassembly a Refit in reverse manner Ensure that the bearing housing...

Page 54: ...p it from the drum then pull clear of the drum c Unclip the lint filter assembly from the lint filter retainer Reassembly a Refit in reverse manner ensuring that when fitting the lint filter retainer to the drum the screw hole in the retainer lines up with the screw hole in the drum 6 32 Removal of Motor a Follow instructions for removal of the drum and chassis assembly Refer to Section 6 16 b Rem...

Page 55: ...ft b Refit the circlip to the motor shaft 6 34 Removal of Fan Motor Housing a Follow instructions for removal of the motor Refer to Section 6 32 b Use fingers to unclip the three clips from the centre beam Spring the housing off over the centre beam tilt horizontally and unhook from the rear beam Reassembly a With the housing horizontal hook it over the rear beam and tilt it down to rest on the ce...

Page 56: ...7 Removal of Gas Igniter Gas Models a Follow general servicing instructions for components within the cabinet Refer to Section 6 6 b Using a small screwdriver prise the connector apart c Remove the screw securing the igniter bracket to the gas burner bracket and lift the igniter bracket tabs clear of the slots in the burner bracket d Carefully extract the igniter from the chamber e Bend the tabs o...

Page 57: ...de the gas burner bracket to the left and lift clear of the slots in the base panel Lift the gas regulator valve and pipe assembly forward and out h Remove the two screws securing the gas burner venturi i Remove the three screws securing the gas regulator valve to the bracket j Unscrew the gas pipe from the gas regulator valve Reassembly a Refit in reverse manner Ensure that the regulator valve is...

Page 58: ...y a Refit in reverse manner 6 43 Removal of Rear Foot Bracket Assembly a Follow instructions for removal of the drum and chassis assembly Refer to Section 6 16 b Remove the rear intake grill by levering the four tabs downwards with the fingers Pull the top of the intake grill outwards and disengage the bottom lugs from the base panel Lift clear c Lay the cabinet on its side on a protective surface...

Page 59: ... lift clear i Push the foot upwards to clear the top of the foot adjusting guide j Slide the foot sideways to remove it from the strap k Draw the strap back through the housing Push upwards on the strap to disengage it from the hooks on the guide Pull the strap clear Reassembly a Refit in reverse manner ...

Page 60: ... 60 7 Wiring Diagrams 7 1 U S A Model Electric ...

Page 61: ... 61 7 2 U S A Model Gas ...

Page 62: ...o the supply outlet Arrange repair of supply etc as necessary Is there continuity of the main harness Check as per Section 5 1 1 Electric or 5 1 3 Gas Check as per Section 5 1 2 Electric or 5 1 4 Gas Fit new motor control module No Yes Yes Yes Is the power cord fitted correctly Yes Refit correctly No ...

Page 63: ...air replace as necessary Check as per Sections 5 2 3 and 5 2 4 Are exhaust sensor resistances OK Yes Yes Yes Check as per Sections 5 2 8 and repair replace as necessary Is a fault code displayed Refer to Section 4 2 Replace motor control module Yes Yes No Is the inlet duct seal OK Is the outlet duct seal OK Fit new outlet duct seal Refer Section 6 20 No Yes Fit new inlet duct seal Refer Section 6 ...

Page 64: ... Are exhaust sensor resistances OK No Yes Check as per Sections 5 2 8 and repair replace as necessary Is a fault code displayed Refer to Section 4 2 Yes Yes No Replace sensor module Is the inlet duct seal OK Is the outlet duct seal OK Fit new outlet duct seal Refer Section 6 20 No Yes Fit new inlet duct seal Refer Section 6 26 No Yes Has the overheat thermostat tripped Reset thermostat Replace if ...

Page 65: ...net racked Rectify fault Level cabinet Is drum inlet bearing tight Replace bearing Refer Section 6 28 Are jockey pulleys free belt aligned OK Rectify fault Yes Yes Yes Yes No No Yes No No Is actuator operating OK Yes Repair as necessary No Check manual operation of drum door for jamming etc OK ...

Page 66: ...e belt aligned OK Refit repair as necessary Are motor winding resistances correct Is continuity of harness to motor OK Refer to Section 5 3 3 Repair replace Yes Yes No No Yes Replace motor control module Is a fault code displayed Refer to Section 4 2 Yes No ...

Page 67: ...t spin speeds to aid drying Is the venting clear not too long not too many bends etc Clear restrictions Advise customer on correct venting methods Yes Yes Yes Yes No No No No Are the inlet grill burner inlet grill free of lint Are the lint filter exhaust sensor free of lint Is heater operating Yes Yes Yes Clean Clean and or reconnect correctly Check as per Section 5 4 5 Clean check sensor as per S...

Page 68: ...new bearing Refer Section 6 28 Are outlet duct bearings OK Fit new bearings Refer Section 6 19 No No No No Yes Yes Yes Yes Yes Are drum vanes tight Is the inlet duct seal OK Yes No Tighten vanes Fit new inlet duct seal Refer Section 6 26 Fit new outlet duct seal Refer Section 6 20 Is outlet duct seal OK No No No No Is there excessive lint build up on the fan blades Clean Yes Is ducting damaged Yes...

Page 69: ... 69 Notes ...

Reviews: