background image

6

Assembly    Montaje

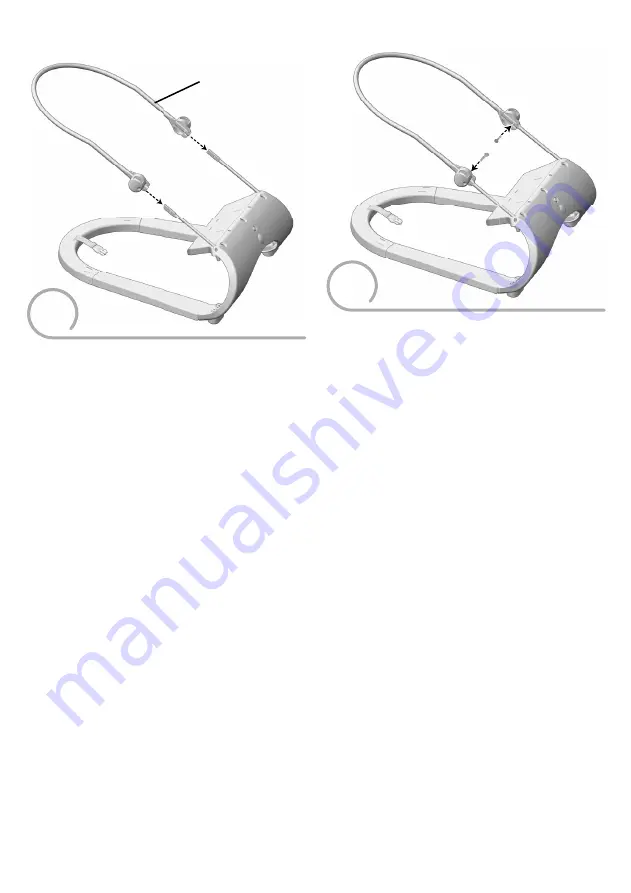
5

• Make sure the socket in each retainer 

is 

upright

• Fit the seat back tube onto the base, 

as shown. 

Hint: 

The seat back tube is designed to fit one 

way. If it does not seem to fit, turn it around 
and try again. 

• Asegurarse de que la conexión de cada 

retenedor esté en posición 

vertical

.

• Ajustar el tubo del respaldo en la base, tal 

como se muestra.

Atención: 

el tubo del respaldo está diseñado 

para ajustarse de una sola manera. Si no se 
ajusta, voltearlo e intentar de nuevo.

5

Seat Back Tube
Tubo del respaldo

j

6

• Insert a screw in each hole in the seat back tube. 

Tighten each screw.

• Pull the seat back tube up to be sure it is secure.

• Insertar un tornillo en cada orificio del tubo del 

respaldo. Apretar los tornillos.

• Jalar hacia arriba el tubo del respaldo para 

asegurarse que está seguro.

Summary of Contents for CHM72

Page 1: ...rations may vary from photographs IMPORTANTE Guardar estas instrucciones para futura referencia ya que contienen información de importancia acerca de este producto Leer estas instrucciones antes de ensamblar y usar este producto Requiere montaje por un adulto Herramienta necesaria para el montaje desatornillador de cruz no incluido La unidad relajante funciona con 1 pila alcalina D LR20 x 1 5V no ...

Page 2: ...SA Tel 0800 54744 E mail Latinoamérica Servicio Clientes Mattel com Care Mantenimiento The pad is machine washable Wash it separately in cold water on the gentle cycle Do not use bleach Tumble dry separately on low heat and remove promptly The frame toy bar and toys may be wiped clean using a mild cleaning solution and damp cloth Do not immerse the toy bar Do not use bleach Do not use harsh or abr...

Page 3: ...n ya que el producto puede voltearse y causar asfixia en superficies suaves No usar como cargador o levantarla mientras el niño esté sentado en ella No usar la barra de juguetes como asa Siempre usar el sistema de sujeción Este producto no está diseñado para reemplazar una cuna o moisés por periodos prolongados de sueño No dejar al niño fuera de su alcance No usar con niños que pueden incorporarse...

Page 4: ...uguetes Seat Back Tube Tubo del respaldo Footrest Reposapiés 2 Bases Left and Right 2 bases izquierda y derecha Rear Cross Brace Barra transversal trasera Front Cross Brace Barra transversal delantera Note Screw shown actual size Tighten or loosen all screws with a Phillips screwdriver Do not over tighten the screws Atención el tornillo se muestra a tamaño real Apretar y aflojar todos los tornillo...

Page 5: ...tamente intentar con la otra base 2 4 Snap the base assembly into the front cross brace Ajustar la unidad de las bases en la barra transversal delantera 3 Slide the footrest into the front cross brace as shown Hint The power switch on the footrest should fit into the lower hole on the front cross brace Ajustar el reposapiés en la barra transversal delantera tal como se muestra Atención el interrup...

Page 6: ... Ajustar el tubo del respaldo en la base tal como se muestra Atención el tubo del respaldo está diseñado para ajustarse de una sola manera Si no se ajusta voltearlo e intentar de nuevo 5 Seat Back Tube Tubo del respaldo j 6 Insert a screw in each hole in the seat back tube Tighten each screw Pull the seat back tube up to be sure it is secure Insertar un tornillo en cada orificio del tubo del respa...

Page 7: ...8 Fit each retainer through each side opening in the pad Ajustar cada retenedor en cada orificio lateral de la almohadilla Retainer Retainer Retenedor Retenedor y 7 Position the pad above the frame Fit the upper pocket on the back of the pad onto the seat back tube Colocar la almohadilla sobre el armazón Ajustar la funda superior del dorso de la almohadilla sobre el tubo del respaldo Pad Almohadil...

Page 8: ...exión del retenedor La barra de juguetes está diseñada para ajustarse de una manera Si no se ajusta voltearla e intentar de nuevo Atención la barra de juguetes es desprendible Jalar los extremos de los seguros y levantar la barra de juguetes Toy Bar Barra de juguetes Sockets Conexiones 10 Fasten the buckle on the rear cross brace to the buckle on the back of the seat pad Abrochar la hebilla de la ...

Page 9: ...ep Never leave child unattended Never use for a child able to sit up unassisted Para evitar lesiones graves o la muerte Peligro de caídas no usar en superficies elevadas ya que el movimiento del niño puede causar que el producto se resbale o voltee Usar únicamente sobre el piso Peligro de asfixia no usar en superficies suaves cama sofá cojín ya que el producto puede voltearse y causar asfixia en s...

Page 10: ... the battery compartment Remove batteries during long periods of non use Always remove exhausted batteries from the product Dispose of batteries safely Do not dispose of this product in a fire The batteries inside may explode or leak Never short circuit the battery terminals Use only batteries of the same or equivalent type as recommended Do not charge non rechargeable batteries Remove rechargeabl...

Page 11: ...istema de sujeción debe permanecer conectado Tighten each waist belt so that the restraint system is snug against your child Please refer to the next section for instructions to tighten the waist belts Apretar cada cinturón de modo que el sistema de sujeción quede bien ajustado al niño a Consultar la siguiente sección para mayores detalles sobre cómo apretar los cinturones Restraint System Sistema...

Page 12: ... IMPORTANTE Si la pila está gastada el producto no funcionará correctamente sin vibraciones ni función de apagado Sacar y desechar la pila y sustituirla por 1 pila nueva alcalina D LR20 x 1 5V Protect the environment by not disposing of this product with household waste 2002 96 EC Check your local authority for recycling advice and facilities Proteger el medio ambiente no desechando este producto ...

Reviews: