background image

4

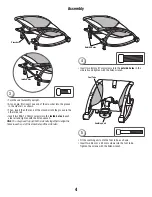
•  Insert two 8mm x 27mm screws into the 

outside holes

 in the 

side rails and tighten with the Allen wrench.

4

Outside Holes

•  Turn the seat assembly upright. 
•  At an angle, first insert one end of the crossbar into the groove 

in the side rail, as shown.

•  Then, insert the other end of the crossbar into the groove in the 

other side rail. 

•  Insert two M6-1 x 15mm screws into the 

inside holes

 in each 

side rail and tighten with the Allen wrench.

Hint:

 You may need to push both side rails together to align the 

holes in each end of the crossbar and the side rails.

3

Crossbar

Inside Holes

Assembly

•  Fit the soothing unit onto the foot tube, as shown. 
•  Insert two 3.5 mm x 32 mm screws into the foot tube. 

Tighten the screws with the Allen wrench.

5

Soothing Unit

Foot Tube

Summary of Contents for P7539

Page 1: ...www fisher price co uk P7539 WARNING IMPORTANT KEEP INSTRUCTIONS FOR FUTURE REFERENCE ...

Page 2: ...ot included Requires three C LR14 alkaline batteries not included for soother operation Product features and decoration may vary from photographs Fasteners are shown actual size Fasteners 3 5mm x 32mm screw 2 M6 1 x 15mm screw 8 8mm x 27mm screw 2 Great Britain Vanwall Business Park Maidenhead SL6 4UB Helpline 01628 500303 www service mattel com uk Australia Mattel Australia Pty Ltd 658 Church Str...

Page 3: ...ws through the holes on each end of the foot tube and into each side rail Tighten each screw with the Allen wrench IMPORTANT Before assembly and each use inspect this product for damaged hardware loose joints missing parts or sharp edges DO NOT use if any parts are missing or broken Contact Fisher Price for replacement parts and instructions if needed Never substitute parts 1 Foot Tube Turn the as...

Page 4: ...the crossbar into the groove in the other side rail Insert two M6 1 x 15mm screws into the inside holes in each side rail and tighten with the Allen wrench Hint You may need to push both side rails together to align the holes in each end of the crossbar and the side rails 3 Crossbar Inside Holes Assembly Fit the soothing unit onto the foot tube as shown Insert two 3 5 mm x 32 mm screws into the fo...

Page 5: ...ou may need to reset the electronics Slide the power mode switch off and then back on IMPORTANT Low battery power could cause this product to operate erratically no vibrations sound and the product may not turn off Remove and discard the batteries and replace them with three new C LR14 alkaline batteries Battery Safety Information In exceptional circumstances batteries may leak fluids that can cau...

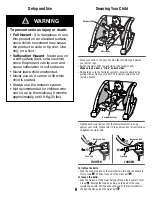
Page 6: ...use suffocation in soft surfaces Never leave child unattended Never use as a carrier or lift while child is seated Always use the restraint system Not recommended for children who can sit up by themselves 6 months approximately until 9 Kg 20 lbs WARNING Anchored End Anchored End Free End Free End LOOSEN TIGHTEN To tighten the belts Feed the anchored end of the waist belt up through the buckle to f...

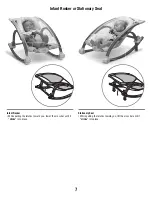
Page 7: ...r or Stationary Seat Infant Rocker While pulling the latches toward you lower the crossbar until it clicks into place Stationary Seat While pulling the latches toward you lift the crossbar until it clicks into place ...

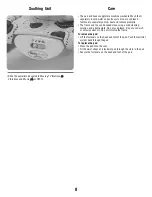
Page 8: ... promptly The frame and toy can be wiped clean using a mild cleaning solution and a damp cloth Do not use bleach Do not use harsh or abrasive cleaners Do not immerse the frame To remove the pad Lift the fasteners on the head and foot of the pad Push the restraint system back through the pad To replace the pad Place the pad onto the seat Fit the waist straps and restraint pad through the slots in t...

Reviews: