background image

14

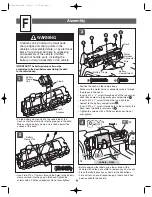
• Fit a support to one side of the sport bar.

• Insert a #8 - 32 x 1.625" screw through the support, the

sport bar and out through the support.

• Fit a lock nut to the end of the screw.

• While holding the lock nut with the pliers, tighten the

screw with a Phillips screwdriver. Do not over-tighten.

Sport Bar

Supports

Assembly

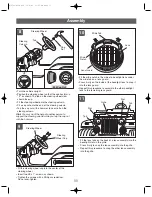
• Insert a #8 x 1" screw into the rear of seat, as shown.
• Tighten the screw with a Phillips screwdriver. Do not 

over-tighten.

20

21

• Fit the light covers to the lights on the sport bar, as shown.

• Insert a #10 x 

1

/

2

" screw through the light cover and into 

the light. Tighten the screws with a Phillips screwdriver.
Do not over-tighten.

Light

Covers

Lights

22

Dash View

B7659a-0920.qrk  12/8/03  11:56 AM  Page 14

Summary of Contents for Power Wheels B7659

Page 1: ...th Type 12V Connector included JEEP and the Jeep grille design are registered trademarks of DaimlerChrysler Corporation and are used under license DaimlerChrysler Corporation 2003 Goodyear and winged foot design and Wrangler for tires are trademarks of The Goodyear Tire Rubber Company used with permission Owner s Manual with Assembly Instructions For Model B7659 www powerwheels com Product feature...

Page 2: ...at belts Please note that the adjustable seat belts are designed to be a play feature only and do not function as protective safety restraints A To prevent damaging the motors and gears teach your child to stop the vehicle before switching between forward and reverse Do not tow anything behind the vehicle or overload it Do not exceed the maximum weight capacity of 130 lb 59 kg For safety reasons y...

Page 3: ...ery Never lift or carry the battery by the wires or connector This can damage the battery and possibly cause a fire resulting in serious injury Lift and carry the battery by the case only Read the safety instructions on the battery Examine the battery charger and their connectors for excessive wear or damage each time you charge the battery If damage or excessive wear is detected do not use the ch...

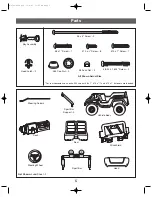
Page 4: ...ete to ensure that no parts are discarded Metal parts have been coated with a lubricant to protect them during shipment Wipe all metal parts with a paper towel to remove any excess lubricant Steering Wheel Cap Short Seat Belt Strap 2 Brushguard Taillight Housing Set Taillight Lens Set 12 Volt Charger Long Seat Belt Strap Lens Guard 2 Headlight Lens 2 Battery Clamp Unit 12 Volt Battery Light Cover ...

Page 5: ...Steering Column All Shown Actual Size Vehicle Body Dash Hood Seat For your convenience an extra 354 cap nut 8 x 1 10 x 1 2 and 10 x 1 fasteners are included Steering Wheel 8 32 x 1 625 Screw 2 Sport Bar Support 2 10 x 1 2 Screw 8 8 Lock Nut 2 354 Cap Nut 2 8 x 4 Screw 2 B7659a 0920 qrk 12 8 03 11 55 AM Page 5 ...

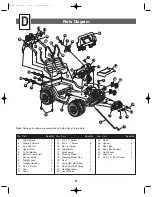
Page 6: ...des of the vehicle 13 10 x 1 Screw 7 14 10 x 1 2 Screw 8 15 8 x 4 Screw 2 16 Windshield 1 17 Brushguard 1 18 Steering Wheel 1 19 Steering Wheel Cap 1 20 Seat 1 21 Long Seat Belt Strap 1 22 Short Seat Belt Strap 2 23 Headlight Lens 2 24 Lens Guard 2 25 Hood 1 26 Spacer 2 27 Sport Bar 1 28 Sport Bar Support 2 29 Light Cover 2 30 Lock Nut 2 31 8 32 x 1 625 Screw 2 1 24 3 11 13 13 13 14 13 13 9 28 5 1...

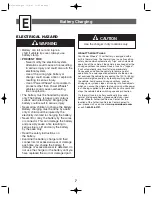
Page 7: ...rwheels com or call 1 800 348 0751 Battery Charging E Battery can fall out and injure a child if vehicle tips over Always use battery clamp PREVENT FIRE Never modify the electrical system Alterations could cause a fire resulting in serious injury and could also ruin the electrical system Use of the wrong type battery or charger could cause a fire or explosion resulting in serious injury Use of Pow...

Page 8: ...st 18 hours before you use it in your vehicle for the first time You do not need to remove the battery from your vehicle to recharge it The battery must be upright while charging The charger is not a toy Do not short circuit the battery We recommend that you start charging your battery before beginning assembly of your new vehicle Before charging the battery examine the battery case for cracks and...

Page 9: ...ying the labels wipe the surface of the vehicle with a clean dry cloth to remove any dust or oils Place the labels exactly as shown in the illustrations For best results avoid repositioning a label once it has been applied to the vehicle 13 14 15 4 HI LO KC 21 23 16 Labels Dash 17 12 WARNING Children can be harmed by small parts sharp edges and sharp points in the vehicle s unassembled state or by...

Page 10: ... body wall and out through the hole in the dash Assembly 5 6 Insert the end of the steering column through the hole in the steering rod Fit a cap nut onto the end of the steering column While supporting the steering column tap the cap nut with a hammer to secure it on the steering column Hint You may want the help of another person to support the steering column while you tap the cap nut with the ...

Page 11: ...lot 10 11 Steering Wheel Fit the steering wheel cap into the center of the steering wheel Insert two 8 x 1 screws as shown Tighten the screws with a Phillips screwdriver Do not over tighten Steering Wheel Cap 9 Turn the vehicle upright Position the steering wheel so that the spokes form a Y as shown The tab on the steering wheel stem should face up Fit the steering wheel onto the steering column F...

Page 12: ...y Close the hood Slot Slot Insert a hood latch into one of the slots in the vehicle body near the hood area Twist the base of the hood latch 1 4 turn to secure it in the vehicle body Repeat this procedure on the other side of the hood area to attach the other hood latch to the vehicle body Hood Latch Slot Hood Latch Slot 12 13 14 Brush Guard Front Bumper 15 Fit and hold the brush guard against the...

Page 13: ... outer edge of the seat Pull each side of the long seat belt strap evenly through the slots Make sure to pull each T loop through a slot Turn the seat upright T Loop Fastener End Long Seat Belt Strap With the seat at an angle insert the tabs on the front edge of the seat into the slots in the foot well wall Push down firmly on the edge of the seat above each tab to snap the tabs into the slots Rot...

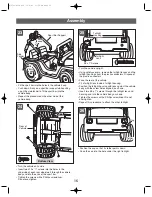
Page 14: ... screwdriver Do not over tighten Sport Bar Supports Assembly Insert a 8 x 1 screw into the rear of seat as shown Tighten the screw with a Phillips screwdriver Do not over tighten 20 21 Fit the light covers to the lights on the sport bar as shown Insert a 10 x 1 2 screw through the light cover and into the light Tighten the screws with a Phillips screwdriver Do not over tighten Light Covers Lights ...

Page 15: ... taillight housing Position the taillight housing with lens against the vehicle body with the screw holes aligned as shown Insert two 8 x 1 screws through the taillight lens and housing and into the vehicle body as shown Tighten the screws with a Phillips screwdriver Do not over tighten Repeat this procedure to attach the other taillight Position the cap so that its tether points down Snap the cap...

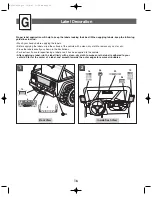
Page 16: ...cloth to remove any dust or oils Place the labels exactly as shown in the illustrations For best results avoid repositioning a label once it has been applied to the vehicle After applying a label rub the label firmly with a clean dry cloth to make sure the label is adhered to your vehicle Start at the center of a label and smooth towards the outer edges to remove air bubbles 1 Inside Dash View 2 B...

Page 17: ...17 Label Decoration Left Side View 25 2 6 5 1 3 4 3 10 11 11 24 7 29 29 29 29 30 30 30 30 Right Side View 4 27 27 31 31 B7659a 0920 qrk 12 8 03 11 56 AM Page 17 ...

Page 18: ...t Battery Battery Clamp Locator Ribs Press the battery clamp to slide it into the dash While holding the battery clamp against the dash place the battery in the battery compartment Make sure the battery is upright and positioned between the locator ribs at the bottom of the battery compartment Battery Clamp Release the battery clamp Make sure the battery clamp slides over the top of the battery If...

Page 19: ...18 hours before first time use Prevent the battery from moving freely inside the battery compartment Always use the battery clamp to secure the battery in the battery compartment Examine the battery charger and its connector for excessive wear or damage each time you charge the battery If damage is detected do not use the charger or the battery until you have replaced the worn or damaged part Alwa...

Page 20: ...ot allow your child to drive on sloped or inclined surfaces Restrict your child s driving to generally level ground ONLY 8 Do not allow your child to drive down or across a steep slope The vehicle may gain unsafe speed even if the pedal is released to stop The vehicle may tilt and tip over The wheels could lose traction causing the vehicle to slip 9 Do not allow your child to drive up steep inclin...

Page 21: ...ild is completely comfortable with operating the vehicle in the forward mode introduce reverse To Back Up Make sure the shifter is in the reverse position Press down on the foot pedal The vehicle will go in reverse at a maximum of 21 2 mph The vehicle is designed to operate in low speed only in reverse Help your child practice steering to learn how far and how quickly to turn the steering wheel wh...

Page 22: ...er For the location of the authorized service center nearest to you visit us on line at www powerwheels com Disconnecting the High Speed Lock Out How to Operate Your Vehicle IMPORANT To avoid damaging the motors and gears stop the vehicle before shifting between low and high speed Make sure the shifter is in the high speed position Press down on the foot pedal The vehicle goes forward at a maximum...

Page 23: ...ich can cause the wheels to stop spinning while power is still being supplied to the motors If a thermal fuse continually trips contact your local Power Wheels authorized service center Loose wire or loose connectors Check all wires and connectors Make sure the motor harness connector is plugged into the battery and that there are no loose wires around the motors Dead battery If your battery is ol...

Page 24: ...mal operation To avoid repeated automatic shutdowns do not overload the vehicle by exceeding the 130 lb maximum weight capacity or by towing anything behind the vehicle Do not drive up hills or run into fixed objects which can cause the wheels to stop spinning while power is still being supplied to the motors If a thermal fuse continually trips contact your local Power Wheels authorized service ce...

Page 25: ...carefully press your hand on the spinning wheel to slow it down The other rear wheel should begin to spin If the other rear wheel does not begin to spin there may be a problem with the vehicle Contact your local Power Wheels authorized service center for diagnosis and repair Sometimes the vehicle doesn t Loose wire or connector Check all wires around the motors and all connectors to run but other ...

Page 26: ...rranty THIS WARRANTY DOES NOT COVER AND IS INTENDED TO EXCLUDE ANY LIABILITY ON THE PART OF POWER WHEELS WHETHER UNDER THIS WARRANTY OR IMPLIED BY LAW FOR ANY INDIRECT OR CONSEQUENTIAL DAMAGES FOR BREACH OF WARRANTY SOME STATES DO NOT ALLOW THE EXCLUSION OR LIMITATION SO THIS LIMITATION MAY NOT APPLY TO YOU Should you need service or assistance with your vehicle during the warranty period do not r...

Page 27: ...27 B7659a 0920 qrk 12 8 03 11 56 AM Page 27 ...

Page 28: ...400 Authorized Service Centers Visit us on line at www powerwheels com for the location nearest you Or contact your local independently owned and operated Power Wheels Authorized Service Center For the location nearest you visit us on line at www powerwheels com Fisher Price Power Wheels and Power Wheels by Fisher Price Power Lock and Power Stick are U S trademarks of Mattel Inc 2003 Mattel Inc Al...

Reviews: