background image

29

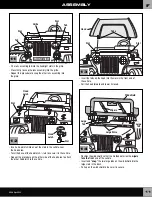
Door 

Hinge

Door

•  Fit a door into the groove on the side of the dash.

Hint:

 Each door is designed to fit one way. If the door does not fit, try 

the other door.

30

15

K4563pr-0920

•  Fit a hinge over the top end of the door.

Hint:

 Each hinge is designed to fit one way. If the hinge does not fit, 

try the other hinge.

•  Insert three #10 x ¾" screws into the hinge and tighten.
•  Repeat assembly steps 29 and 30 to assemble the other door 

and hinge.

ASSEMBLY 

F

27

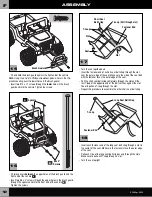
Taillight 
Housing

Taillight 
Lens

#8 x 1" Screws

•  Turn the vehicle upright.
•  Using safety scissors, remove the taillight lenses and the taillight 

housings from the plastic connectors. Dispose of the plastic 
connectors.

•  Face the rear of the vehicle.
•  Fit a taillight lens inside a taillight housing.
•  Position the taillight housing with lens against the vehicle with the 

screw holes aligned, as shown.

•  Insert two #8 x 1" screws through the taillight lens, housing and into 

the vehicle as shown. Tighten the screws. 

•  Repeat this procedure to attach the other taillight assembly.

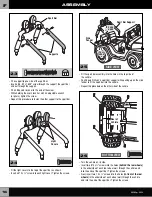
28

•   Position the cap so that the tether is down.
•  Snap the cap into the hole under the right taillight.

Tether

Cap

BACK VIEW

SIDE VIEW

Summary of Contents for Power Wheels K4563

Page 1: ...ad Acid Rechargeable Battery and Power Wheels Battery and Power Wheels 12 Volt Charger with Type 12V 12 Volt Charger with Type 12V Connector both included Connector both included Requires four C LR14...

Page 2: ...g can be damaged by riding this vehicle indoors Fisher Price will not be responsible for damage to the floor if the vehicle is used indoors To prevent damaging the motors and gears teach your child to...

Page 3: ...lectrical system Alterations could cause a fire resulting in serious injury and could also ruin the electrical system Use of the wrong type battery or charger could cause a fire or explosion resulting...

Page 4: ...f you experience a problem with this product or are missing a part please call us at 1 800 348 0751 rather than return this product to the store Please identify all parts before assembly and save all...

Page 5: ...ver tighten the screws 5 PARTS C Part Not Shown Label Sheet K4563pr 0920 Hood Latch 2 Key Assembly Taillight Lens Set 12 Volt Charger Taillight Housing Set Lens Guard 2 Headlight Lens 2 12 Volt Batter...

Page 6: ...ash 1 2 Headlight Lens 2 1 3 Lens Guard 2 1 4 Short Seat Belt Strap 1 5 Windshield 1 6 Brush Guard 1 7 Steering Wheel 1 8 Seat 1 9 Long Seat Belt Strap 20 Spacer 2 21 Sport Bar 22 Sport Bar Support 2...

Page 7: ...ing conditions too severe Once a fuse has tripped remove your foot from the pedal and wait approximately 25 seconds before operating the vehicle again To avoid repeated automatic shut downs do not ove...

Page 8: ...than 30 hours Recharge the battery for at least 14 hours after each use of your vehicle Do not charge the battery longer than 30 hours Once the battery is charged disconnect the battery connector fro...

Page 9: ...osition the steering wheel so that the large opening and the tab on the steering wheel stem are both UP Fit the steering wheel onto the steering column Steering Wheel Steering Column 5 Tab UP Large Op...

Page 10: ...End of Steering Column 8 Lock Nut 8 x 5 8 Screw Fit the steering wheel cap into the center of the steering wheel Insert two 8 x 1 screws and tighten Insert the 5 32 x 11 2 pin through the hole in the...

Page 11: ...ht slots in the grille Press firmly to snap the lens assembly into the grille Repeat this procedure to snap the other lens assembly into the grille 11 Position the windshield so that the molded detail...

Page 12: ...t belt strap through a slot in the center of the seat Make sure the fasteners face the outer edge of the seat Pull each side of the long seat belt strap evenly through the slots Make sure to pull each...

Page 13: ...e plastic tie holding Map in the clip Fit the clip to the windshield Insert a 10 x screw into the clip and tighten Replace Map into the clip Note to Retailer Do not remove the plastic tie Simply remov...

Page 14: ...top side of the vehicle Push down firmly on a sport bar support while pulling up on the side fender to fit the sport bar into the vehicle Repeat this procedure on the other side of the vehicle K4563pr...

Page 15: ...ight Lens 8 x 1 Screws Turn the vehicle upright Using safety scissors remove the taillight lenses and the taillight housings from the plastic connectors Dispose of the plastic connectors Face the rear...

Page 16: ...exhausted batteries from the product Dispose of batteries safely Do not dispose of product in a fire The batteries may explode or leak Never short circuit the battery terminals Use only batteries of t...

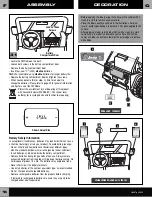
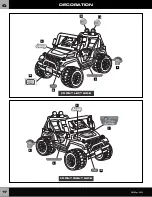
Page 17: ...H4433pr 0920 FRONT LEFT SIDE FRONT RIGHT SIDE 17 DECORATION G 13 4 3 K4563pr 0920 3 10 4 13 18 10 6 1 6...

Page 18: ...rtment Hood Hood Latches Lower the hood and secure the hood latches Hood Latches Battery Retainer IMPORTANT Use only a Power Wheels 12 volt lead acid rechargeable battery Use of any other battery will...

Page 19: ...ysician If acid is internally ingested give water milk of magnesia or egg whites immediately Never give emetics or induce vomiting Call a physician Charge a new battery for at least 18 hours before fi...

Page 20: ...ll lit area 7 Do not allow your child to drive on sloped or inclined surfaces Restrict your child s driving to generally level ground ONLY 8 Do not allow your child to drive down or across a steep slo...

Page 21: ...vehicle before shifting from forward to reverse Once your child is completely comfortable with operating the vehicle in the forward mode introduce reverse Make sure the shifter is in the reverse posi...

Page 22: ...ext station with good reception Hint Each time power is turned off and back on the FM Radio will reset to the first station Setting the Digital Clock Press the power button off Press the hour adjust b...

Page 23: ...cause harmful interference to radio or television reception which can be determined by turning the equipment off and on the user is encouraged to try to correct the interference by one or more of the...

Page 24: ...o not drive up hills or run into fixed objects which can cause the wheels to stop spinning while power is still being supplied to the motors If a thermal fuse continually trips contact your local Powe...

Page 25: ...s before operating the vehicle again To avoid repeated automatic shutdowns do not overload the vehicle by exceeding the 130 lb 59 kg maximum weight capacity or by towing anything behind the vehicle Do...

Page 26: ...and all connectors to make sure they are tight Motor or electrical switch damage Contact your local Power Wheels authorized service center for diagnosis and repair When the go foot pedal is pressed th...

Page 27: ...lly different location Power was turned off and the radio Use the scan button to reset to your favorite station reset back to the first station Digital Clock display is faint C batteries are weak or d...

Page 28: ...related titles logos and characters are trademarks of Viacom International Inc Fisher Price Inc a subsidiary of Mattel Inc East Aurora New York 14052 U S A 2005 Mattel Inc All Rights Reserved and desi...

Reviews: