background image

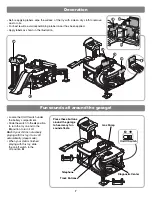
Decoration

• Before applying labels, wipe the surface  of the toy with a clean, dry cloth to remove

dust or oils.

• For best results, avoid repositioning a label once it has been applied.

• Apply labels as shown in the illustration.

4

6

9

10

1

7

2

3

Fun sounds all around the garage!

Press these buttons
around the garage
to hear many fun
sound effects.

Telephone

Gas Pump

Diagnostic Center

Track Entrance

• Locate the On/Off switch under

the battery compartment.

• Slide the switch to the 

position

to turn the toy on and to the

o

position to turn it off.

Hint:

If your child is not actively

playing with this toy, it turns off
automatically (sleep mode)

.

• When your child is finished

playing with this toy, slide
the on/off switch to the
off position 

o

.

On/Off Switch

o

7

5

8

Summary of Contents for Ramps Around Garage B1832

Page 1: ... Please keep this instruction sheet for future reference as it contains important information Requires three AA LR6 alkaline batteries not included Adult assembly is required Tool required for assembly and battery installation Phillips screwdriver not included ...

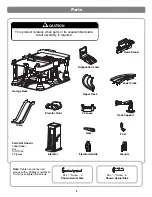
Page 2: ...Car Tow Truck 2 Figures 6 x 1 Screw 4 Shown Actual Size 6 x 1 2 Screw 6 Shown Actual Size Elevator Elevator Handle Elevator Roof Upper Track Lower Track Track Support Garage Base Diagnostic Center Post Gate Ramp Vacuum News Stand 2 Fences Note Tighten and loosen all screws with a Phillips screwdriver Do not over tighten the screws ...

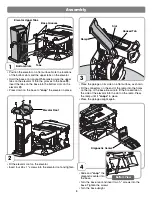
Page 3: ...6 x 1 screws into the elevator roof and tighten Elevator Roof Bottom Slots Elevator Upper Tabs Base Grooves Tabs Place the garage on its side on a flat surface as shown Fit the connectors on the end of the ramp into the holes on the top of the base Be sure to fit the hooked tab on the side of the elevator into the slot on the ramp Press the ramp until it snaps in place Place the garage upright aga...

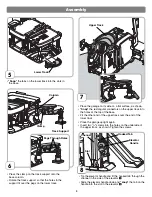
Page 4: ...shown Snap the rectangular connectors on the upper track into the holes at the top of the base Fit the other end of the upper track over the end of the lower track Place the garage upright again Insert two 1 2 screws into the holes on the underside of the upper track as shown Tighten the screws Upper Track 7 Tip the elevator handle and fit the hooked tab through the channel in the side of the elev...

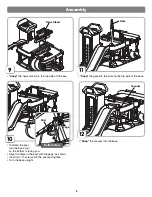
Page 5: ...urn the base over so the bottom is facing you Align the holes in the post with the pegs as shown Insert two 1 2 screws into the post and tighten Turn the base upright Post Pegs Vacuum Bottom View Snap the gate into the slots on the top side of the base Gate 11 Snap the vacuum into the base 12 10 ...

Page 6: ... battery leakage Do not mix old and new batteries or batteries of different types alkaline standard carbon zinc or rechargeable nickel cadmium Insert batteries as indicated on the battery compartment door Remove batteries during long periods of non use Always remove exhausted batteries from the toy Dispose of batteries safely Do not dispose of batteries in a fire The batteries may explode or leak ...

Page 7: ...ss these buttons around the garage to hear many fun sound effects Telephone Gas Pump Diagnostic Center Track Entrance Locate the On Off switch under the battery compartment Slide the switch to the position to turn the toy on and to the o position to turn it off Hint If your child is not actively playing with this toy it turns off automatically sleep mode When your child is finished playing with th...

Page 8: ...or modifications not expressly approved by the manufacturer responsible for compliance could void the user s authority to operate the equipment Consumer Information Questions We d like to hear from you Call Fisher Price Consumer Relations toll free at 1 800 432 5437 8 AM 6 PM EST Monday through Friday Hearing impaired consumers using TTY TDD equipment please call 1 800 382 7470 Or write to Fisher ...

Reviews: