e
Assembly Tip
f
Conseil d'assemblage
e
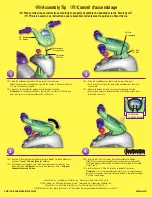
Please follow these instructions carefully to properly assemble the pedals to the Smart Cycle
™
.
f
Prière de suivre ces instructions pour assembler correctement les pédales au Smart Cycle.
e
• Locate the left pedal marked with an
L
on the outside end.
• Fit the threaded end of the left pedal into the hole in the left pedal axle marked
with an
L
.
• Hand-tighten the pedal by turning it
COUNTER-CLOCKWISE
.
f
• Repérer la pédale gauche identifiée par un
L
à l'extrémité.
• Insérer l'extrémité filetée de la pédale gauche dans le trou de l'axe de la pédale
gauche qui est marqué par un
L
.
• Serrer la pédale manuellement en la faisant tourner dans le
SENS ANTI-HORAIRE.
e
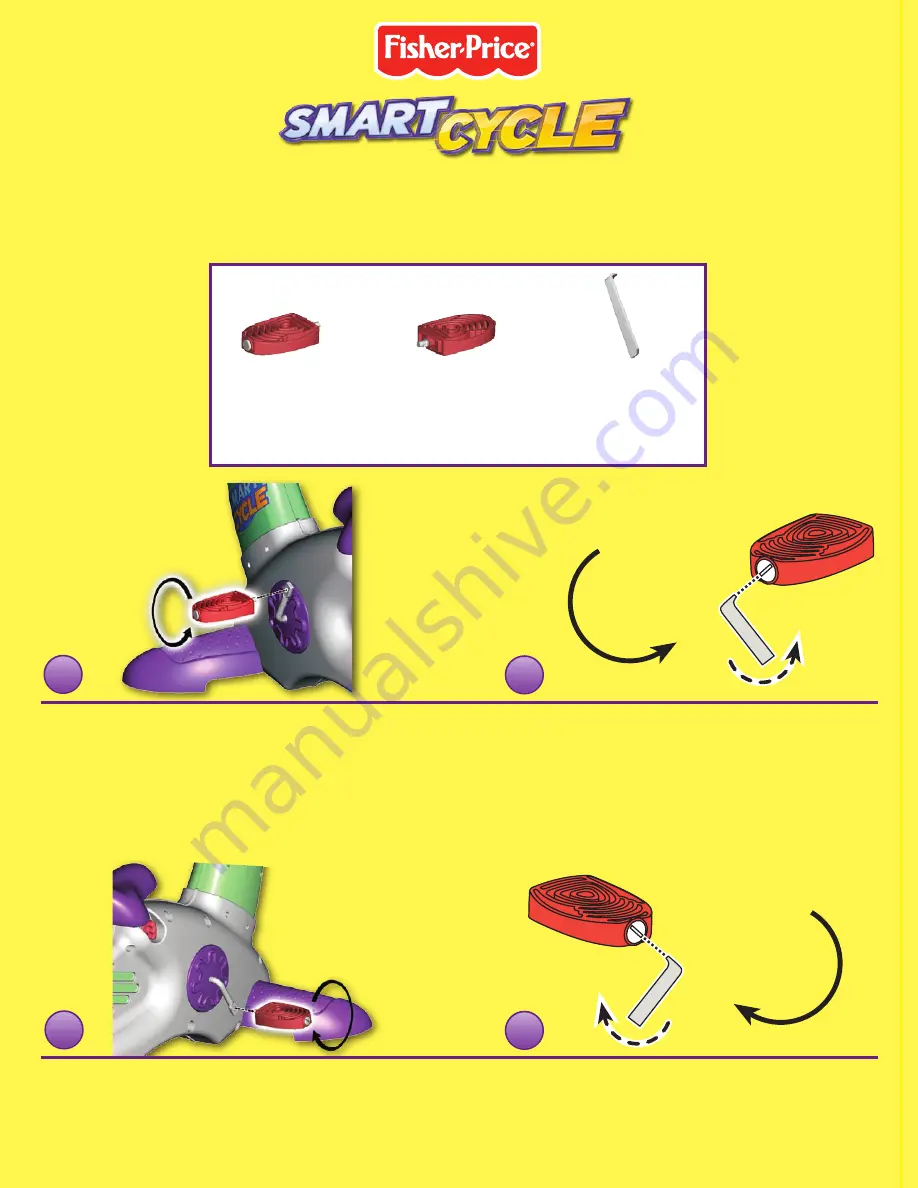
• Fit the end of the assembly tool to the groove in the end of the pedal.
• Turn the assembly tool
COUNTER-CLOCKWISE
to
fully
tighten the pedal.
f
• Insérer l'outil d'assemblage dans la rainure à l'extrémité de la pédale.
• Tourner l'outil d'assemblage dans le
SENS ANTI-HORAIRE
pour
bien
serrer la pédale.
e
• Fit the end of the assembly tool to the groove in the end of the pedal.
• Turn the assembly tool
CLOCKWISE
to
fully
tighten the pedal.
f
• Insérer l'outil d'assemblage dans la rainure à l'extrémité de la pédale.
• Tourner l'outil d'assemblage dans le
SENS HORAIRE
pour
bien
serrer
la pédale.
e
Left Pedal
f
Pédale gauche
e
Right Pedal
f
Pédale droite
e
Assembly Tool
f
Outil d'assemblage
e
Your Smart Cycle includes a left and right pedal along with an assembly tool.
You must use the assembly tool to attach the pedals.
f
Une pédale gauche, une pédale droite et un outil d'assemblage sont inclus avec le Smart Cycle.
L'outil d'assemblage doit être utilisé pour fixer les pédales.
e
• Fit the threaded end of the right pedal (marked with an
R
) into the hole in the
right pedal axle (also marked with an
R
).
• Hand-tighten the pedal by turning it
CLOCKWISE
.
f
• Insérer l'extrémité filetée de la pédale droite (identifiée par un
R
) dans le trou
pratiqué dans l'axe de la pédale droite (aussi identifié par un
R
).
• Serrer la pédale manuellement en la faisant tourner dans le
SENS HORAIRE
.
L
R
e
C
o
u
nte
r-C
loc
kwis
e
e
Clockw
ise
f
S
e
n
s
ho
ra
ire
f
S
e
n
s
an
ti-h
ora
ire
L
R
e
C
o
u
nte
r-C
loc
kwis
e
e
Clockw
ise
f
S
e
n
s
ho
ra
ire
f
S
e
n
s
an
ti-h
ora
ire
1
2
3
4
TM


