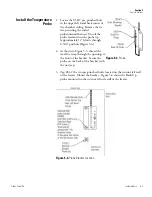
1. Locate the 0.500” pre-punched hole
in the upper left hand back corner of
the chamber ceiling. Remove the tie
wrap securing the coiled
probe/solenoid harness. Uncoil the
probe lead and run the probe tip
(approximately 12”) down through
0.500” porthole (Figure 5-4).
2. As shown in Figure 5-3, thread the
small tie wrap through the openings in
the front of the bracket. Secure the
probe on the back of the bracket with
the tie wrap.
3. Tap #8-32 the two pre-punched holes located on the interior left wall
of the freezer. Mount the bracket. Figure 5-4 shows the Back-Up
probe mounted on the interior left side wall of the freezer.
Isotemp Basic 5-3
Fisher Scientific
Section 5
Factory Options
Install the Temperature
Probe
Figure 5-3.
Probe
Figure 5-4.
Probe Bracket Location
Summary of Contents for Isotemp Basic -86C
Page 17: ......
Page 29: ......
Page 41: ......
Page 47: ...A 4 Isotemp Basic Thermo Scientific ...
Page 48: ...Fisher Scientific 300 Industry Drive Pittsburgh PA 15275 USA www fishersci com ...

