background image


12

4.2 Wiring Diagram 


Indoor unit FSAI-SU-90AE2 , FSAI-SU-120AE2 


Outdoor unit FSOAI-SU-90AE2 


Summary of Contents for FSAI-SU-120AE2

Page 1: ...oner Split Wall Mounted Type FSAI SU 90AE2 FSOAI SU 90AE2 FSAI SU 120AE2 FSOAI SU 120AE2 NOTE Before servicing the unit please read this at first Always contact with your service center if meet problem FI_SM_FSAI SU 90 120AE2_150903 ...

Page 2: ...cting the cables 14 5 3 Pipe length and the elevation 15 5 4 Installation for the first time 16 5 5 Adding the refrigerant after running the system for many years 20 5 6 Re installation while the indoor unit need to be repaired 21 5 7 Re installation while the outdoor unit need to be repaired 23 6 Operation Characteristics 26 7 Electronic function 27 7 1 Abbreviation 27 7 2 Display function 27 7 3...

Page 3: ...ir the product there is risk of fire or electric shock Always ground the product There is risk of fire or electric shock Install the panel and the cover of control box securely There is risk of fire of electric shock Always install a dedicated circuit and breaker Improper wiring or installation may cause fore or electric shock Use the correctly rated breaker of fuse There is risk of fire or electr...

Page 4: ...r electric shock Do not touch operation the product with wet hands Do not place a heater or other appliance near the power cable There is risk of fire and electric shock Do not allow water to run into electrical parts It may cause fire failure of the product or electric shock Do not store or use flammable gas or combustible near the product There is risk of fire or failure of product Do not use th...

Page 5: ... damage or failure or unintended operation Take care to ensure that nobody could step on or fall onto the outdoor unit This could result in personal injury and product damage CAUTION Always check for gas refrigerant leakage after installation or repair of product Low refrigerant levels may cause failure of product Install the drain hose to ensure that water is drained away properly A bad connectio...

Page 6: ...filter securely Clean the filter every two weeks or more often if necessary A dirty filter reduces the efficiency of the air conditioner and could cause product malfunction or damage Do not insert hands or other objects through air inlet or outlet while the product is operated Do not drink the water drained from the product Use a firm stool or ladder when cleaning or maintaining the product Be car...

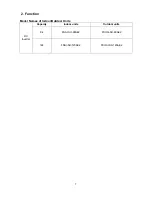
Page 7: ...7 2 Function Model Names of Indoor Outdoor Units DC Inverter Capacity Indoor units Outdoor units 9k FSAI SU 90AE2 FSOAI SU 90AE2 12k FSAI SU 120AE2 FSOAI SU 120AE2 ...

Page 8: ...8 3 Dimension 3 1 Indoor Unit W D H Model W D H FSAI SU 90AE2 715 188 250 FSAI SU 120AE2 800 188 275 ...

Page 9: ...9 Model L mm R mm H mm Dimension of installation hole mm FSAI SU 90AE2 85 88 45 65 FSAI SU 120AE2 100 95 45 ...

Page 10: ...or Unit More than 30cm More than 60cm More than 200cm More than 30cm More than 60cm Service space Fence or obstacles Model W D H W1 A B FSOAI SU 90AE2 780 250 540 843 549 276 FSOAI SU 120AE2 780 250 540 843 549 276 ...

Page 11: ...Y TUBE LIQUID SIDE GAS SIDE HEAT EXCHANGE EVAPORATOR HEAT EXCHANGE CONDENSER Compressor 2 WAY VALVE 3 WAY VALVE 4 WAY VALVE COOLING HEATING T2 Evaporator temp sensor T1 Room temp sensor T3 Condenser temp sensor Accumulator T5 Discharge temp sensor T4 Ambient temp sensor INDOOR OUTDOOR ...

Page 12: ...12 4 2 Wiring Diagram Indoor unit FSAI SU 90AE2 FSAI SU 120AE2 Outdoor unit FSOAI SU 90AE2 ...

Page 13: ...13 Outdoor unit FSOAI SU 120AE2 ...

Page 14: ... 2 Connecting the cables The power cord of connect should be selected according to the following specifications sheet Rated capacity kBTU h Nominal cross sectional area mm 9k 2 5 12k 2 5 The cable size and the current of the fuse or switch are determined by the maximum current indicated on the nameplate which located on the side panel of the unit Please refer to the nameplate before selecting the ...

Page 15: ...gth m Max Elevation B m Max Length A m Additional refrigerant g m Gas Liquid FSAI SU 90AE2 FSOAI SU 90AE2 3 8 Ф9 52 1 4 Ф6 35 5 10 25 20 FSAI SU 120AE2 FSOAI SU 120AE2 5 10 25 20 Caution The capacity test is based on the standard length and the maximum permissive length is based on the system reliability ...

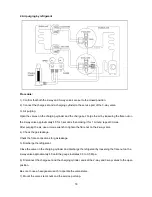
Page 16: ... and outdoor units must be leak tested and evacuated to remove gas and moisture from the system Gas leak check Soap water method Apply soap water or a liquid neutral detergent on the indoor unit connections or outdoor unit connections by a soft brush to check for leakage of the connecting points of the piping If bubbles come out the pipes have leakage 1 Air purging with vacuum pump Indoor unit Liq...

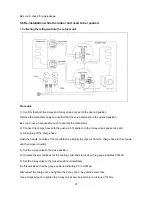
Page 17: ... minutes it should be pumped 20 minutes more If the pressure can t achieve 0 1Mpa after pumping 50 minutes please check if there are some leakage points Fully close the handle Lo valve of the manifold valve and stop the operation of the vacuum pump Confirm that the gauge needle does not move approximately 5 minutes after turning off the vacuum pump 7 Turn the flare nut of the 3 way valves about 45...

Page 18: ...ute repeat 3 times After purging the air use a torque wrench to tighten the flare nut on the 2 way valve 4 Check the gas leakage Check the flare connections for gas leakage 5 Discharge the refrigerant Close the valve on the charging cylinder and discharge the refrigerant by loosening the flare nut on the 2 way valve approximately 45 until the gauge indicates 0 3 to 0 5 Mpa 6 Disconnect the charge ...

Page 19: ... the valve at the bottom of the cylinder and press the check valve on the charge set to purge the air be careful of the liquid refrigerant 3 Put the charging cylinder onto the electronic scale and record the weight 4 Operate the air conditioner at the cooling mode 5 Open the valves Low side on the charge set and charge the system with liquid refrigerant 6 When the electronic scale displays the pro...

Page 20: ...he charge set to purge the air be careful of the liquid refrigerant 3 Put the charging cylinder onto the electronic scale and record the weight 4 Operate the air conditioner at the cooling mode 5 Open the valves Low side on the charge set and charge the system with liquid refrigerant 6 When the electronic scale displays the proper weight refer to the gauge and the pressure of the low side disconne...

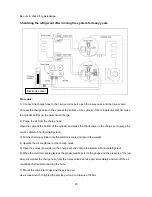
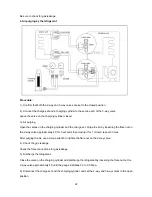
Page 21: ...handle lo to the 3 way valves gas service port 3 Air purging of the charge hose Open the handle Lo valve of the manifold valve slightly to purge air from the charge hose for 5 seconds and then close it quickly 4 Set the 2 way valve to the close position 5 Operate the air conditioner at the cooling cycle and stop it when the gauge indicates 0 1MPa 6 Set the 3 way valve to the closed position immedi...

Page 22: ... loosening the flare nut on the 2 way valve approximately 45 for 3 seconds then closing it for 1 minute repeat 3 times After purging the air use a torque wrench to tighten the flare nut on the 2 way valve 4 Check the gas leakage Check the flare connections for gas leakage 5 Discharge the refrigerant Close the valve on the charging cylinder and discharge the refrigerant by loosening the flare nut o...

Page 23: ...d 1 Evacuation for the whole system Procedure 1 Confirm that both the 2 way and 3 way valves are set to the opened position 2 Connect the vacuum pump to 3 way valve s service port 3 Evacuation for approximately one hour Confirm that the compound meter indicates 0 1Mpa 4 Close the valve Low side on the charge set turn off the vacuum pump and confirm that the gauge needle does not move approximately...

Page 24: ...ale and record the weight 4 Open the valves Low side on the charge set and charge the system with liquid refrigerant If the system cannot be charge with the specified amount of refrigerant or can be charged with a little at a time approximately 150g each time operating the air conditioner in the cooling cycle however one time is not sufficient wait approximately 1 minute and then repeat the proced...

Page 25: ...25 Use torque wrench to tighten the service port cap to a torque of 18N m Be sure to check for gas leakage ...

Page 26: ...ditions certain safety protection features may come into operation and cause the unit to operate abnormally 2 The room relative humidity should be less than 80 If the air conditioner operates beyond this figure the surface of the air conditioner may attract condensation Please set the vertical air flow louver to its maximum angle vertically to the floor and set HIGH fan mode 3 The optimum performa...

Page 27: ...n on this unit defrost DEFROST indication lamp For cooling heating models only Lights up when the air conditioner starts defrosting automatically or when the warm air control feature is activated in heating operation run OPERATION indication lamp This lamp illuminates when the air conditioner is in operation timer TIMER indication lamp Lights up during Timer operation Temperature indicator Display...

Page 28: ...orking 7 3 6 Indoor fan delayed open function When the unit starts up the louver will be active immediately and the indoor fan will open 10s later If the unit runs in heating mode the indoor fan will be also controlled by anti cold wind function 7 3 7 Compressor preheating functions Preheating permitting condition When T4 outdoor ambient temperature 3 C the preheating function will be activated 7 ...

Page 29: ...29 7 3 10 Zero crossing detection error protection If AC detects time interval is not correct the unit will stop and the LED will display the failure ...

Page 30: ...ing Mode 7 4 2 1 Compressor running rules When T1 Ts 2 the compressor will stop when T1 TS 0 5 the compressor will be activated When the AC run in mute mode the compressor will run with low frequency When the current is more than setting value the current protection function will be activated and the compressor will stop 7 4 2 2 Outdoor fan running rules The outdoor unit will be run at different f...

Page 31: ...is controlled as below Setting fan speed Actual fan speed H H H G A H H B C M M M Z D M M M E F L L L D G L L L H I T1 Td F L L L L D H H H H G M M M M Z The auto fan acts as below rules a b c d T 1 e 7 4 2 4 Condenser temperature protection T3 Resume Off Decrease Hold When condenser temperature temp is more than setting value the compressor will stop 7 4 2 5 Evaporator temperature protection When...

Page 32: ...ng to T4 For different outdoor units the fan speeds are different T 4 E D C B A A 7 4 3 3 Indoor fan running rules When the compressor is on the indoor fan can be set to high med low auto When indoor unit coil temp is low the anti cold air function will start and indoor fan motor will run at low speed the speed can t be changed when the temp is lower than setting value the indoor fan motor will st...

Page 33: ... to the value of temp of T3 and the value range of temp change of T3 and also the compressor running time During the defrosting mode the compressor keep running indoor and outdoor motor will stop defrost lamp of the indoor unit will be lighted Will be displayed 7 4 3 5 Evaporator coil temperature protection Resume Off Decrease Hold When evaporator temperature temp is more than the setting protecti...

Page 34: ...ill keep stopping for certain time and then choose mode according to T1 Ts If the setting temperature is modified the machine will choose running function again 7 4 5 Drying mode 7 4 5 1 Indoor fan speed is fixed at breeze and can t be changed The louver angle is the same as in cooling mode 7 4 5 2 Low indoor room temperature protection In drying mode if room temperature is lower than 10 the compr...

Page 35: ... is the same as normal auto mode with 24 setting temperature 7 4 7 Auto Restart function The indoor unit is equipped with auto restart function which is carried out through an auto restart module In case of a sudden power failure the module memorizes the setting conditions before the power failure The unit will resume the previous operation setting not including swing function automatically after ...

Page 36: ...36 The PCB will detect the voltage of power supply and adjust the compressor running frequency to protect the system ...

Page 37: ...tion Displaying code Meaning T1 T1 T1 temp T2 T2 T2 temp T3 T3 T3 temp T4 T4 T4 temp T2B Tb T2B temp TP TP TP temp TH TH TH temp Targeted Frequency FT Targeted Frequency Actual Frequency Fr Actual Frequency Indoor fan speed IF Indoor fan speed Outdoor fan speed OF Outdoor fan speed EXV opening angle LA EXV opening angle Compressor continuous running time CT Compressor continuous running time Cause...

Page 38: ...31 139 E0 E1 E9 140 141 149 F0 F1 F9 150 151 159 Indoor fan speed Outdoor fan speed 0 OFF 1 2 3 4 Low speed Medium speed High speed Turbo For some big capacity motors 14 FF Actual fan speed Display value turns to decimal value and then multiply 10 The unit is RPM For some small capacity motors display value is from 14 FF hexadecimal the corresponding fan speed range is from 200 2550RPM EXV opening...

Page 39: ...mperature T2 sensor 7 times X EC Refrigerant Leakage Detection 1 times O F0 Overload current protection 2 times O F1 Open circuit or short circuit of outdoor ambient T4 temperature sensor 3 times O F2 Open circuit or short circuit of condenser coil temperature T3 sensor 4 times O F3 Open circuit or short circuit of compressor discharge T5 temperature sensor 5 times O F4 Outdoor unit EEPROM paramet...

Page 40: ...40 8 2 Diagnosis and Solution 8 2 1 EEPROM parameter error diagnosis and solution E0 EEPROM a read only memory whose contents can be erased and reprogrammed using a pulsed voltage ...

Page 41: ...41 8 2 2 Indoor unit and outdoor unit communication protection error diagnosis and solution E1 ...

Page 42: ...42 8 2 3 Zero crossing detection error diagnosis and solution E2 8 2 4 Fan speed has been out of control diagnosis and solution E3 F5 ...

Page 43: ...control chip is in outdoor PCB Power on and check if the fan can run normally if the fan can run normally the PCB must has problems and need to be replaced If the fan can t run normally measure the resistance of each two pins If the resistance is not equal to each other the fan motor must have problems and need to be replaced otherwise the PCB must has problems and need to be replaced 3 Indoor AC ...

Page 44: ...emperature sensor diagnosis and solution E4 E5 F1 F2 F3 Check the connection between temperature sensor and PCB Correct the connection No Yes Replace indoor or outdoor main PCB Measure the resistance value of the sensor Repalce the sensor No Yes ...

Page 45: ...45 8 2 6 Refrigerant Leakage Detection diagnosis and solution EC ...

Page 46: ...46 8 2 7 IPM malfunction or IGBT over strong current protection diagnosis and solution P0 ...

Page 47: ...47 8 2 8 Over voltage or too low voltage protection diagnosis and solution P1 ...

Page 48: ...48 8 2 9 High temperature protection of compressor top diagnosis and solution P2 ...

Page 49: ...49 8 2 10 Inverter compressor drive error diagnosis and solution P4 ...

Page 50: ...TAGE CAUTION Connect discharge resistance approx 100Ω 40W or soldering iron plug between terminals of the electrolytic capacitor on the contrary side of the outdoor PCB Note The picture above is only for reference The plug of your side may be different Main parts check 1 Temperature sensor checking Disconnect the temperature sensor from PCB measure the resistance value with a tester ...

Page 51: ...of each winding by using the multi meter Table 1 Some frequently used R T data for T1 T2 T3 and T4 sensor Temperature 5 10 15 20 25 30 40 50 60 Resistance Value KΩ 26 9 20 7 16 1 12 6 10 8 5 2 3 5 2 4 Table 2 Some frequently used R T data for T5 sensor Temperature 5 15 25 35 60 70 80 90 100 Resistance Value KΩ 141 6 88 56 1 36 6 13 8 9 7 6 9 5 3 7 Resistance value KΩ Temperature T5 T1 T2 T3 T4 ...

Page 52: ...del FSAI SU 90AE2 FSOAI SU 90AE2 FSAI SU 120AE2 FSOAI SU 120AE2 Compressor ASK89D53UEZ ASK89D53UEZ Indoor fan motor RPG20E RPG20E Outdoor fan motor WZDK36 38G W WZDK36 38G W Note The motor marked means DC fan motor with control chip in the PCB ...

Page 53: ...e 3 IPM continuity check Turn off the power let the large capacity electrolytic capacitors discharge completely and dismount the IPM Use a digital tester to measure the resistance between P and UVWN UVW and N Digital tester Normal resistance value Red Black Several MΩ P N U V W Digital tester Normal resistance value Red Black Several MΩ U N V W 4 Indoor AC Fan Motor Measure the resistance value of...

Page 54: ...54 Position Resistance Value RPG20E Black Red 430Ω 8 20 Brand Dayang 388Ω 8 20 Brand Weiling White Black 370Ω 8 20 Brand Dayang 360Ω 8 20 Brand Weiling ...

Reviews: