background image

Lit. No. 94196/94197/94198, Rev. 05 

16 

November 1, 2010

OPERATING THE SPREADER – CAB CONTROL

DIAGNOSTIC INDICATOR LIGHT AND 
AUDIO BEEP

The diagnostic indicator light located to the right of 
the START/BLAST button remains dark unless a 
problem with the motor or wiring is detected. The light 
will 

fl

 ash in coordination with an audio beep a number 

of 

fl

 ashes/beeps in a row, pause, then repeat. Count 

the 

fl

 ashes/beeps to determine the nature of the 

malfunction and refer to diagnostic chart below.

NOTE: Always close the lids on the hopper to 
prevent moisture buildup. Do not let spreader sit 
idle with material in the hopper for an extended 
period of time. This can cause material to 
compact, reduce or stop the 

fl

 ow of material and 

cause permanent hopper body deformation.

# of

Flashes/Beeps

Problem

Possible Cause

0

No  Error

1

No Communication

Loss of communication between spreader module and cab control. Vehicle 
cable assembly is disconnected or faulty.

2

Empty Hopper

Spreader is empty or material has bridge in the hopper.

3

Conveyor Over Current Over 70 amps for up to 3 seconds. Conveyor Chain is stalled.

4

No Power

Battery fuse is blown or vehicle cable assembly is disconnected or faulty.

5,8

Over Temp

Motor is OFF due to spreader module overheating from high-current draw 
over a long period of time.

6

Battery Saver

Reduced spreader performance due to vehicle voltage drop. Spreader will 
function at reduced output until vehicle voltage increases.

7

Spinner Over Current Over 32 amps for up to 3 seconds. Spinner is stalled.

9

Sander Reset

Module came out of reset. Momentary loss of power. Restart unit, check 
power wiring.

10

Cool Down

If the unit gets more than 5 faults with each fault starting within 60 seconds 
from the last, it will not start for 60 seconds from the last fault to allow the unit 
to cool.

11

Low Battery

Low battery voltage or poor electrical connection of vehicle cable assembly.

Summary of Contents for POLY-CASTER 78001

Page 1: ...r 1 2010 Lit No 94197 Rev 05 POLY CASTER Hopper Spreader 78001 78004 78007 Owner s Manual This manual is for FISHER POLY CASTER Hopper Spreaders with serial numbers beginning with 090528 and higher CA...

Page 2: ......

Page 3: ...ns 10 Determining Vehicle Payload 10 Determining Vehicle Payload Worksheet 11 MOUNTING THE SPREADER 12 OPERATING THE SPREADER CAB CONTROL 15 Starting and Stopping the Motor 15 Adjusting Spinner Convey...

Page 4: ......

Page 5: ...__________ Serial ______________________ Length ________________________ Weight __________________ lb kg _________________ This manual has been prepared to acquaint you with the safety information ope...

Page 6: ...Owner s Manual before operating or servicing spreader Empty and clean spreader after every use CAUTION WARNING 68584 SAFETY INFORMATION WARNING CAUTION LABELS Please become familiar with the Warning a...

Page 7: ...we recommend the addition of an OSHA compliant Backup Alarm This alarm is required for OSHA governed employers CAUTION Do not operate a spreader in need of maintenance Before operating the spreader re...

Page 8: ...60 M 8 17 M 14 95 M 10 35 M 16 155 These torque values apply to fasteners except those noted in the instruction CAUTION Batteries normally produce explosive gases which can cause personal injury Ther...

Page 9: ...NG Overloading could result in an accident or damage Do not exceed GVWR or GAWR as found on the driver side cornerpost of vehicle WARNING New untitled vehicle installation of a spreader requires Natio...

Page 10: ...the GVWR to determine the available material payload 6 Obtain the weight per cubic yard lb cu yd of the desired material Divide the weight into the payload to determine the maximum volume of material...

Page 11: ...r Front Gross Axle Weight Rating FGAWR lb Rear Gross Axle Weight Rating RGAWR lb Gross Vehicle Weight Rating GVWR lb 8600 Gross Vehicle Weight empty lb 6500 Payload Available lb 2100 Material Density...

Page 12: ...e supplied bars to the correct length c Attach them to the sill brackets using the supplied hardware as shown MOUNTING THE SPREADER 4 The spreader can be moved into the truck bed either by lifting the...

Page 13: ...holdling the wire harness to the conveyor chain Connect the vehicle side harness to the hopper side harness 11 Assemble the material deflectors to the sill a Loosen both carriage bolts for the bearing...

Page 14: ...EADER 12 To assemble the chute to the spreader a Select the height for the chute assembly The upper chute position using lower two slots is typically used for pickup truck installations b Remove the e...

Page 15: ...e motors will stop START BLAST Button OFF Button Emergency Stop Spinner Speed Dial Conveyor Speed Dial Diagnostic Indicator Light ADJUSTING SPINNER CONVEYOR SPEED The speed setting can be adjusted whe...

Page 16: ...nication between spreader module and cab control Vehicle cable assembly is disconnected or faulty 2 Empty Hopper Spreader is empty or material has bridge in the hopper 3 Conveyor Over Current Over 70...

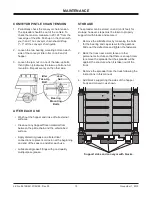
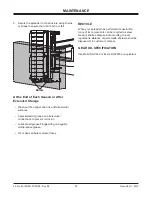
Page 17: ...n handles located on the corner legs or by sliding the spreader out of the truck bed onto the ground 2 To remove the spreader from the truck without a lifting device first make sure all material has b...

Page 18: ...etween the sprockets GREASE FITTINGS To keep your spreader running smoothly observe the following recommendations Lubricate grease fittings after each use and at the end of each season DRIVE BELT AND...

Page 19: ...ace Apply dielectric grease on all electrical connections to prevent corrosion at the beginning and end of the season and after each use Lubricate all grease fittings with good quality multipurpose gr...

Page 20: ...all electrical connections to prevent corrosion Lubricate all grease fittings with good quality multipurpose grease Oil or paint all bare metal surfaces RECYCLE When your spreader has performed its u...

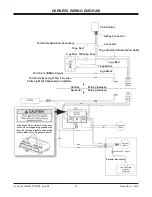
Page 21: ...ir Cable 4 ga Red 18 ga Black 4 ga Black Wiring Harness Wiring Harness Vehicle Spreader To Vehicle CHMSL Signal To Vehicle Park Light Tap if License Plate Light Kit Optional is installed Battery 100 A...

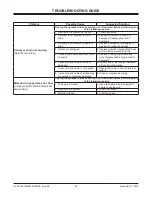
Page 22: ...cab control by turning the power OFF Depress the START BLAST switch to resume operation 2 Wire harness is damaged or has an open circuit between cab control and spreader 2a Check plug connections at c...

Page 23: ...not turn when input shaft turns 5 Conveyor sprockets are not secured to shafts 5 Replace missing cap screws and nuts Replace shafts or sprockets if damaged 6 Conveyor pintle chain is loose or damaged...

Page 24: ...n or design details and furnish equipment when so altered without reference to illustrations or specifications used Fisher Engineering or the vehicle manufacturer may require or recommend optional equ...

Reviews: