


- 24 -
Using salt damage inhibitor SALT-AWAY included in the FIX maintenance kit, sold
separately, is even more effective.
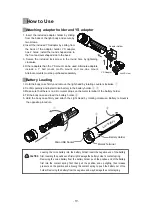
1. Submerge the light body into fresh water for about 10-20 minutes before opening the light head
after use. Also press the Power Button/Light Output Adjustment Button and Light Output
Adjustment Button in fresh water several times and wash off the salt deposits around buttons.
2.After removing from fresh water, rinse with slow flowing running water. Never use high pressure
water from one direction as it may cause water intrusion.
3.After rinsing, wipe off remaining water with a soft dry cloth. Do not dry in direct sunlight or dry
with a dryer or stove as it may cause failure, deformation or damage.
4.After use, lightly coat the O-ring with silicon grease and store. Replacing with a new O-ring once
a year is recommended.
5. For long time storage, avoid areas of extreme high temperature and humidity, direct sunlight or
extreme cold temperature.
6. Never use any organic solvents such as alcohol, benzene or thinner or neutral detergents as it
may cause deformation or damage.
The circuit board location of this product is waterproof to minimize the damage even in case of
water intrusion occurring inside the light body. The battery is also “drip-proof”. In case of water
intrusion, however, immediately stop using this product and remove any residual water inside of
the light and the battery. Do not put the battery back in the light body and store it separately. If
there is some water remaining inside, it may cause electric shock or damage to the circuit board
therefore never use it after water intrusion and contact Fisheye or your local retailer for service.
After Use Care and Storage
What to do In case of internal water contact
Regular overhaul is recommended once every 1-2 years, regardless of the frequency of use of
this product. Waterproof O-rings that cannot be exchanged by customers are used inside of the
product. Please ask Fisheye Customer Service for overhaul after a certain period of time to
exchange and maintain these to prevent accidents and extend the life of the product.
Recommended Service
After use in salt water, if salt deposits are allowed to remain and dry in small gaps, salt
crystals will form and will not subsequently dissolve. Make sure to submerge in fresh water
to wash off the salt deposits as these salt crystals may occasionally push up the O-ring and
cause water intrusion.
CAUTION
NOTE
Summary of Contents for FIX NEO Mini 1000 WR FS
Page 1: ...NEO Mini 1000WR FS user manual...
Page 2: ...2 O 3 5 6 7 7 8 9 10 10 11 12 13 28...
Page 3: ...3 FIX NEO Mini...
Page 4: ...4 100m O...
Page 6: ...6 LED LED LED...
Page 7: ...7 1 2 2 YS YS 2 3 4 YS GoPro Loc Line YS YS Li ion USB Li ion 1 2 Li ion 3 4 USB 5...
Page 8: ...8 O O O O LED 1 2 AC 3 USB A 4 USB B USB 5 LED 6 LED 4 7 USB 100 240V 30 USB NOTE...
Page 9: ...9 1000WR FS LED 1 1 LED 1 1 LED NOTE 1 2 LED 2 LED 100 75 50 25...
Page 10: ...10 OFF ON 100 NOTE 4 NOTE 60 20 OFF 45 25 20 LCD 10 1 2...
Page 11: ...11 O O O O O O O O O O O O O O O O FIX NEO Mini O O 1 2 O...
Page 12: ...12 1 10 20 2 3 4 O O 1 5 6 O 1 2 O FIX NOTE Tel 03 5988 0191...
Page 13: ...13 1 2 3 4 5 6 7 8...
Page 26: ...26 Memo...
Page 27: ...27 Memo...