background image

- 18 -

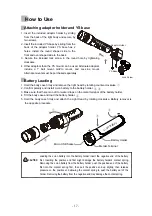
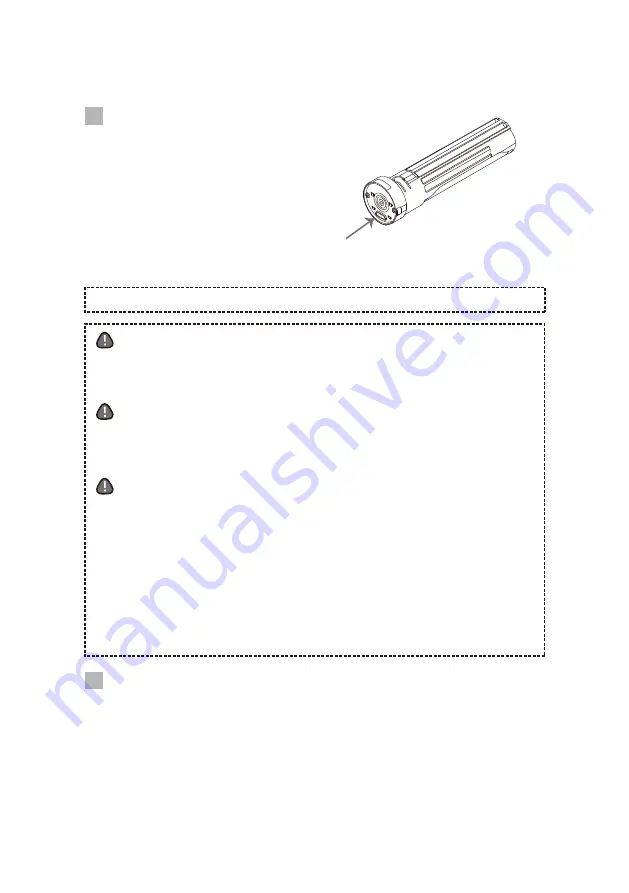
1. Take the battery holder out of the light.
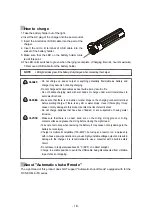
2. Insert the AC plug of the charger into the power outlet.
3. Insert the A terminal of USB cable into the port of the 

charger.

4. Insert the micro B terminal of USB cable into the 

socket of the battery holder.

5. Make sure that the LED on the battery holder turns 

red at this point.

6. The LED color switches to green when charging is complete. (Charging time is 4 hours maximum) 

7. Remove a USB cable from the battery holder.

The Light Head of this product does NOT support "Automatic shut-off mode" equipped with for the 
FIX NEO Mini FS series.

About "Automatic shut-off mode"

DANGER

- Do not charge on paper, carpet or anything potentially flammable as battery and 

charger may become hot during charging.

- Do not charge with coiled cables as heat build-up may result in fire.
- Do not handle charging work with wet hands or charge under wet circumstances to 

avoid electric shock.

- Make sure that there is no debris or water drops on the charging connector terminal 

before starting charge. If there is any dirt or water drops, clean it thoroughly. It may 
cause not only damage to this product but also the riskof electric shock.

- Do not charge batteries that have been flooded, or are suspected of having water 

intrusion.

- Make sure that there is no dust, sand etc. on the O-ring, O-ring groove or O-ring 

contact surface and grease the O-ring before closing the Light Head.

- Take care not to drop when removing the battery. It may cause not only damage to the 

battery but also injury.

- Charger is multi-volt compatible (100‒240V), but using at a resort or on a cruise ship 

with in-house power generation may cause highly unstable voltage output and result in 
damage to the charger. It is recommended to use a converter with a built-in safety 
circuit.

- Do not leave in temperatures above 30°C (86°F) or in direct sunlight.
- Charge in a stable position to avoid the USB cable being disconnected from vibration, 

impact shock or dropping.

WARNING

CAUTION

How to charge

LED light remains green if the battery is fully charged when connecting the charger.

NOTE

Summary of Contents for FIX NEO Mini 800SS

Page 1: ...NEO Mini 800SS user manual...

Page 2: ...2 O 3 4 5 6 6 7 8 8 8 9 10 11 24...

Page 3: ...3...

Page 4: ...CR123 x2 4 100m O FIX NEO Mini 800SS 800 6 000 6 500K 120 10 4 Li ion 3 100mAh 100m W38 x H40 x L155mm 185g 65g Li ion USB A B YS O O O x2...

Page 5: ...5 LED LED...

Page 6: ...6 1 2 2 YS 3 4 YS FIX NEO GoPro Loc Line YS YS Li ion USB Li ion 1 1 2 Li ion 2 3 3 4 USB 4 5...

Page 7: ...7 LED 1 2 AC 3 USB A 4 USB B USB 5 LED 6 LED 4 7 USB 8 USB O O O O 100 240V 30 C USB FIX NEO Mini FS NOTE...

Page 8: ...8 LED 1 1 LED OFF ON 100 NOTE 55 C 20 4 100 75 50 25 20 LED 10...

Page 9: ...9 O O O O O O O O O O O O O O O O O O 1 2 O...

Page 10: ...10 1 10 20 2 3 4 O O 1 5 6 O 1 2 O FIX NOTE Tel 03 5988 0191...

Page 11: ...11 1 2 3 4 5 6 7 8...

Page 12: ...isheye or your local supplier This manual may not be reproduced or copied in whole or part for any reason except personal use Introduction Safety Specifications Name of Parts How to Use Attaching the...

Page 13: ...stalled to prevent battery off gassing or leaking Do not shine the light directly into your eyes or another person s eyes Doing so may cause permanent eye damage Do not turn on the light with the ligh...

Page 14: ...seal the light in environments where an excess of sand dirt lint dust or animal hair are present These elements and other free floating bodies can breach O ring sealing surfaces and cause the light t...

Page 15: ...Mini 800SS 800 lumens 6 000 6 500K approx 120min approx 10 degrees Not available 4 hours max Li Ion 3 100mAh 100m W38 x H40 x L155mm 185g 65g Product Name Li ion Battery Battery Charger USB cable A mi...

Page 16: ...16 Names of Parts Light Head Body Case Power Button Body Case Wrist lanyard installation hole Adaptor Holder LED...

Page 17: ...he battery holder s contact spring Removing the Li ion battery from the battery holder push the positive end of the battery first into the contact spring first then pull the positive end up slightly t...

Page 18: ...is no debris or water drops on the charging connector terminal before starting charge If there is any dirt or water drops clean it thoroughly It may cause not only damage to this product but also the...

Page 19: ...nutes When initially powered ON the NEO Mini will always start with 100 This product is NOT designed to memorize the light output setting when the power is turned OFF NOTE The light output is cycles i...

Page 20: ...lint or dust and cause water intrusion Never use and immediately exchange with a spare O ring if there are any small cuts or cracks on the O ring surface Make sure that there is no sand small lint or...

Page 21: ...location of this product is waterproof to minimize the damage even in case of water intrusion occurring inside the light body The battery is also drip proof In case of water intrusion however immediat...

Page 22: ...ll be charged at normal rates 1 Damage caused by improper use such as mishandling not in accordance with handling cautions in the User Manual 2 When the light is repaired modified or disassembled by a...

Page 23: ...23 Memo...

Page 24: ...tion Service Warranty Customer Name Address Tel Email Warranty Period Purchase Date Product Name Dealer Name Serial Number One year from purchase date Dealer Fill your company name contact information...

Reviews: