background image

11

MAINTENANCE

CLEANING

The elliptical trainer can be cleaned with a soft cloth and mild detergent.  Do not use abrasives or 

solvents on plastic parts.  Please wipe your perspiration off the elliptical trainer

after each use.  Be careful not get excessive moisture on the computer display panel as this 

might cause an electrical hazard or electronics to fail.

Please keep the elliptical trainer, specially, the computer console, out of direct sunlight to 

prevent screen damage.  

Please inspect all assembly bolts and pedals on the machine for proper tightness every week.

STORAGE

Store the elliptical trainer in a clean and dry environment away from children.
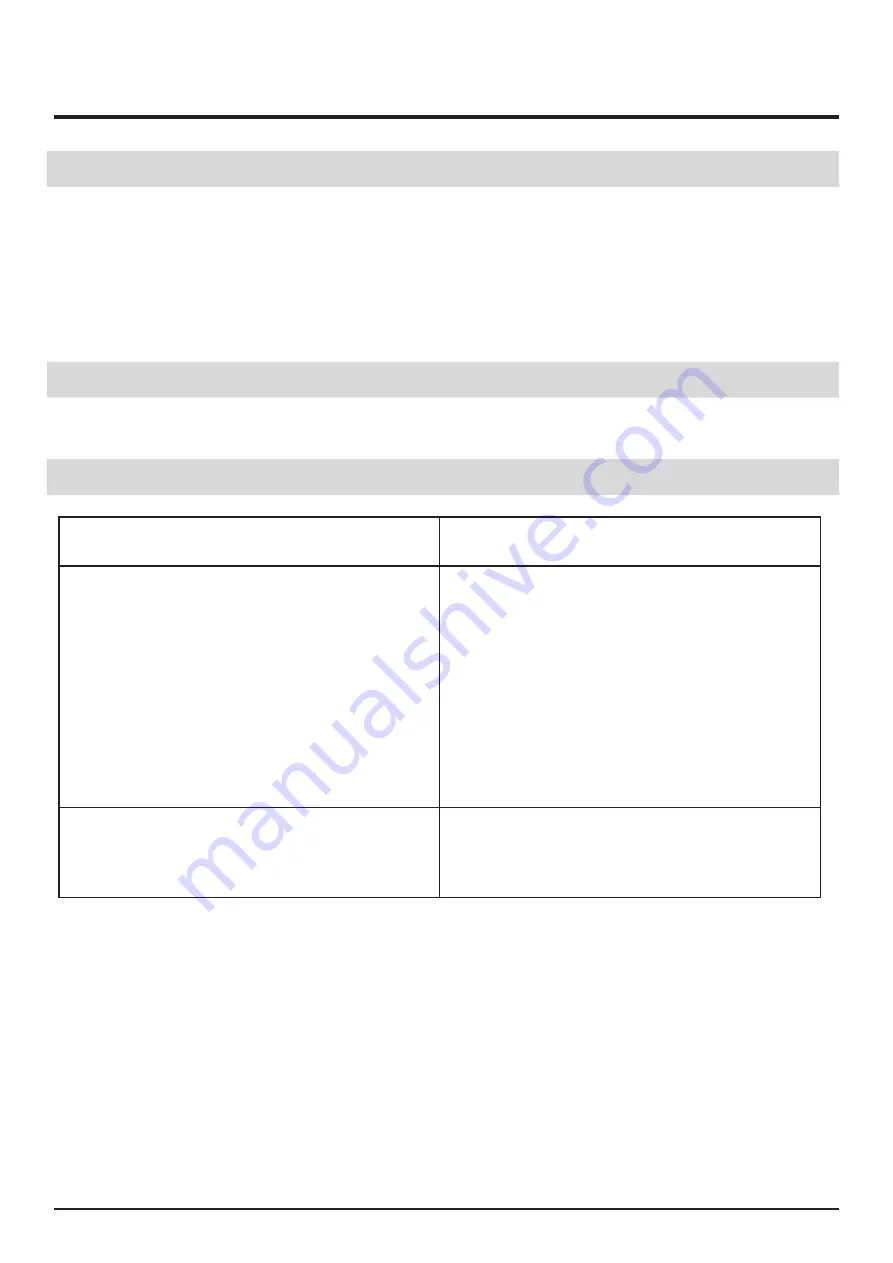
TROUBLESHOOTING

PROBLEM

SOLUTION

There is no display on the computer

console.

1.  Remove the computer console and 

verify the wire that comes from 

the computer console is properly 

connected to the wire that comes from 

the main frame.

2.  Check if the batteries are correctly 

positioned and battery springs are in 

proper contact with batteries.

3.  The batteries in the computer console 

may be dead.  Change to new batteries.

The elliptical trainer makes a squeaking 

noise when in use.

The bolts may be loose on the elliptical 

trainer, please inspect the bolts and 

tighten the loose bolts.

Summary of Contents for EK-EQXH-NEJX

Page 1: ...ntain important information which will help you get the best from your equipment and ensure safe and correct assembly use and maintenance If you need help or have damaged or missing parts call the Cus...

Page 2: ...Safety Information Exploded Diagram Parts List Assembly Instructions Step 1 Step 2 Step 3 Step 4 Step 5 Step 6 Step 7 Operating the Computer Maintenance Declaration 03 04 05 06 07 07 07 08 08 08 09 0...

Page 3: ...hine in good condition It is your responsibility to ensure that all users of the equipment are informed of all warnings and precautions 5 Keep children and pets away from the equipment The equipment i...

Page 4: ...4 EXPLODED DIAGRAM NEEDS DIAGRAM IMAGE...

Page 5: ...andle bar 1 53 Square end cap 2 7L Left handle bar 1 54 End cap S14 4 8R Right chain cover 1 55 Washer 1 8L Left chain cover 1 56 D shape washer 28 16 2 14 B5 er 28 16 2 1 4 B5 2 9 End cap S16 4 57 Bo...

Page 6: ...1 28 Plastic cap 2 76 Tube plug 2 29 Washer 1 77 Washer D8 2 30R Collar housing R 1 78 Hexagon bolt M8 2 30L Collar housing L 1 79 Handlebar post 1 31 Collar ball 2 80 Nylon nut M6 2 32 Collar housin...

Page 7: ...t the Handle bar shaft 12 through the Coupler bar of left right 4 5 and the Main frame 1 at the same time then fix with D shape washers 56 Washers 52 Bolts 57 on both sides B Insert the Pedal hinge bo...

Page 8: ...asher 65 then cover the Extension tube 68 Insert the saddle tube 67 into the main fame 1 then tighten with the knob 85 STEP 4 Insert the Handle bar 7L 7R to the coupler bar 5 4 select a height setting...

Page 9: ...ll the handlebar post 79 on the spile 74 using the washer 77 and the bolt 78 STEP 7 Connect the computer wire with sensor wire after that fix the computer 50 to the computer bracket on the handlebar p...

Page 10: ...be shown when starting exercise 2 SPEED Press the MODE key until the pointer advance to SPEED The current speed will be shown 3 DISTANCE Press the MODE key until the pointer advance to DISTANCE The d...

Page 11: ...ls on the machine for proper tightness every week STORAGE Store the elliptical trainer in a clean and dry environment away from children TROUBLESHOOTING PROBLEM SOLUTION There is no display on the com...

Page 12: ...8 2DA Elliptical Trainer Complies with the essential health and safety requirements of the following directive Stationery training equipment EN ISO 20957 1 2013 EN ISO 20957 9 2016 Authorised Signator...

Page 13: ...13...

Reviews: