background image


Owner’s Manual: 

 FDX 2.0 - 002 

CAUTION! 
 

READ  ALL  INSTRUCTIONS.  
 
TAKE  THE  TIME  TO  READ  THE  SAFETY  TIPS 
AND MAINTENANCE SECTIONS. NO EXERCISE 
EQUIPMENT IS SAFE UNLESS YOU LEARN HOW 
TO  SAFELY  OPERATE  THE  EQUIPMENT. 
REGULAR 

MAINTENANCE 

IS 

VERY 

IMPORTANT!  
THIS PRODUCT HAS MOVING PARTS. TAKE ALL 
PRECAUTIONS  WHEN  CHILDREN,  PETS  AND 
OTHER OBJECTS NEEDING  CARE ARE  IN THE 
AREA  OF  THIS  PRODUCT.  USE  RESPONSIBLY, 
MACHINE CAN TIP, ITEMS CAN GET CAUGHT IN 
THE  PEDALS.  TAKE  EXTRA  CARE  WHEN 
FOLDING,  TRANSPORTING,  UNFOLDING  AND 
MAKING  ANY  ADJUSTMENTS  TO  PRODUCT. 
WHEN USING  DESK AREA TO PLACE ITEMS ON 
– ALWAYS USE SAFETY STRAP TO HOLD ITEM 
DOWN.  IF  YOU  DO  NOT  HAVE  A  STRAP. 
CONTACT US.  WE CAN HELP. 
 
WE WANT YOU TO SAFELY USE THIS PRODUCT. 
PLEASE DO NOT HESITATE TO EMAIL, CALL OR 
TEXT IF YOU HAVE ANY QUESTIONS. 
 
EMAIL: CUSTOMERSERVICE @FITDESK.NET 
 
PHONE: 615-669-9004 
 

Assembly Instructions 

Operations Manual 

Where Productivity and Health Converge 

Summary of Contents for FDX 2.0 - 002

Page 1: ...ARE IN THE AREA OF THIS PRODUCT USE RESPONSIBL Y MACHINECANTIP ITEMSCANGETCAUGHTIN THE PEDALS TAKE EXTRA CARE WHEN FOLDING TRANSPORTING UNFOLDING AND MAKING ANY ADJUSTMENTS TO PRODUCT WHENUSING DESKAREATOPLACEITEMSON ALW AYS USE SAFETY STRAP TO HOLD ITEM DOWN IF YOU DO NOT HA VE A STRAP CONTACTUS WECANHELP WEW ANTYOUTOSAFEL YUSETHISPRODUCT PLEASEDONOTHESITA TETOEMAIL CALLOR TEXTIFYOUHA VEANYQUESTI...

Page 2: ...SING PARTS OR FOR HELP WITH A QUESTION at Customerservice fitdesk net Also we have a detailed FAQ section at our website www FitDesk net Or call Monday to Friday 9am to 5pm CST 615 669 9004 For fastest possible service please have Model refer to this manual Serial located on stabilizer bar sticker ...

Page 3: ...Range 4 10 to 6 5 147cm to 199cm Recommended Max User Weight 250lbs 113kgs Weight of Bike 47lbs Foot Print in OPEN position 16 wide X 26 long X 45 high T a b l e o f C o n t e n t s Precautions Parts and Maintenance Get to know your FitDesk 2 0 Assembly Instructions Meter Instructions Contact Information ...

Page 4: ...e following symptoms Pain tightness in your chest irregular heartbeat extreme shortness of breath feeling light headed dizzy or nauseous If you do experience any of these conditions you should consult your doctor before continuing with your exercise program 4 Fingers can get pinched when picking up the bike Lift by seat and handlebar only 5 The frame must be in the closed and locked position prior...

Page 5: ...commercial or rental settings This item was not intended or designed for use in commercial or public places 17 Keep wires from getting tangled in pedals Suggestion is to wrap computer charging wires over meter holder to keep away from pedals and in center of desk NOT on side 18 Do not stand while pedaling For light use only 19 SADDLE COMFORT We here at Revo Innovations LLC love cycling and try to ...

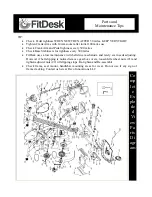
Page 6: ...y 300 miles Check Base Stabilizers for tightness every 300 miles FitDesk uses a low maintenance twin belt drive mechanism and rarely ever needs adjusting However if belt slipping is noticed remove gearbox covers loosen Idle wheel nuts 21 and tighten adjuster nuts 22 till slipping stops Re tighten and Re assemble Check frame seat mount handlebar mounting areas for wear Do not use if any sign of fra...

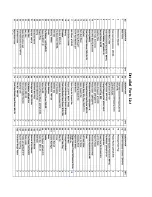
Page 7: ...Detailed Parts List ...
Page 8: ... and Total miles PRESS MODE BUTTON AT VERY BOTTOM Pedal straps keep feet in place This model FitDesk uses a Quick release frame unlock design As a safety precaution please use the technique shown here to Open and Close To Open pull pin on frame support while placing foot on base Then release To Close 1 Remove any items on desk and in drawer 2 Pull pin and close frame by lifting on bottom of saddle...

Page 9: ...er Tools Bracket Strap Resistance Rails Bands L R Saddle Left and Right Post Saddle Performance Pedals Adjuster Height Meter Extender Rear Stabilizer Front Stabilizer Saddle Post Saddle Back Main Frame Handlebar Main Desk Massage Bar 2 0 PARTS LIST ...

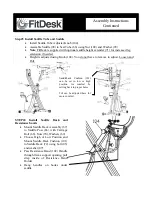
Page 10: ... to Main Frame 01 with hex cap nuts 61 and curved washer 06 tighten securely Rear Stabilizer has transport wheels STEP 1 STEP 2 MOUNTING HARDWARE IS LOCATED ON PARTS THEY ARE TO BE INSTALLED ON FOR EASY IDENTITY Step 2 Install Pedals Note Left Pedal installs counter clockwise Install by rotating to LEFT Use care that Pedal Shaft is Perpendicular to Crank Shaft Use supplied wrench to tighten Check ...

Page 11: ...ort opening pull strap inside of Resistance Band Holder Hang handles on hooks under saddle Step 3 Install Saddle Tube and Saddle Install Saddle Tube Adjuster Knob 104 Assemble Saddle 98 to Seat Tube 66 using Nut 100 and Washer 99 Note FitDesk is supplied with optional saddle height extender 71 for increased leg extension if needed Height is adjusted using Knob 104 You do not have to remove to adju...

Page 12: ...bike main frame Place Desk over frame and install the 2 bolts with washers in to threaded holes as shown to right Tighten with 5mm hex wrench to a snug fit Do NOT over tighte Connect Meter wire to wire from frame STEP 7 Assemble Massage Bar Arm Rests Bolt Massage Bar 80 to Desk using Knob Bolts 85 Massage Bar 80 can be set in 3 positions above Horizontal Choose a desired height Align each Support ...

Page 13: ...Tighten Knobs Saddle Height can be adjusted for comfortable use while pedaling Loosen Knob 104 Pull to release pin adjust to height release and tighten Knob Loosen knobs 89 to slide desk Raise or Lower Massage Bar with Knob 85 Easy adjust seat height knob Loosen pull adjust re tighten Hold Down Strap Use upright or semi recumbent Thread Hold Down Strap Through Openings in Desk and around device Wr...

Page 14: ...only through Loop in frame support tube Do not use bands in a sawing motion through frame loop Take care of bands to assure they are safe before each use Contact us for replacements Use caution when reaching under saddle to mount handles on hanger Stop pedaling drop handles on floor and dismount and put handles on Do not pedal bike and do arm exercises at the same time Use caution not to get the r...

Page 15: ...n lower area of button FUNCTIONS 1 TIME Press the MODE key until the pointer is on TIME The time of the workout will be displayed 2 SPEED Press the MODE key until the pointer advances to SPEED The current speed will be shown 3 DISTANCE Press the MODE key until the pointer advances to DISTANCE The distance of each workout will be displayed 4 CALORIE Press the MODE key until the pointer advances to ...

Page 16: ...ve time with your health goals See our latest products and accessories at Our website www fitdesk net Or Friend us on Facebook for latest discounts and news www facebook com fitdesk Tell others how we are doing we will be sure to thank you and maybe more Please write a review at your favorite shopping site Email customerservice fitdesk net ...

Reviews: