background image


12 

97

105

91

92

05

07

06

85

80

85


Get to know your 

New Exercise Bike 

Assembly Instructions 

Continued 

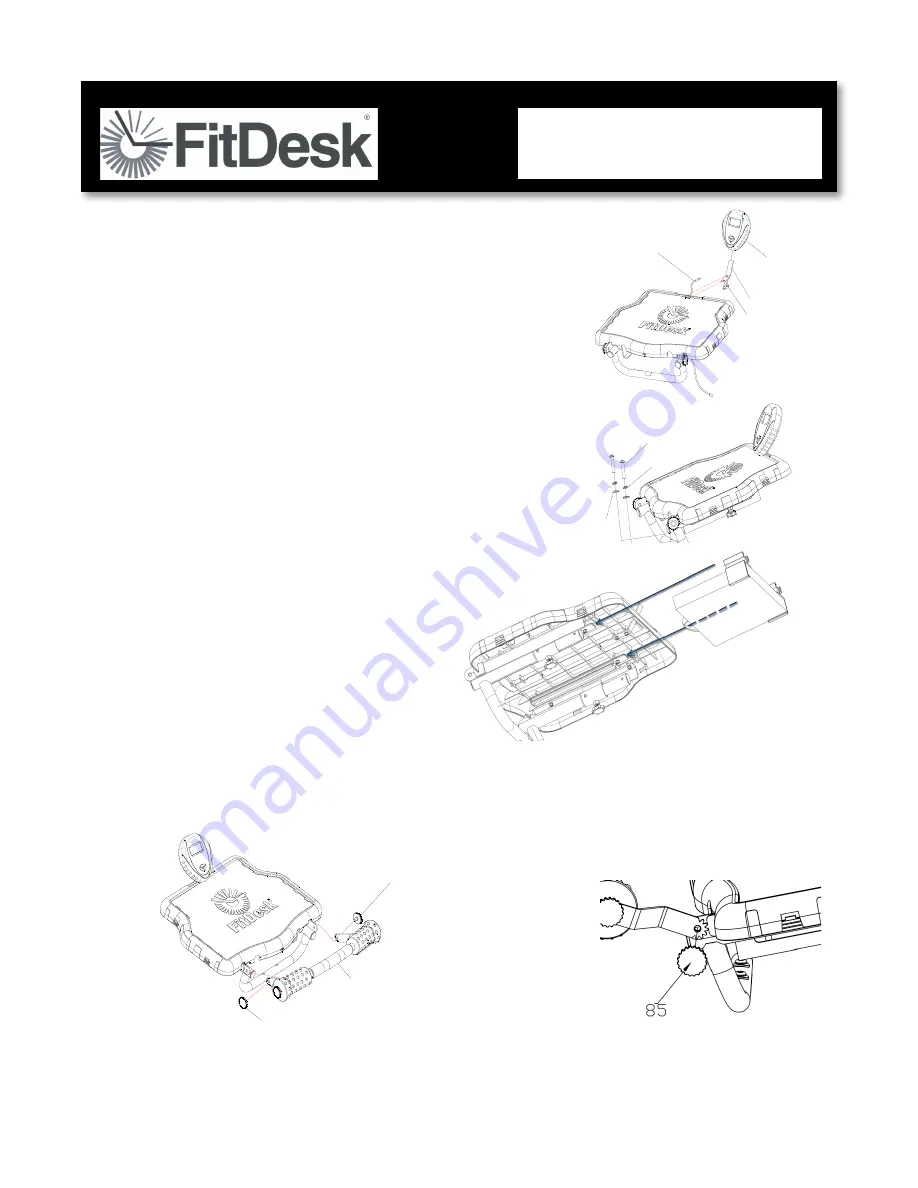
STEP#7 Install Desk Assembly to bike frame  


Locate  and  remove  2  handlebar  mounting  bolts 
(05) with washers (07,06) in bike main frame. 


Place Desk over bike main frame and install the 2 
bolts with washers in to threaded holes as shown 
to right. 


Tighten  with  5mm  hex  wrench  to  a  snug  fit.  Do 
NOT over tighten 


Connect Meter wire (92) to wire from frame 

STEP#9 Assemble Massage Bar Arm Rests 


Bolt Massage Bar (80) to Desk using Knob Bolts (85)


Massage  Bar  (80)  can  be  set  in  3  positions  above  Horizontal.  Choose  a  desired  height. 
Align each Support Arm in same position on each side. Tighten Knob Bolt (85)


3 position armrest height adjustment 

STEP#6 Install Meter Holder to bottom of desk 


Slide  Meter  Holder  (105)  and  meter  wire 
through opening in top center 


Install  and  tighten  2  screws  (91)  through 
Meter Holder (105) 


Slide Meter (97) on to Meter Holder (105) and 
plug meter wire in to back of meter 


STEP#8 Install Drawer to Desk 


Align and Slide Drawer Assembly to 
Desk  Rails  located  on  bottom  of 
Desk. 


Push through to rider side 

Summary of Contents for FDX 2.0 - 003

Page 1: ...THE AREA OF THIS PRODUCT USE RESPONSIBLY MACHINECANTIP ITEMSCANGETCAUGHTIN THE PEDALS TAKE EXTRA CARE WHEN FOLDING TRANSPORTING UNFOLDING AND MAKING ANY ADJUSTMENTS TO PRODUCT WHENUSING DESKAREATOPLAC...

Page 2: ...ISSING PARTS OR FOR HELP WITH A QUESTION at Customerservice fitdesk net Also we have a detailed FAQ section at our website www FitDesk net Or call Monday to Friday 9am to 5pm CST 615 669 9004 For fast...

Page 3: ...Range 4 10 to 6 5 147cm to 199cm Recommended Max User Weight 300lbs 136kgs Weight of Bike 47lbs Foot Print in OPEN position 16 wide X 26 long X 45 high T a b l e o f C o n t e n t s Precautions Parts...

Page 4: ...wing symptoms Pain tightness in your chest irregular heartbeat extreme shortness of breath feeling light headed dizzy or nauseous If you do experience any of these conditions or any other signs that c...

Page 5: ...wires from getting tangled in pedals Suggestion is to wrap computer charging wires over meter holder to keep away from pedals and in center of desk NOT on side 18 Do not stand while pedaling For ligh...

Page 6: ...tenance Tips TIP Check Pedal tightness with 15mm wrench WHEN NEW THEN AFTER 30 miles KEEP VERY TIGHT IF you hear a click noise when pedaling the pedals are loose Retighten and install THREAD LOCK TO P...

Page 7: ...7...

Page 8: ...l miles PRESS MODE BUTTON AT VERY BOTTOM This model FitDesk uses a Quick release frame unlock design As a safety precaution please use the technique shown here to Open and Close To Open pull pin on fr...

Page 9: ...Y MAIN FRAME METER HOLDER RESISTANCE BAND HOLDER SADDLE POST REAR STABILIZER FRONT STABILIZER DESK FRAME SUPPORT DESK STRAP SADDLE HEIGHT RESISTANCE BANDS PEDALS MASSAGE BAR SADDLE HEIGHT ADJUSTER KNO...

Page 10: ...and curved washer 06 tighten securely Rear Stabilizer has transport wheels STEP 1 STEP 2 MOUNTING HARDWARE IS LOCATED ON PARTS THEY ARE TO BE INSTALLED ON FOR EASY IDENTITY Step 2 Install Pedals Note...

Page 11: ...d Washer 99 Note FitDesk is supplied with optional saddle height extender 71 for increased leg extension if needed Recommended for use if taller than 5 9 175cm Height is adjusted using Knob 104 You do...

Page 12: ...ssemble Massage Bar Arm Rests Bolt Massage Bar 80 to Desk using Knob Bolts 85 Massage Bar 80 can be set in 3 positions above Horizontal Choose a desired height Align each Support Arm in same position...

Page 13: ...Height can be adjusted for comfortable use while pedaling Loosen Knob 104 Pull to release pin adjust to height release and tighten Knob Loosen knobs 89 to slide desk Raise or Lower Massage Bar with Kn...

Page 14: ...n to assure the tube is passing only through Loop in frame support tube Do not use bands in a sawing motion through frame loop Take care of bands to assure they are safe before each use Contact us for...

Page 15: ...ONS 1 TIME Press the MODE key until the pointer is on TIME The time of the workout will be displayed 2 SPEED Press the MODE key until the pointer advances to SPEED The current speed will be shown 3 DI...

Page 16: ...zon com fitdesk or www fitdesk net review Here is a quick scan code for fastest way to leave a review Now you can turn your computer time in to the healthiest part of your day See our complete line of...

Reviews: