background image

36

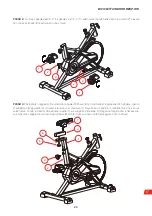
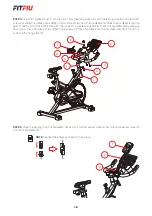
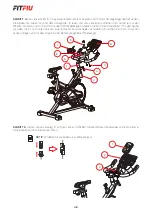
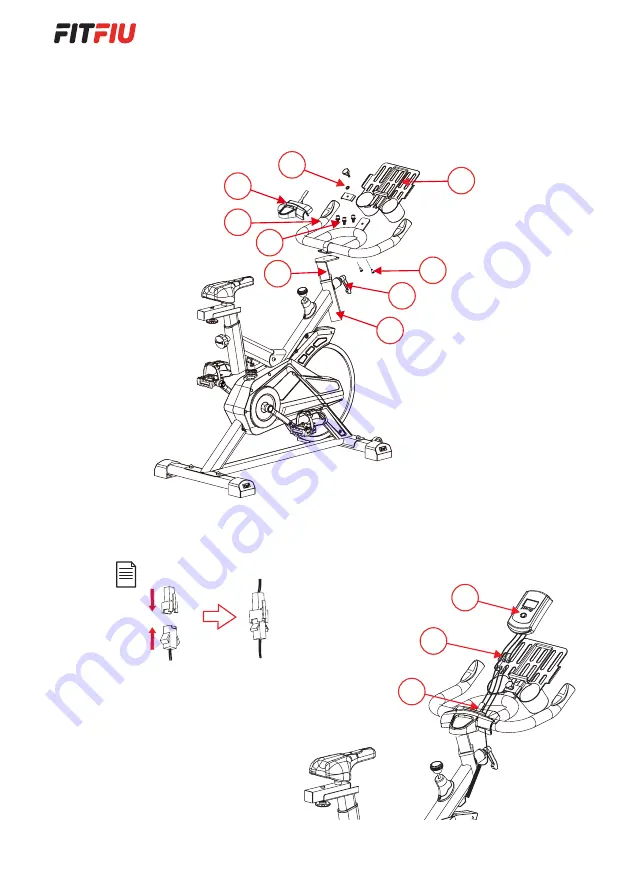
STEP 5. 

Place the display (1) on the handlebar. Connect the monitor sensor wires to the mainframe sensor wires (2) 

and to the handlebar (3).

NOTE: 

Connect the cables as shown in the picture.

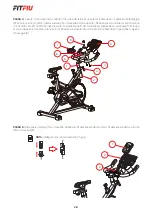
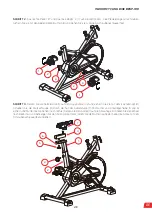
STEP 4.

 Insert the handlebar post (1) into the main frame tube (2) and secure it with the locking knob (3). Unscrew the 2 

screws (4) under the mobile phone holder (7) and remove them from the handlebars (6). Place the handlebar (6) on the 
post (1) and fix it with the 3 M8 screws (5). Then insert the mobile phone holder (7) into the handlebar (6) by pressing 
down until it clicks into place. Then tighten the 2 screws (4). Place the table (9) on the handlebar (4) and fix it with the 
knob 

and 

the 

fixing 

plate 

(8). 


2

3

4

1

5

9

8

7

6

1

3

2

Summary of Contents for 1100025

Page 1: ...Manual usuario Bicicleta Indoor Manuel d utilisation V lo Indoor Manuale dell utente Bicicletta Indoor Instruction manual Indoor Bike Betriebsanleitung Indoor Cycling Bike BESP 100 ES IT FR EN DE...

Page 2: ...ual al nuevo propietario Consulte a un m dico para comprobar su estado de salud sobre todo en el caso de las personas mayores de 35 a os y las que hayan tenido problemas de salud anteriormente Este ap...

Page 3: ...se de la marca MAX cuando ajuste el manillar o el sill n Ajuste el manillar y el sill n seg n las necesidades del usuario Por favor aseg rese de que las roscas est n bloqueadas y que el sill n y el ma...

Page 4: ...n el estabilizador delantero y trasero junto con el bastidor 3 Coloque la arandela M8 4 y f jela con la tuerca M8 5 Bicicleta Indoor Modelo BESP 100 Disco inercia 16Kg Peso m ximo de usuario 120Kg Pes...

Page 5: ...l cuadro principal 2 y f jela con el pomo de ajuste 3 Pase el tornillo del soporte del asiento 4 a trav s de la ranura de la tija de sill n 1 Aseg relo con la tuerca y la arandela 5 y 6 y apriete firm...

Page 6: ...5 A continuaci n introduzca el soporte del tel fono m vil 7 en el manillar 6 presionando hacia abajo hasta que encaje en su sitio A continuaci n atornille los 2 tornillos 4 Coloque la mesa 9 en el ma...

Page 7: ...rcicio exitoso consiste en ejercicios de precalentamiento aer bicos y de relajaci n El precalentamiento es una parte esencial del entrenamiento que deber realizar cada vez que comience una actividad f...

Page 8: ...te bot n unaflecha indicar lafunci n que en ese momento se muestra en la pantalla En el caso de seleccionar la funci n Scan la pantalla cambiar cada pocos segundos para mostrar las diferentes funcione...

Page 9: ...rnas elija una pendiente mayor y aumente el tiempo de ejercicio ENTRENAMIENTOAER BICOPARAPERDERPESO ESFUERZOINTENSOENTRE35Y60MINUTOS Este tipo de entrenamiento permite quemar calor as de forma eficaz...

Page 10: ...as m s susceptibles de desgastarse Reemplace de inmediato las piezas defectuosas Mantenga el aparato fuera de servicio hasta su reparaci n Por favor compruebe que todas las etiquetas de seguridad est...

Page 11: ...lante son conformes con los requerimientos de las Directivas del Parlamento Europeo y del Consejo aplicables Directiva 2014 30 UE del Parlamento Europeo y del Consejo de 26 de febrero de 2014 sobre la...

Page 12: ...n aient pas l exp rience suffisante ou des connaissances pour l utiliser au moins qu elles soient surveill es parune personne responsable de leurs curit et qui les apprenne employerl appareil Ce produ...

Page 13: ...ue MAX quand vous ajustez le guidon ou la selle Ajustez le guidon et la selle selon les n cessit s de l utilisateur S il vous pla t assurez vous que les filetages soient bien bloqu s et la selle et le...

Page 14: ...1 dans le stabilisateur avant et arri re avec le cadre 3 Monter la rondelle M8 4 et la fixer avec l crou M8 5 V lo Indoor Mod le BESP 100 Disque inertie 16Kg Poids maximum de l utilisateur 120Kg Poid...

Page 15: ...le 1 sur le cadre principal 2 et la fixer avec le bouton de r glage 3 Poussez le boulon de support de la tige de selle 4 travers la rainure de la tige de selle 1 Fixez le avec l crou et la rondelle 5...

Page 16: ...t la fixer l aide du bouton de verrouillage 3 D visser les 2 vis 4 sous le support de t l phone portable 7 et les retirer du guidon 6 Placer le guidon 6 sur le montant 1 et le fixer avec les 3 vis M8...

Page 17: ...ercices de pr chauffage a robiques et de relaxation Le pr chauffage est une partie essentielle de l entra nement que vous devrez r aliser chaque fois que vous commencez une activit physique parce que...

Page 18: ...fois que vous appuyez sur ce bouton une fl che indique la fonction qui se montre sur l cran dans ce moment Si vous choisissez la fonction Scan l affichage sur l cran changera chaque quelques secondes...

Page 19: ...se Pour augmenter la tonicit des jambes choisissez une inclinaison plus importante et augmentez la dur e de l exercice ENTRA NEMENTA ROBIEPOURLAPERTEDEPOIDS EFFORTMOD R PENDANT35 60MINUTES Ce type d e...

Page 20: ...tement les pi ces d fectueuses N utilisez pas l appareil jusqu qu il sera repair S il vous pla t v rifiez que toutes les tiquettes de s curit sont dans des bonnes conditions et qui peuvent tre lues Si...

Page 21: ...l ann e 2018 est conforme aux exigences des directives applicables du Parlement europ en et du Conseil Directive 2014 30 UE du Parlement europ en et du Conseil du 26 f vrier 2014 concernant l harmonis...

Page 22: ...l nuovo proprietario Consulti un medico per verificare il suo stato di salute soprattutto nel caso di persone con et superiore a 35 anni e quelle che abbiano avuto problemi di salute anteriormente Que...

Page 23: ...AX quando regoli il manubrio o il sellino Regoli il manubrio e il sellino secondo le necessit dell utente Per favore si assicuri che le viti siano bloccate e che il manubrio sia regolato in modo sicur...

Page 24: ...tabilizzatore anteriore e posteriore insieme al telaio 3 Montare la rondella M8 4 e fissarla con il dado M8 5 Bicicletta Indoor Modello BESP 100 Disco di inerzia 16Kg Peso massimo dell utente 120Kg Pe...

Page 25: ...ul telaio principale 2 e fissarlo con il pomello di regolazione 3 Spingere il perno di supporto del reggisella 4 attraverso la relativa scanalatura 1 Fissarlo con il dado e la rondella 5 e 6 e serrare...

Page 26: ...o principale 2 e fissarlo con il pomello di bloccaggio 3 Svitare le 2 viti 4 sotto il portacellulare 7 e rimuoverle dal manubrio 6 Posizionare il manubrio 6 sul montante 1 e fissarlo con le 3 viti M8...

Page 27: ...i di successo consiste in esercizi di preriscaldamento aerobici e di rilassamento Il preriscaldamento una parte essenziale dell allenamento che deve effettuare ogni volta che inizi una attivit fisica...

Page 28: ...derata Ogni volta che prema questo bottone una freccia le indicher la funzione che in quel momento si mostra sullo schermo Nel caso di scegliere la funzione Scan lo schermo cambier ogni pochi secondi...

Page 29: ...scelga una pendenza maggiore e aumenti il tempo di esercizio ALLENAMENTO AEROBICO PER PERDERE PESO SFORZO INTENSO TRA 35 E 60 MINUTI Questo tipo di allenamento permette bruciare calorie in modo effic...

Page 30: ...ediatamente le parti difettose Non utilizzi l apparato fino a che non viene riparato Per favore controlli che tutte le etichette di sicurezza siano in buone condizioni e che possano essere lette Se ma...

Page 31: ...ell anno 2018 in avanti conform e ai requisiti delle Direttive del Parlamento Europeo e del Consiglio applicabil i Direttiva 2014 30 UE del Parlamento Europeo e del Consiglio del 26 febbraio del 2014...

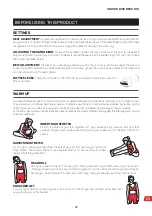
Page 32: ...or to determine if you have any physical or health conditions that could create a risk to your health and safety or prevent you from using the equipment properly especially people over 35 years old th...

Page 33: ...xceed the mark MAX when adjusting the seat or the handlebar Adjust the seat and the handlebar according to the needs of the user Please ensure that all threads are blocked properly and securely fasten...

Page 34: ...rew 1 into the front and rear stabilizer together with the frame 3 Fit the M8 washer 4 and secure it with the M8 nut 5 Indoor Bike Model BESP 100 Inertia disk 16Kg User maximum weight 120Kg Product we...

Page 35: ...post 1 on the main frame 2 and secure it with the adjusting knob 3 Push the seat post support bolt 4 through the seat post groove 1 Secure it with the nut and washer 5 and 6 and tighten the nut firmly...

Page 36: ...2 and secure it with the locking knob 3 Unscrew the 2 screws 4 under the mobile phone holder 7 and remove them from the handlebars 6 Place the handlebar 6 on the post 1 and fix it with the 3 M8 screws...

Page 37: ...a cool down Warming up is an important part of your workout and should begin every session It prepares your body for more strenuous exercise by heating up and stretching out your muscles increasing y...

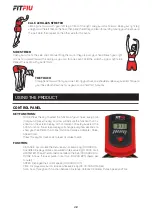
Page 38: ...ODUCT CONTROL PANEL KEY FUNCTIONS MODE Press this key to select the function of your choice Every time that you will press this key an arrow will indicate the function that it is shown on the screen d...

Page 39: ...warm up activity before more intense physical exercise To develop muscle tone in the legs choose a steeper incline and increase the duration of the exercise AEROBIC EXERCISE FOR WEIGHT LOSS MODERATE E...

Page 40: ...jury The brake pad is most susceptible to wear Before exercising inspect braking system for functionality Check that all fixings and parts are well fastened Carefully inspect all parts more susceptibl...

Page 41: ...ards is in accordance with the European Parliament Directives and of the Council Directive 2014 30 EU of the European Parliament and of the Council of 26 February 2014 on the harmonisation of the laws...

Page 42: ...lichen sensorischen oder geistigen F higkeiten oder durch Personen ohne Erfahrung oder Wissen bestimmt es sei denn sie werden von einer f r ihre Sicherheit verantwortlichen Person beaufsichtigt oder a...

Page 43: ...r absenken Beim Einstellen des Lenkers oder Sattels die Markierung MAX nicht berschreiten Passen Sie den Lenker und den Sitz an die Bed rfnisse des Benutzers an Bitte achten Sie darauf dass die Gewind...

Page 44: ...deren und hinteren Stabilisator einsetzen Die M8 Scheibe 4 montieren und mit der M8 Mutter 5 sichern Indoor Cycling Bike Modell Nummer BESP 100 Tr gheitsscheibe 16Kg Maximales Benutzergewicht 120Kg Pr...

Page 45: ...die Sattelst tze 1 auf den Hauptrahmen 2 und sichern Sie sie mit dem Einstellknopf 3 Schieben Sie die St tzschraube 4 durch die Nut der Sattelst tze 1 Mit Mutter und Unterlegscheibe 5 und 6 sichern u...

Page 46: ...zen und mit dem Verriegelungsknopf 3 sichern Die beiden Schrauben 4 unter dem Handyhalter 7 l sen und vom Lenker 6 entfernen Den Lenker 6 auf den Pfosten 1 setzen und mit den 3 Schrauben M8 5 befestig...

Page 47: ...sprogramm besteht aus Aufw rm Aerobic und Entspannungs bungen Das Aufw rmen ist ein wesentlicher Bestandteil des Trainings das Sie jedes Mal durchf hren sollten wenn Sie mit einer k rperlichen Aktivit...

Page 48: ...on auszuw hlen Jedes Mal wenn Sie diese Taste dr cken zeigt ein Pfeil die aktuell auf dem Bildschirm angezeigte Funktion an Wenn die Funktion Scannen ausgew hlt ist wechselt die Anzeige alle paar Seku...

Page 49: ...it t verwendet werden Um den Tonus Ihrer Beine zu erh hen w hlen Sie eine steilere Steigung und erh hen Sie Ihre Trainingszeit AEROBES ABNEHMTRAINING INTENSIVE BUNG 35 BIS 60 MINUTEN DieseArtdesTraini...

Page 50: ...die Schrauben richtig angezogen sind berpr fen Sie sorgf ltig die verschlei anf lligsten Teile Defekte Teile sofort austauschen Halten Sie das Ger t bis zur Reparatur au er Betrieb Bitte pr fen Sie o...

Page 51: ...rderungen der geltenden Richtlinien des Europ ischen Parlaments und des Rates entspricht Richtlinie 2014 30 EU des Europ ischen Parlaments und des Rates vom 26 Februar 2014 zur Harmonisierung der Rech...

Page 52: ...Manual revisado en junio de 2019 www fitfiu es...

Reviews: