32
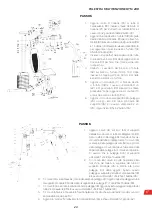
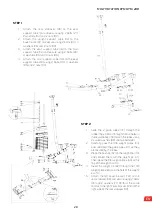
STEP 7
1. Attach one end of the butterfly arm cable
(66) to the hook on the right-side butterfly
arm (10R) and secure using 1 bolt (24), 1
washer (35A) and 1 nut (38).
2. Pull cable (66) around the upper pulley (49),
then attach this pulley to the pulley bracket
(20) on the righthand side of the main
support tube (05) and secure using 1 bolt
(25) and 1 nut (39).
3. Loop cable (66) around the lower pulley (49),
then attach this pulley to the upper part of
the two-way pulley bracket (18) and secure
using 1 bolt (25) and 1 nut (39).
4. Pull cable (66) upward and around the
second upper pulley (49), then attach this
pulley to the pulley bracket (20) on the left-
hand side of the main support tube (05) and
secure using 1 bolt (25) and 1 nut (39).
5. Attach the other end of cable (66) to the
hook on the left-side butterfly arm (10L) and
secure using 1 bolt (24), 1 washer (35A) and
1 nut (38).
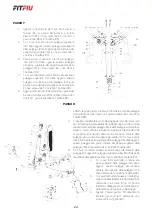
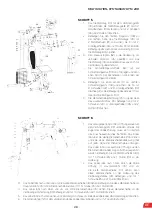
STEP 8
1. Place the cable guides (69) on either side of the small pulley
(49A) as shown, and secure using 1 bolt (26) and 1 nut (39).
2. Pull the NON-stopper-ball end of the lower pull bar cable (67)
through the opening at the bottom of the leg curl tube (06),
around the undersides of pulley (49) and small pulley (49A).
Then pull the cable through the opening in the lower part of
the upright support tube (02), then around the underside of
pulley (49) in the seat support tube (04). Pull the cable upward
and around the upper side of a pulley (49), then attach this
pulley to the underside of the two-way pulley bracket (18) and
secure using 1 bolt (25) and 1 nut (39).
3. Pull cable (67) downward and around the underside of a pulley
(49), then attach this pulley to the bracket on the end of the
seat support tube (04) and secure using 1 bolt (25) and 1 nut
(39).
4. Pull cable (67) upward and around the
upper side of a pulley (49), then attach
this pulley to the lower section of the
pulley bracket (17) and secure using 1
bolt (25) and 1 nut (39).
5. Pull cable (67) downward and connect
it to the bracket on the rear stabilizer
(03) using chain (61) and 1 X1 hook (62).
Note: Hook the cable to a chain link that
causes it to be taught.
6. Attach the lower pull bar (13) to the front
end of cable (67) using chain (61) and 2
X1 hooks (62).
Summary of Contents for 1110029
Page 2: ......
Page 44: ...Manual revisado en mayo de 2019 www fitfiu es ...


