45
EXERCISE BIKE BEST-100
EN
3.
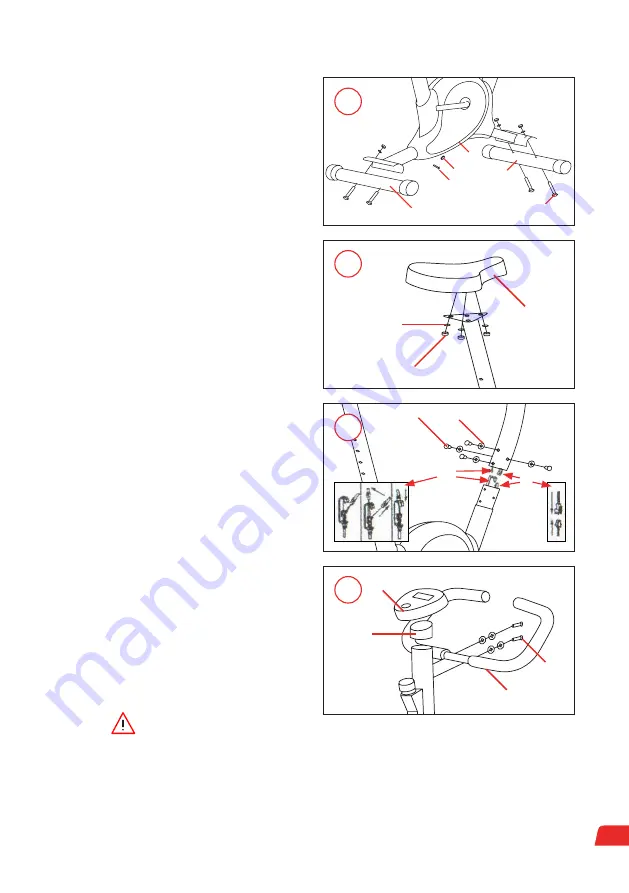
See Fig. 2. Remove the nuts and washers (10 and 11)
from under the saddle (12). Place the saddle on top
of the saddle post (9) and secure with the nuts and
washers (10 and 11). Tighten (rotate right) the nuts with
the supplied spanner.
4.
Insert the saddle post (9) into the frame (1), with the
height adjustment holes facing rearward. Secure it
at the desired height with the saddle post locking
screw (8) – the pin on the end of the screw must
enter a hole in the post to be able to secure properly.
Firmly tighten (rotate right) the screw by hand.
5.
See Fig. 3. Bring the handlebar post (15) near to its
location on the bike frame (1). Hook the tension cable
in the handlebar post to the bracket on the end of the
tension cable in the frame (A). Note that you may need
to loosen the cable by rotating the effort adjuster left in
order to connect the cables. Then, connect the wiring in
the handlebar post to the wiring in the frame (B).
6.
Insert the handlebar post into the frame, being
careful not to pinch the electrical cables. Secure
the handlebar post using 4 screws (14) and curved
washers (5). Ensure the washers follow the shape
of the tube when installed. Tighten (rotate right) the
screws using the supplied Allen key.
7.
See Fig. 4. Plug the console (17) electrical cable to
the handlebar post electrical cable. If the cable in
the handlebar post is not visible, pull the console
mounting cap (16) off the post and gently pull the
cable out. Ensure that the cable passes through
the hole on top of the console mounting cap and
push the cap back onto the top of the post. Excess
cable can be stored in the handlebar post. Slide the
console onto the mounting cap. Install the supplied
battery into the console.
8.
Attach the handlebar (19) to the top of the
handlebar post using 2 screws (18), spring washers
(20) and washers (21). Tighten (rotate right) the
screws using the supplied Allen key. Gradually
tighten both screws in stages and ensure that the
handlebar clamp remains parallel to its mounting.
10
9
3
4
6
5
1
2
1
17
16
11
10
9
3
6
5
1
12
2
2
17
14
16
11
3
4
6
5
1
5
19
12
2
3
A
B
17
16
11
10
9
18
19
12
4
ATTENTION
Failure to correctly follow the following step may void your warranty. The left pedal, marked “L”
on the end of the pedal bolt, must be fitted to the left-side crank arm and rotated left (anti-
clockwise) to install. The right pedal, marked “R” on the end of the pedal bolt, must be fitted to the
right-side crank arm and rotated right (clockwise) to install.
9.
Attach the left-side pedal (7) and right-side pedal (13) to the respective crank arms. Tighten the pedal bolts using
the supplied spanner. Once assembled, the machine ready for use.


