background image

17

WEIGHT BENCH MUB3002P

EN

INDEX

INTRODUCTION 17

IMPORTANT SAFETY INFORMATION 

17

ASSEMBLY 18

MAINTENANCE 21

RECYCLING AND DISPOSING 

21

GUARANTEE 21

INTRODUCTION

Thank you for selecting the FITFIU product.
Weight Bench offers you a total body workout, you can build muscle with a huge range of exercises for your upper 
and lower body at your own home.
This product is ideal for both those wanting to get fit as well as fitness junkies. Work out in comfort with the high-
density cushioning protected by high-quality sweat-proof material, and thick quality padding for chest flys, leg 
extensions and leg curls. Adjustable racking poles enable you to tailor the height to be perfect for your needs. 
We hope you will enjoy and that this FITFIU product will fully meet your expectations. 

IMPORTANT SAFETY INFORMATION

Before using this product, read all important safety information as well as the instructions manual. Please keep this 
manual in a safe place for future reference, and if you decide to sell this product, remember to give it to the new owner.


lt is the responsibility of the owner to ensure that all users of the weight bench are adequately informed of all 
precautions.


The weight bench is intended far home use only. Do not use the weight bench in any commercial, rental, or 
institutional setting.


Recommended maximum user weight: 100kg.


Recommended maximum weight of barbell and weights: Do not place more than 80kg, including a barbell and 
weights, on the weight rest. Note: The weight bench does not include a barbell or weights.


Keep children and pets away from the machine at ali times. DO NOT leave unattended children in the same room 
with the machine.


Only one person at a time should use the machine.


If the user experiences dizziness, nausea, chest pain, or any other abnormal symptoms, STOP the workout at 
once. CONSULT A PHYSICIAN IMMEDIATELY.


Position the machine on a clear, level surface. DO NOT use near water or outdoors.


Make sure the set screws attaching the adapters are properly tightened each time the adapters are used.


Use the weight bench only on a level surface. Cover the floor beneath the weight bench to protect the floor.


Make sure all parts are properly tightened each time the weight bench is used. Replace any worn parts immediately.


Always be sure there is an equal amount of weight on each side of your barbell when you are using it. Always keep 
sorne weight on both ends of the barbell when adding or removing weights to prevent the barbell from tipping.


Always exercise with a partner. When you are performing bench press exercises, your partner should stand 
behind you to catch the barbell if you cannot complete a repetition,


Keep hands away from all moving parts.


Always wear appropriate workout clothing when exercising. Do not wear robes or other clothing that could 
become caught in the machine. Running or aerobic shoes are also required.


lf you feel pain or dizziness at any time while exercising, atop immediately and begin cooling down.


Use the machine only for its intended use as described in this manual. DO NOT use any other accessories not 
recommended by the manufacturer.

Summary of Contents for MUB3002P

Page 1: ...MUB3002P IT FR EN Manual usuario Banco de pesas Manuel d instructions Banc d exercices Manuale dell utente Panca pesi Instruction manual Weight bench ES...

Page 2: ...n uso comercial alquiler o entorno institucional Peso m ximo recomendado del usuario 100kg Peso m ximo recomendado de pesas y barra no coloque m s de 80kg incluyendo la barra de pesas y las pesas en e...

Page 3: ...salud preexistentes Leatodaslasinstruccionesantesdeusarlam quina noasumimosningunaresponsabilidad porlesiones personales o da os a la propiedad sufridos poro atrav s del uso de este producto NOTA FITF...

Page 4: ...erca de nylon 27 Ver Fig 6 3 Deslice la varilla de ajuste 8 a trav s del tubo de soporte de pesas 1 y coloque el respaldo sobre la varilla de ajuste 8 Ver Fig 7 PASO 3 1 Inserte el tubo de soporte del...

Page 5: ...17 x 2 bujes de pl stico 35 x 3 arandelas 23 y una tuerca de bloqueo de nylon 27 deslizando el soporte almohadilla de mariposa 13 a trav s del brazo de mariposa 9 y coloque la almohadilla de espuma 38...

Page 6: ...decida deshacerse de la m quina h galo de manera responsable siguiendo la normativa local Proteja el medio ambiente desh gase de la m quina cuidando del medioambiente No la tire en la basura Por favo...

Page 7: ...ids sur le support Remarque Le banc de musculation n inclut pas la barre ou les poids Tenez les enfants et les animaux domestiques loign s de la machine tout le temps Ne laissez pas les enfants sans s...

Page 8: ...it pourlesblessuresoulesdommagesmat rielssubisparou traversl utilisationdeceproduit NOTE FITFIU n est pas responsable des dommages la personne ou des dommages mat riels r sultant d une utilisation inc...

Page 9: ...en nylon x 1 27 Voir le SCH MA 6 3 Faites glisser la tige de r glage 8 travers le tube de support de poids 1 et placez le dossier sur la tige de r glage 8 Voir le SCH MA 7 TAPE 3 1 Ins rez le tube de...

Page 10: ...en plastique 35 x 3 rondelles 23 et un crou Verrouiller le nylon 27 en faisant glisser le porte tampon papillon 13 travers le bras papillon 9 et fixer le coussin en mousse 38 Et placez le clip 41 sur...

Page 11: ...ET LIMINATION Lorsque vous d cidez de vous d barrasser de la machine faites le de mani re responsable en respectant les r glementations locales Prot ger l environnement disposer de la machine en pren...

Page 12: ...onga pi di 80kg includendo la barra dei pesi e i pesi sul portapesi Nota La panca pesi non include la barra dei pesi o i pesi Mantenga sempre i bambini e gli animali lontani dalla macchina NON lasci i...

Page 13: ...cchina nonassumiamonessunaresponsabilit per lesioni personali o danni alla propriet causati da o attraverso l uso di questo prodotto NOTA FITFIU non si assume nessuna responsabilit per lesioni alla pe...

Page 14: ...il tubo di supporto dei pesi 1 e collochi lo schienale sull asticella di regolazione 8 Vedere Fig 7 PASSO 3 1 Inserisca il tubo di supporto dello strumento per l esercitazione della gambe 6 all inter...

Page 15: ...tica 35 x3 guarnizioni 23 e un bullone di bloccaggio in nylon 27 facendo scivolare il supporto dei cuscinetti a farfalla 13 attraverso il braccio a farfalla 9 e collochi il cuscinetto in gommapiuma 38...

Page 16: ...outine necessaria potrebbero essere causate lesioni personali e o causare danni all impianto SMALTIMENTO RICICLAGGIO Quando desidera disfarsi della macchina si assicuri di seguire la normativa locale...

Page 17: ...s on the weight rest Note The weight bench does not include a barbell or weights Keep children and pets away from the machine at ali times DO NOT leave unattended children in the same room with the ma...

Page 18: ...ot responsible or liable for any injury to the person or damage to property arising from the wrong use of the equipment ASSEMBLY STEP 1 2 Attach the Connect tube 3 onto Weight Support Tube 1 fastened...

Page 19: ...tightened with Hex head bolt 18 x 2 Washer 23 and x 1 Nylon lock nut 27 See fig 6 3 Slide Adjustment Rod 8 through Weight support tube 1 and place Back Rest onto Adjustment Rod 8 See fig 7 STEP 3 1 In...

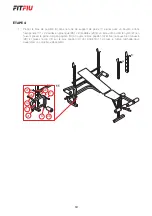
Page 20: ...ex head bolt 17 x 2 Plastic Bushing 35 x 3 Washer 23 and Nylon Lock Nut 27 Slide Butterfly Pad Holder 13 through Butterfly Arm 9 and attached Foam Pad 38 And place Clip 41 onto Buttery Arm 9 See fig 1...

Page 21: ...r Check welds to be free of cracks Failure to perform routine maintenance could result in personal injury and or equipment damage RECYCLING AND DISPOSING When you decide to get rid of the machine make...

Page 22: ...22...

Page 23: ...23 WEIGHT BENCH MUB3002P EN...

Page 24: ...Manual revisado en febrero de 2018 www fitfiu es...

Reviews: