19
WEIGHT BENCH MUB3002P
EN
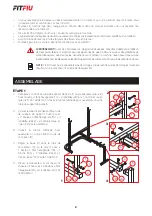
STEP 2
1. Attach Main frame support tube
(11) onto Main Frame (4) and Front
stabilizer (5), tightened with x 2
Carriage Bolt (19), x 2 Washer (24) and
x 2 Nylon lock nut (26). See fig.5.
2. Attached Seat (40) onto Base Frame
(4), tightened with x 4 Hex head bolt
(22) and x4 Washer (25). Attached Back
rest (39) onto Back rest support tube
(10), fastened x 4 Hex head bolt (21) and
x 4 Washer (25). And Place Back rest
support tube (10) W/ Back rest onto
Base frame (4), tightened with Hex head
bolt (18), x 2 Washer (23) and x 1 Nylon
lock nut (27). See fig.6.
3. Slide Adjustment Rod (8) through Weight
support tube (1) and place Back Rest
onto Adjustment Rod (8). See fig.7.
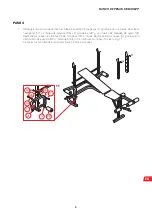
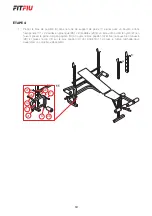
STEP 3
1. Insert Leg curl support tube
(6) into Front stabilizer (5),
tightened with Adjustment
Knob (37). See fig. 8.
5
9
10
8
7
19
4
5
11
26
24
10
4
39
27
25
22
21
25
23
18
40
1
8
5
37
6
7
38
12
7
41
27
6
23
16
6
2. Place Leg curl tube (7) onto Leg curl
support tube (6), tightened with Hex
head bolt (16), x 2 Washer (23) and Nylon
lock nut (27), and then attached Clip (41)
onto Leg curl tube (7), see fig. 9.
3. Place 3 x Axle for foam pad (12) and x
6 Foam pad (38) onto Leg curl tube (7).
See fig. 10.
Summary of Contents for MUB3002P
Page 22: ...22...
Page 23: ...23 WEIGHT BENCH MUB3002P EN...
Page 24: ...Manual revisado en febrero de 2018 www fitfiu es...

