background image


power bench


MANUAL INSTRUCTION 

Summary of Contents for Titan

Page 1: ...power bench MANUAL INSTRUCTION ...

Page 2: ... Contents 1 Summary of Parts Page 2 2 Important Recommendations and Safety Information Page 3 3 Parts List Page 4 5 4 Assembly Instructions With Exploded Diagrams Page 6 8 5 Training Instructions Page 9 ...

Page 3: ...Parts 2 D 7 H 8 7 G H 8 4 G 8 S 18 I 7 T 9 8 R 26 L M 1 11 1 10 12 19 2 9 18 4 15 P 3 9 E O P K 3 15 6 2 11 3 13 20 Q 22 J 17 21 6 K 17 16 24 25 3 J F 2 3 27 3 2 23 28 6 17 14 A C 6 3 20 J 3 3 20 5 N 2 16 17 B 6 2 6 ...

Page 4: ...ing work 6 In general you should consult your doctor before starting targeted training work He can make a defi nitive statement as to the maximum exertion pulse rate wattage duration of training etc you can set for yourself and can also give you detailed information with respect to the correct body position during training your training target and questions of diet It is to take care that this ite...

Page 5: ... FRAME 1 E BACK LEFT STAND FRAME 1 F LEG EXTENSION 1 G CLAPPER ADJUST FRAME 2 H TOP CLAPPER FRAME 2 I BACK SEAT ADJUST FRAME 1 J PAD HOLDER 3 K CLAPPER FRAME 2 L CURL BAR 1 M ELBOW MAT FRAME 1 N FRONT STAND FRAME 1 O SEAT ASSEMBLY UNIT 2 P BACK SEAT FRAME 2 Q SEAT ADJUST ASSEMBLY UNIT 1 R SEAT 1 S BACK SEAT 1 T ELBOW MAT 1 ...

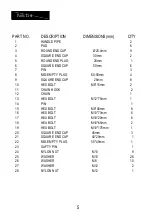
Page 6: ...m 4 9 SQUARE END CAP 25mm 8 10 HEX BOLT M8 15mm 2 11 CHAIN HOOK 2 12 CHAIN 1 13 HEX BOLT M12 75mm 1 14 PIN 1 15 HEX BOLT M8 40mm 8 16 HEX BOLT M10 70mm 6 17 HEX BOLT M10 20mm 8 18 HEA BOLT M10 65mm 2 19 HEX BOLT M10 175mm 1 20 SQUARE END CAP 45mm 3 21 SQUARE END CAP 40 20mm 1 22 MID EMPTY PLUG 50 45mm 1 23 SAFTY PIN 1 24 NYLON NUT M10 9 25 WASHER M10 26 26 WASHER M8 10 27 WASHER M12 2 28 NYLON NUT...

Page 7: ...he clapper adjust frame G to the back stand frame D and E then connect the top clapper frame H to the back stand frame D and E with the hex bolts M10x65mm 18 the washers M10 25 and the nylon nuts M10 24 Step 4 Connecting the front stand frame N to the front base B with the hex bolts M10x20mm 17 and the washers M10 25 Step 5 Connecting the main frame A to the front stand frame N with the hex bolts ...

Page 8: ...onnect the leg extension F to the front stand frame N with the hex bolt M12x75 13 the washer M12 27 and the nylon nut M12 28 Step 9 Connect the curl bar L to the leg extension F with the chain hook 11 and chain 12 Step 10 Insert the pad holder J to the leg extension F then put the pad 2 on the pad holder J T L 1 11 12 2 2 11 3 J M 1 3 13 J F 20 3 10 27 28 2 3 3 20 J 3 3 20 2 23 7 N 5 2 B 2 ...

Page 9: ...th the hexbolt M8x40 15 andthe washer M8 26 19 25 9 S 9 15 9 P 26 O 9 O 9 P 15 24 Q 9 9 21 14 Step 14 Checks 1 Check the correct installation and function of all screwed and plug connections Installation is thereby complete 2 Before starting training ensure that the recommended safety clearances are maintainedtootherobjects Tosecureaparticularpositionofthemachine the machine can be fastened firmly...

Page 10: ...ree times a week A normal adult must train twice a week to maintain his current level of condition At least three training sessions a week are required to improve one condition and reduce one weight Of course the ideal frequency of training is five sessions a week 3 Planning the training Each training session should consist of three phases the warm up phase the training phase and the cool down pha...

Reviews: