background image

11 


1)


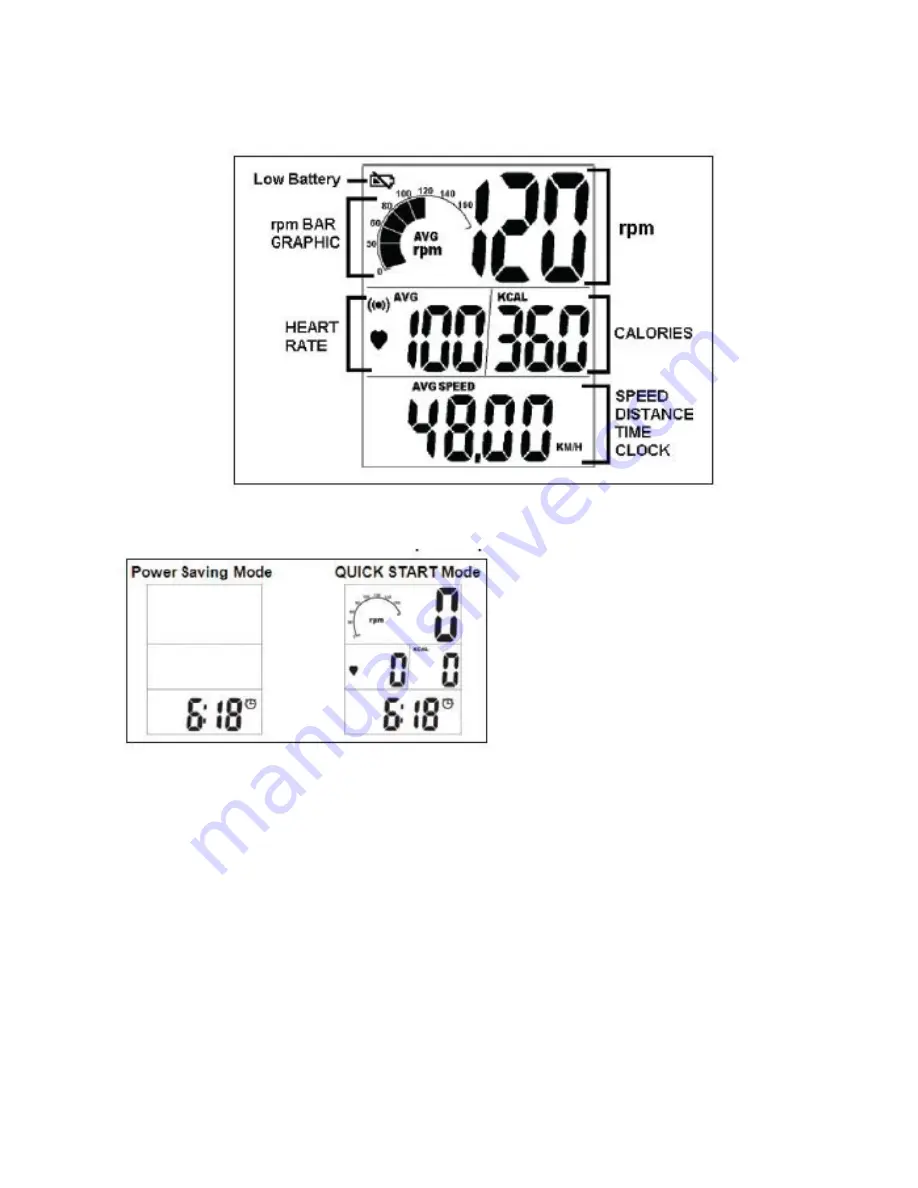
QUICK START : 

The console will go to power saving mode when remaining idle for several minute. To start 

the console again, press any key.   


2)


MODE SELECTION : 

Press the left-hand key to select the measurement to be shown on the bottom of the 

display ( Speed, distance, time or clock ). 

CONSOLE OPERTION   

Summary of Contents for RX125v3

Page 1: ...RX125v3 INDOOR CYCLE ...

Page 2: ...2 ...

Page 3: ...3 ...

Page 4: ...4 Assembly Drawing ...

Page 5: ...le stopper 30 is plugged into the hole that the lower cable connections came through Step three Insert the seat post 43 into the seat tube on the frame Attach the saddle 1 into seat slider 42 Then tighten seat clamp s screw Insert the seat slider 42 into the seat post 43 and fix Using release lever 6 adjusts and tightens the height in the desired position Step four Attach the pedals 11 into the cr...

Page 6: ...6 Exploded Drawing ...

Page 7: ...lease lever PC 15 Flywheel security nut 7t PC 45 Belt PC 16 Flywheel adjuster bolt PC 46 Spring PC 17 Handle bar release lever w washer PC 47 Outer chain guard bolt M5 PC 18 Front foot tube complete SET 48 Cage bracket PC 19 Right belt guard PC 49 Flywheel complete SET 20 Left crank arm PC 50 Rubber sleeves PC 21 Right crank arm PC 51 Fixed bolt for tension knob casing PC 22 27 28 Handle bar post ...

Page 8: ... handlebar slider Slide the handlebar assembly forwards and backwards until you reach the required position Then securely re tighten the Release lever Adjusting the seat height undo the release lever located where the seat post fits into the frame Adjust the seat to the required height Then retighten the release lever Make sure it is tighten enough to prevent the seat from twisting side to side Th...

Page 9: ... Remove handlebar post and clean tube X 7 Remove seat and clean tube X 8 Check brake pads for wear align X 9 Check brake adjustment X 10 Check security of all knobs release lever X 11 Check toe straps for signs of wear X 12 Check crank bolts and re tighten X 13 Make sure pedals are screwed in X 14 Check the magnetic holder in correct position X 15 Check belt tension X 16 Wipe the anti rust oil on ...

Page 10: ...orkout time clock The workout time will count up or down during pedaling If the user stops pedaling the time count will stop after 3 seconds 2 RPM CADENCE Cadence is the number of pedal revolutions per minute RPM The average RPM value is shown on the bar graphic 3 SPEED The approximate speed of the wheel can be shown in kilometers per Hour KM H or miles per hour MPH 4 DISTANCE The virtual distance...

Page 11: ... saving mode when remaining idle for several minute To start the console again press any key 2 MODE SELECTION Press the left hand key to select the measurement to be shown on the bottom of the display Speed distance time or clock CONSOLE OPERTION ...

Page 12: ...ress the left hand key until SPEED indicator is displayed then press the right hand key for 5 seconds The TIME indicator will be flashing press the right hand key to adjust the workout time To set the heart Rate limit press the left hand key to select the heart rate target zone settings The first limit to be set is the upper one Use the right hand key to adjust the upper value Once the desired val...

Page 13: ...warranty You can clean the outside of your console with a lightly damp cloth The console is a sealed unit and should not be opened other than for changing the batteries by opening the battery cover in the back 8 USING THE HEART RATE TRANSMITTER To measure the heart rate The user must wear the chest strap optional At the beginning of the workout you may need to lightly dampen the two sensors electr...

Page 14: ...is warranty is limited to the repair or replacement of the defective part at no cost The supplier shall in no event be responsible for consequential special damages and any parts failures breakages or injuries resulting from misuse of the machine or failure to follow the recommended maintenance procedures Warranty claims must be through an authorized dealer and replacement parts will normally be d...

Page 15: ...15 ...

Page 16: ...16 INDOOR CYCLE ...

Reviews: