background image

BEFORE

YOU 
BEGIN

10

INTRODUCTION

IMPORT

ANT

PRECAUTIONS

ASSEMBL

Y

BEFORE

YOU 
BEGIN

ELLIPTICAL

OPERA

TION

LIMITED

W

ARRANTY

TROUBLESHOOTING

MAINTENANCE

CONDITIONING

GUIDELINES

BEFORE YOU 

BEGIN

ASSEMBL

Y

11

INTRODUCTION

IMPORT

ANT

PRECAUTIONS

ELLIPTICAL OPERA

TION

CONDITIONING GUIDELINES

TROUBLESHOOTING & 

MAINTENANCE

LIMITED WARRANTY

ASSEMBLY

 STEP 

ASSEMBLY

 STEP  

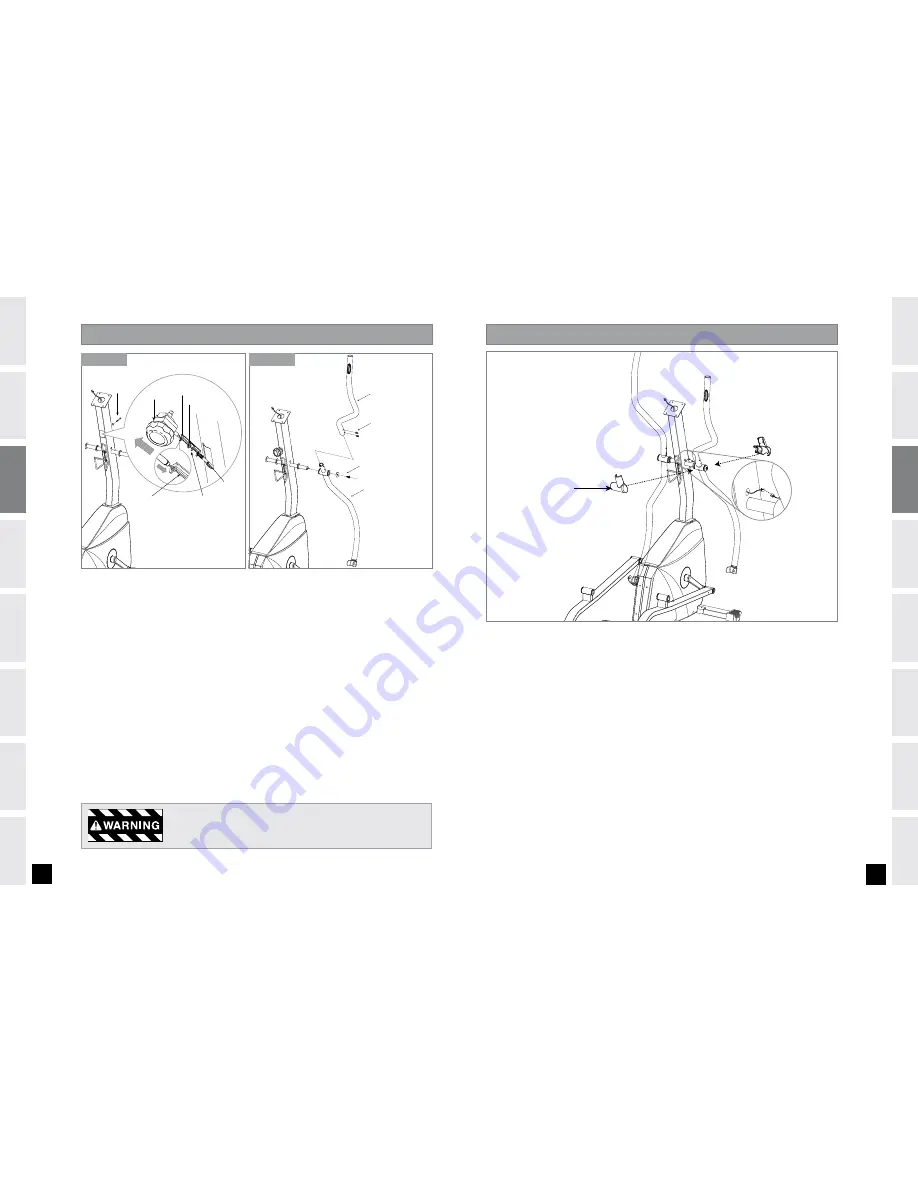
HANDLEBAR

COVERS

NOTE: 

There is NO hardware bag for this step.

A) Attach 

WIRES

 from mast to handlebar. 

DO NOT PINcH WIRES

B) Snap the front and back 

HANDLEBAR cOVERS

 together onto the 

UPPER HANDLE BARS

Note the position of the snap tabs on the covers before snapping into position.

C) Repeat on other side.

PRE-ATTACHED BOLTS AND WASHERS

LOWER HANDLEBAR

PRE-ATTACHED SET SCREWS

UPPER HANDLEBAR

F) Remove 

PRE-ATTAcHED BOLT & WASHERS

 from 

cONSOLE MAST.

G) Slide 

LOWER HANDLEBARS

 onto 

cONSOLE MAST 

and attach by re-inserting 

PRE-ATTAcHED SET ScREWS.

H) Slide 

UPPER HANDLEBARS 

onto 

LOWER HANDLEBARS

. Secure 

UPPER HANDLEBARS 

to 

LOWER HANDLEBARS


using 

PRE-ATTAcHED SET ScREWS

.

After handlebars are assembled they will rotate freely – be cautious. Until the 
machine is fully assembled, do not grab the handlebars for support.

PRE-INSTALLED

BOLT & WASHER

RESISTANCE

KNOB

TENSION WIRE

RESISTANCE

KNOB BRACKET

TENSION

CABLE

TOP KEY HOLE

BOTTOM KEY HOLE

NOTE: 

There is NO hardware bag for this step. All hardware is pre-installed. 

 A) Pull 

TENSION cABLE

 out from square hole in console mast.

B) Turn 

RESISTANcE KNOB

 to highest resistance setting. Place the 

TENSION WIRE

 into the 

BOTTOM KEY HOLE


on the 

RESISTANcE KNOB BRAcKET

.

C) While holding the 

RESISTANcE KNOB BRAcKET

, pull the 

RESISTANcE KNOB

 up to slide it into the 

TOP KEY 

HOLE

 position on the 

RESISTANcE KNOB BRAcKET

.

D) Once the 

TENSION WIRE

 is in position, turn the 

RESISTANcE KNOB

 to the lowest resistance setting.

E) Slide 

RESISTANcE KNOB & BRAcKET

 into the 

cONSOLE MAST 

and attach using 

PRE-INSTALLED BOLT & 

WASHER

.

STEPS A-E

STEPS F-H

Summary of Contents for 810E

Page 1: ...ELLIPTICAL USER S GUIDE FOR MODEL 810E ...

Page 2: ...onomics and innovative features you need to get stronger and healthier faster Because we re committed to designing fitness equipment from the inside out we use only the highest quality components It s a commitment we back with one of the strongest frame to brake warranty packages in the industry You want exercise equipment that offers the most comfort the best reliability and the highest quality i...

Page 3: ...lebars are secure before each use Do not insert or drop any object into any opening Unplug elliptical before moving or cleaning it To clean wipe surfaces down with soap and slightly damp cloth only never use solvents See MAINTENANCE This elliptical should not be used by persons weighing more than 250 pounds Failure to comply will void the warranty This elliptical is intended for in home use only D...

Page 4: ... mm Qty 2 HARDWARE BAG FOR STEP 1 CONTENTS TOOLS INCLUDED PARTS INCLUDED 5mm Allen Wrench 4mm Allen Wrench 13 17mm Flat Wrench 1 Console 1 Console Mast 1 Front Stabilizer Tube 2 Upper Handlebars 2 Lower Handlebars 2 Pivoting Foot Pads 1 Top Side Cover CONSOLE UPPER HANDLEBAR MAIN FRAME LOWER HANDLEBAR LOWER LINK ARM FRONT STABILIZER TUBE GRIP PULSE CONSOLE MAST PIVOTING FOOT PAD PEDAL ARM 2 AA Bat...

Page 5: ...RS B and 2 NUTS F from the side Make sure to pull the WIRE through the CONSOLE MAST D Snap TOP CAP into place BOLT A 20 mm Qty 1 NUT F Qty 2 BOLT E 55 mm Qty 2 SPRING WASHER D 15 mm Qty 1 WASHER B 17 mm Qty 3 HARDWARE BAG FOR STEP 3 CONTENTS MAIN FRAME CONSOLE MAST BOLT A BOLTS E WASHERS B NUTS F SPRING WASHER D WASHER B TOP CAP ASSEMBLY STEP 2 A Open HARDWARE BAG FOR STEP 2 B Attach the REAR WHEE...

Page 6: ... by re inserting PRE ATTACHED SET SCREWS H Slide UPPER HANDLEBARS onto LOWER HANDLEBARS Secure UPPER HANDLEBARS to LOWER HANDLEBARS using PRE ATTACHED SET SCREWS After handlebars are assembled they will rotate freely be cautious Until the machine is fully assembled do not grab the handlebars for support PRE INSTALLED BOLT WASHER RESISTANCE KNOB TENSION WIRE RESISTANCE KNOB BRACKET TENSION CABLE TO...

Page 7: ... while positioning it on the LOWER LINK ARM C Slide SPACER G through the LOWER LINK ARM and 2 TEFLON WASHERS B outside of the LOWER LINK ARM D Insert BOLT E into outside end of LOWER LINK ARM to secure LOWER HANDLEBAR E Insert NUT C on right side of LOWER LINK ARM F Repeat on other side HARDWARE BAG FOR STEP 7 CONTENTS LOWER HANDLEBAR LOWER LINK ARM NUT C BOLT E TEFLON WASHERS B SPACER G Qty 2 BOL...

Page 8: ...sustaining an exercise program Your elliptical is a tremendously effective tool for achieving your personal fitness goals Regular use of your elliptical can improve the quality of your life in so many ways Here are just a few of the health benefits of exercise Weight Loss A Healthier Heart Improved Muscle Tone Increased Daily Energy Levels The key to reaping these benefits is to develop an exercis...

Page 9: ...ot positions Moving your foot to the forward most position of the foot pad increases your step height which will create a feel similar to a step machine Placing your foot toward the back of the foot pad decreases your step height and creates more of a gliding feel similar to a smooth walk or run Your elliptical also allows you to pedal both forward and backwards to offer a variation to your workou...

Page 10: ...ime when you won t be interrupted To be successful with your fitness program you have to make it a priority in your life So decide on a time pull out your day planner and pencil in your exercise times for the next month HOW LONG Duration of Workouts For aerobic exercise benefits it s recommended that you exercise from between 24 and 60 minutes per session But start slowly and gradually increase yo...

Page 11: ... bottom of the chart round to 40 follow age column up to the target zone bar Results 60 of maximum Hear Rate 108 Beats Per Minute 75 of maximum Heart Rate 135 Beat Per Minute Always consult your physician before beginning an exercise program STRETCH FIRST Before using your product it is best to take a few minutes to do a few gentle stretching exercises Stretching prior to exercise will improve fle...

Page 12: ...ore specific you can be the easier it will be to track your progress If your goals are long term divide them up into monthly and weekly segments Longer term goals can lose some of the immediate motivation benefits Short term goals are easier to achieve Your console provides you with several readouts that can be used to record your progress You can track Distance Calories or Time THE IMPORTANCE OF ...

Page 13: ...e levels during the workout Has the machine been maintained per the maintenance schedule Does the problem occur when using the handlebars Without using the handlebars Answering these and other questions will give the technicians the ability to send proper replacement parts and the service necessary to get you and your Fitness Gear elliptical running again HEART RATE TROUBLESHOOTING ARE THE SOUNDS ...

Page 14: ... is covered The original owner and is not transferable What IS covered Repair or replacement of a defective motor electronic component or defective part and is the sole remedy of the warranty What IS NOT covered Normal wear and tear improper assembly or maintenance or installation of parts or accessories not originally intended or compatible with the equipment as sold Damage or failure due to acci...

Page 15: ...ort Hotline 1 877 501 GEAR Every employee at Fitness Gear takes pride in providing you with a high quality product We want to know if you have a problem and we want to have an opportunity to correct it for you Note Please read the troubleshooting section before contacting Customer Tech Support 1 6 2 0 L a n d m a r k D r C o t t a g e G r o v e W I 5 3 5 2 7 T e l 1 8 7 7 5 0 1 G E A R CUSTOMER TE...

Reviews: