background image

3

IMPORTANT SAFETY INSTRUCTIONS

Read all instructions before using this machine

.

KEEP THESE INSTRUCTIONS

CAUTION:

Exercise of a strenuous nature, as is customarily done on this equipment,
should not be undertaken without first consulting a physician. No specific
health claims are made or implied as they relate to the equipment.

1. Know your heart rate and/or pulse, and your physician recommended target heart rate 

training zone.

2. Proper medical clearance is recommended for anyone beginning an exercise program 

especially if you are over 35 years of age or suffer from heart or respiratory problems.

3. Warm up before any exercise program by stretching, followed by 8 minutes of aerobic activity.

4. Wear comfortable clothes that allow freedom of movement and that are not tight or restricting.

5. Wear comfortable shoes made of good support with non-slip soles.

6. Breathe naturally, never holding your breath during an exercise.

7. Avoid over training. You should be able to carry on a conversation while exercising.

8. After an exercise session, cool down with slow walking or stretching.

9. This machine should not be used by or near children.

10. Handicapped or disabled people must have medical approval before using this machine and

should be under close supervision when using any exercise equipment.

11. Use this machine only for its intended use as described in this manual. Do not use 

attachments not recommended by the manufacturer.

12. Only one person at a time should use this machine.

13. Do not put hands, feet, or any foreign objects on or near this machine when in use by others.

14. Always use this machine on a level surface.

15. Never operate the machine if the machine is not functioning properly.

16. Start exercise slowly and gradually increase the amount of resistance.

17. If the user experiences dizziness, nausea, chest pain, or any other abnormal symptoms, 

stop exercise at once and consult a physician immediately.

18. Use caution not to pinch fingers or hands in moving parts when using the unit.

Summary of Contents for Edge 386da

Page 1: ... Model 386da Dual Action Magnetic Bike ...

Page 2: ...w fat diet strength training and aerobic exercise tones and conditions the muscles we use every day to stand walk lift and turn It can actually transform our body composition by reducing body fat and increasing the proportion of lean muscle in our bodies Be sure to read through this Owner s Manual carefully It is the authoritative source of information about your Edge 386 Dual Action Magnetic Bike...

Page 3: ... breath during an exercise 7 Avoid over training You should be able to carry on a conversation while exercising 8 After an exercise session cool down with slow walking or stretching 9 This machine should not be used by or near children 10 Handicapped or disabled people must have medical approval before using this machine and should be under close supervision when using any exercise equipment 11 Us...

Page 4: ...ME MAILING ADDRESS AND TELEPHONE NUMBER 2 DATE OF PURCHASE 3 WHERE PRODUCT IS PURCHASED NAME OF RETAIL STORE CITY 4 MODEL NUMBER EXB01386 5 PART ORDER NUMBER AND DESCRIPTION All details depicted in this Owner s Manual and of the product itself are subject to change without notice Manual Packet Includes Manual Warranty Card Fastener Pack Includes 2 Large Washers 2 Cap Nuts 1 6mm Allen Tool 1 Adjust...

Page 5: ...E 2 FIGURE 2 Step 3 Remove the two M8 x 1 25 x 60 CARRIAGE BOLTS 1 M8 WASH ERS 4 and M8 x 1 25 CAP NUTS 5 from the FRONT FOOT TUBE 2 Step 4 Attach FOOT TUBE 2 to front of FRAME 3 with hardware removed in Step 3 Make sure to insert BOLTS through square holes first 2 REAR FOOT TUBE 6 FOOT CAP 1 M8 x 1 25 x 60 CARRIAGE BOLT 6 FOOT CAP 3 FRAME 5 M8 x 1 25 CAP NUT FIGURE 1 3 FRAME 4 M8 WASHER 2 FRONT F...

Page 6: ...reely after tightening FIGURE 3 FIGURE 4 Step 8 Turn LOCKING KNOB 15 counterclockwise to loosen Step 9 Pull LOCKING KNOB 15 out and raise SEAT POST 14 to desired SEAT 13 height and release LOCKING KNOB so that it snaps into hole in SEAT POST then turn clockwise until tight IMPORTANT LOCKING KNOB MUST be locked tightly before you sit on the SEAT FIGURE 4 9 RIGHT PEDAL SHAFT 11 CRANK 8 PEDAL BUSHING...

Page 7: ...USING on top of TENSION BLOCK 19 see DETAIL Make sure the EXTENSION WIRE 17 is through the top of the CONSOLE TUBE 16 and slide CONSOLE TUBE over the FRAME 3 Fasten with hardware removed in Step 11 NOTE DO NOT pinch wires while attaching CONSOLE TUBE NOTE You may need two people to complete the following steps One to hold CONSOLE TUBE 16 while attachments are made 20 BUTTON HEAD SCREW 17 EXTENSION...

Page 8: ...of AXLE with hammer ASSEMBLY FIGURE 6 AXLE FIGURE 7 Step 18 Lower SLOT in CONNECTING ARMS 23 24 down over PEDAL BUSHING 8 FIGURE 8 Step 19 Slide RETAINER 28 until CONNECTING ARMS 23 24 are locked in DUAL ACTION MODE FIGURE 8 FIGURE 7 Steps 18 and 19 are for DUAL ACTION MODE 26 PUSH NUT 25 LARGE WASHER 23 RIGHT CONNECTING ARM 21 RIGHT HANDLEBAR 22 LEFT HANDLEBAR PIVOT TUBE ON REAR SIDE 23 RIGHT CON...

Page 9: ... the HANDLEBARS 21 22 closer to you which is better for shorter people The INSIDE HOLE puts the GRIP end farther away from you which is better for taller people To adjust follow Steps 21 through 23 FIGURE 10 Step 21 Remove HAIRPIN COTTER 29 and M8 WASHER 4 from PIVOT PIN in HANDLEBAR 21 RIGHT 22 LEFT Step 22 Slide desired ADJUSTMENT HOLE of CONNECTING ARM 23 24 onto PIVOT PIN of HANDLEBAR 21 22 St...

Page 10: ...OLE 32 and insert two AA SIZE BATTERIES and replace BATTERY DOOR NOTE DO NOT use rechargeable batteries Using rechargeable batteries will cause a short circuit and destroy CONSOLE 32 IMPORTANT Your monitor includes low grade batteries that will operate the computer for display purposes only You will need to replace the batteries shortly after using the bike for the first few times 30 CONSOLE BATTE...

Page 11: ...our heart rate with increased exercise demands Fluttering in your chest heart palpitations Stop exercising if you experience any of the following symptoms SET FITNESS GOALS General guidelines to follow If any of these symptoms occur call your doctor immediately If exercise is new to you don t push yourself too fast Be conscious of your body and what it is telling you If pain develops anywhere in y...

Page 12: ...fter feeling your pulse count the number of beats for 10 seconds Multiply the number of beats by six to determine your pulse rate per minute Keep a log of your heart rate at rest after warming up during your workout and two minutes during your cool down then 10 minutes after your cool down We recommend taking your heart rate at these times to accurately track your progress as it relates to better ...

Page 13: ...0 100 195 165 136 190 161 133 185 157 129 180 153 129 175 148 129 170 144 119 165 140 115 160 136 112 155 131 108 150 127 105 145 123 101 140 119 98 AGE YRS TABLE 2 Exercise Week 1 2 3 4 5 6 7 8 9 10 11 12 Warm Up Period 4 5 5 5 5 5 THR Minutes 60 65 8 65 70 10 70 75 15 70 80 20 70 85 25 70 85 25 Cool Down Period 5 5 5 5 5 5 Total Time 17 20 25 30 35 35 Sessions Per Wk 3 3 3 3 3 3 Total Time Per W...

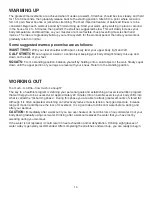
Page 14: ... From a standing position balance yourself by holding onto a solid object or the wall Slowly squat down until the upper portion of your legs are level with your knees Return to the standing position WORKING OUT Too much too little how much is enough The key to a healthful program is defining your personal goals and establishing an exercise nutrition program that will help you to be successful At a...

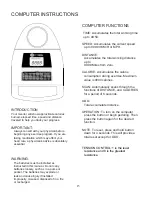
Page 15: ...ed disposed of in a fire or recharged COMPUTER FUNCTIONS TIME Accumulates the total working time up to 99 59 SPEED Accumulates the current speed up to 999 99 KM H or MPH DISTANCE Accumulates the total working distance up to 99 99 Miles from Zero CALORIE Accumulates the calorie consumption during exercise Maximum value is 9999 calories SCAN Automatically scans through the functions of DISTANCE and ...

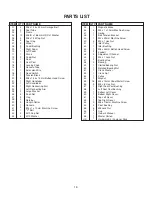
Page 16: ...1 x 10mm Machine Screw V Belt M10 Cap Nut M10 Washer ITEM 35 36 37 38 39 40 41 42 43 44 45 46 47 48 49 50 51 52 53 54 55 56 57 58 59 60 61 62 63 64 65 66 67 68 HK QTY 1 4 1 1 1 6 1 1 1 2 2 1 2 2 1 1 1 1 1 1 18 9 1 1 1 1 1 1 9 4 6 2 1 1 1 PART NAME Magnetic Brake M6 x 1 x 10mm Machine Screw Spring Belt Tension Bracket M6 x 20mm Machine Screw M6 x 1 Hex Nut Idler Pulley Idler Bushing M8 x 45mm Butto...

Page 17: ...17 FIGURE 13 ...

Page 18: ...o be free from all defects in material and workmanship when used according to the manufacturer s instructions See Limited Warranty Card for details If you have any comments or questions contact our Customer Service Department toll free at 1 800 321 9236 Monday through Friday 9 00 am to 5 00 pm Eastern Time Please record the following information and keep for reference Serial ___________________ Da...

Reviews: